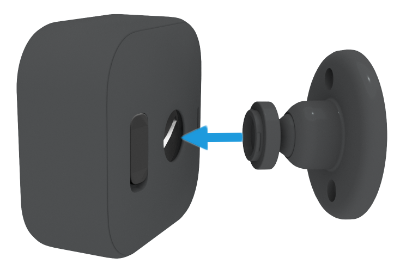
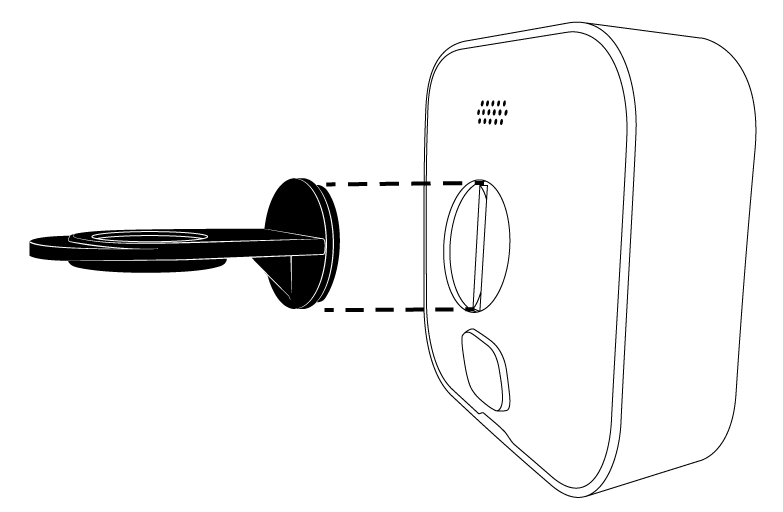
Align the Blink camera with the mount, press until it clicks, then tighten.
If you want a quick, secure setup that stays put, you’re in the right place. I’ve mounted dozens of Blink cameras on brick, wood, siding, and ceilings. In this friendly but expert guide, I’ll show you how to attach Blink camera to mount the right way, avoid common mistakes, and get a clean, sturdy fit that delivers clear video and reliable motion alerts. Stick with me, and you’ll know exactly how to attach Blink camera to mount like a pro.
What you need before you start
A good mount starts with the right tools and parts. You do not need a lot. You do need to keep it simple and steady. This helps you avoid crooked holes and loose fits.
Have these on hand:
- Phillips screwdriver or drill with a Phillips bit for screws.
- 3/16 inch drill bit for wall anchors in drywall, brick, or concrete.
- Wall anchors if you are not drilling into a stud or solid wood.
- Pencil and tape measure to mark accurate spots.
- Ladder if you plan to mount above head height.
- The Blink mount, mounting adapter, and screws from the box.
Pro tip: Lay out all parts on a towel so small pieces do not roll away. This small step has saved me more times than I can count when learning how to attach Blink camera to mount.
Know your Blink model and mount style
Different Blink models attach in slightly different ways. Your mounting steps depend on the mount and the back of the camera. Knowing this makes how to attach Blink camera to mount smooth and fast.
Here is what to expect:
- Blink Outdoor and Indoor (3rd/4th Gen): Use a snap-on back slot that mates with a ball-joint mount. Many kits include a small adapter for 1/4-20 tripod threads if you use third-party mounts.
- Blink Mini: Uses a small stand. The camera slides onto the stand and clicks into place. Angle with the built-in hinge.
- Blink Floodlight Camera: The camera attaches to a bracket on the floodlight housing. It still uses a press-fit with a ball joint.
- Blink Video Doorbell: Uses a doorbell backplate, not a standard camera mount. Steps differ. This guide focuses on camera mounts.
If your kit includes a round adapter puck, that adapter lets you use common 1/4-20 mounts. This is useful when you learn how to attach Blink camera to mount on tripods, clamps, or magnetic bases.
Step-by-step: how to attach Blink camera to mount
Follow these steps for a fast, secure fit. This method works for most Blink Outdoor and Indoor models. It is the safest path when learning how to attach Blink camera to mount across many surfaces.
- Choose the location
- Pick a spot with strong Wi-Fi. Test a live view on your phone from that spot.
- Aim for 7 to 9 feet high. This gives a wide view and better motion detection.
- Avoid direct sun at noon. Glare makes video look washed out.
- Mark and pre-drill
- Hold the mount base where you want it.
- Mark screw holes with a pencil.
- Pre-drill small pilot holes. Use wall anchors for drywall, brick, or concrete.
- Secure the mount base
- Place the mount base over the holes.
- Drive screws until snug. Do not overtighten. You can crack plastic or strip anchors.
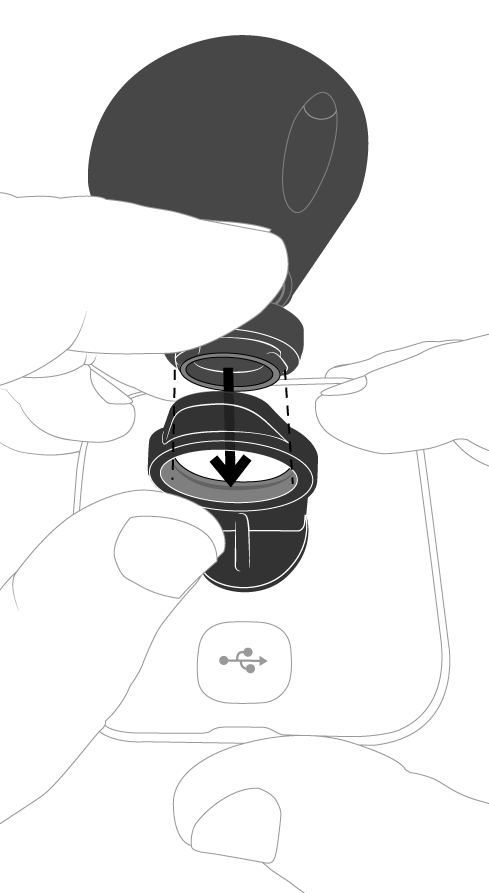
- Attach any adapter (if included)
- If your camera needs the adapter puck, snap or screw it onto the mount now.
- Make sure the ball joint still moves but is firm.
- Attach the camera to the mount
- Align the back slot of the Blink camera with the mount head.
- Press firmly until you hear or feel a click. Some mounts twist slightly to lock.
- If using the Mini, slide the camera onto the stand until it clicks.
- Set the angle
- Tilt and swivel the ball joint to frame the area.
- Tighten the joint collar until the camera holds its position.
- Test and adjust
- Open the Blink app and check live view.
- Adjust the angle for faces, doors, and walkways.
- Run a motion test and fine-tune zones.
This basic flow is the core of how to attach Blink camera to mount. It is quick, stable, and works indoors and outdoors.
Model-specific notes
-
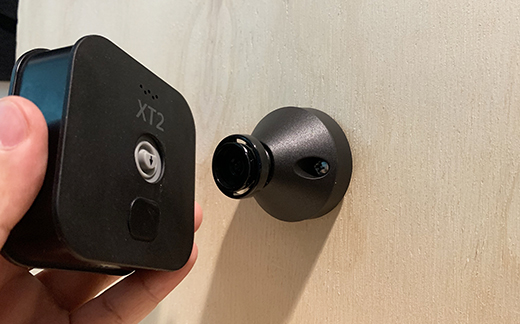
Blink Outdoor/Indoor
- Ensure the back cover is fully seated after installing batteries.
- Press the mount head into the back slot until it locks.
-
Blink Mini
- Slide the Mini onto its stand until it clicks.
- Route the USB cable with clips for a neat look.
-
Third-party 1/4-20 mounts
- Attach the adapter puck first.
- Thread the mount screw into the adapter. Hand-tighten only.

Best placement tips for clear video and fewer false alerts
Where you mount matters as much as how to attach Blink camera to mount. Good placement reduces false alerts and boosts detail in your clips. Think like a photographer, not just a DIYer.
Use these tips:
- Height: 7 to 9 feet for outdoor entryways. Lower indoors for face detail.
- Angle: Aim across walk paths, not straight at them. Side-to-side motion triggers better.
- Distance: Keep targets within 5 to 20 feet for sharp faces and plates.
- Lighting: Avoid bright backlight. Tilt down slightly to reduce sky glare.
- Avoid glass: Glass reflects IR. Do not mount behind windows.

Test, tune, and lock it in
After you learn how to attach Blink camera to mount, test the view right away. A few minutes here saves hours later. I always do three passes: live view, motion path, and night test.
Do this quick checklist:
- Live view: Confirm framing and horizon level.
- Motion test: Walk in and out. Check when alerts start.
- Night view: Turn off nearby lights and test IR clarity.
- Final tighten: Lock the ball joint so bumps do not move it.
Weatherproofing, cable routing, and anti-theft tips
Good mounts survive wind, rain, and curious hands. When thinking about how to attach Blink camera to mount outside, plan for weather and security.
Try these simple wins:
- Seal and seat: Make sure the back cover is fully closed. Keep the USB port cap closed on outdoor models if present.
- Cable care: Use UV-rated clips and drip loops to keep water off ports.
- Extra hold: On rough brick, use masonry anchors. On vinyl, consider siding clips that avoid drilling.
- Anti-theft: Use skins with lanyards, or lockable housings. A small deterrent goes a long way.

Using third-party mounts for special setups
Sometimes the included mount will not fit your spot. This is where the adapter puck shines. It expands how to attach Blink camera to mount almost anywhere.
Great third-party options:
- Magnetic mounts for steel beams or garage frames.
- Vinyl siding clips to avoid holes in siding.
- Gutter and eave clamps for roof lines.
- Suction mounts for glass in temporary setups.
- Tripods or light stands for events or construction.
Always check weight limits. Keep the camera out of direct rain and heavy wind if the mount is light or temporary.

Common mistakes and easy fixes
I see the same errors when people try how to attach Blink camera to mount. The fixes are fast and simple.
Avoid these:
- Mount too high: You miss faces. Drop to 7–9 feet outdoors.
- Facing the sun: Glare kills detail. Angle down or pick a shaded spot.
- Loose ball joint: The view drifts. Tighten the collar until firm.
- Wrong anchors: The mount pulls out. Use anchors that match the wall type.
- Behind glass: IR bounces back. Mount outside or turn off IR and add light.
Maintenance to keep views sharp all year
A minute of care keeps your mount solid and your image clear. This part of how to attach Blink camera to mount is often skipped but pays off.
Do this every season:
- Wipe the lens with a microfiber cloth.
- Check screws and the ball joint for loosening.
- Inspect cables for UV and weather wear.
- Update firmware and review motion zones after big weather shifts or yard changes.
- Replace batteries before they die in cold snaps.
Frequently Asked Questions of how to attach blink camera to mount
How do I attach a Blink Outdoor camera to the mount?
Align the back slot on the camera with the mount head, then press until it clicks. Adjust the angle and tighten the collar so it stays put.
Can I mount a Blink camera without drilling?
Yes, with vinyl siding clips, magnetic mounts on metal, or strong outdoor-rated adhesive plates. Check that the surface is clean and the adhesive is rated for the weight.
What height should I mount my Blink camera?
Aim for 7 to 9 feet outdoors for a wide view and good face capture. Indoors, go a bit lower to focus on people rather than the ceiling.
Will a third-party 1/4-20 mount work with Blink?
Yes, if you use the included adapter puck that adds a 1/4-20 thread. Hand-tighten only to avoid cracking the adapter.
Why is my video washed out after mounting?
The camera likely faces strong sun or reflective surfaces. Tilt the camera down a bit and avoid aiming at the sky or windows.
Does the Blink Mini attach differently?
Yes. The Mini slides onto its small stand and clicks in place. Angle it with the hinge and tidy the USB cable with clips.
How tight should I make the screws and ball joint?
Snug, not forced. Overtightening can crack plastic or strip anchors, so stop once the mount does not wiggle.
Conclusion
You now know how to attach Blink camera to mount with confidence. Pick the right spot, pre-drill smart, lock in the angle, and test in the app. These simple steps give you stable video, fewer false alerts, and a cleaner look. Put the tips in this guide to work today, and your Blink will be up, aimed, and capturing the moments that matter. Want more practical home security tips? Subscribe, explore our other guides, or drop your questions in the comments.

Jamie Lee is a seasoned tech analyst and writer at MyTechGrid.com, known for making the rapidly evolving world of technology accessible to all. Jamie’s work focuses on emerging technologies, product deep-dives, and industry trends—translating complex concepts into engaging, easy-to-understand content. When not researching the latest breakthroughs, Jamie enjoys exploring new tools, testing gadgets, and helping readers navigate the digital world with confidence.