Attach the plate, tighten the screw, slide into head, lock, balance, test.
If you want smooth, sharp photos and rock-solid video, learn how to attach camera to tripod the right way. I’ve mounted cameras in rain, sand, and on tiny ledges, and the process is simple once you know each part and the safety steps. This guide shows how to attach camera to tripod with clear steps, pro tips, and fixes for the most common problems.

Gear you need before you start
You only need a few parts, but they must match. This is key when you learn how to attach camera to tripod.
- Tripod with a ball head or a pan-tilt head. Both work.
- Quick release plate or clamp. Many use Arca-Swiss. Some use Manfrotto RC2.
- Camera with a standard 1/4-20 thread in the base. Most cameras have this.
- Optional tools. A coin or hex key to tighten the plate.
- Optional extras. L-bracket for fast vertical shots. Phone clamp. Lens collar for big telephoto lenses.
Tip from the field: I keep a spare plate in my bag. It has saved more than one shoot when a plate went missing.

Learn the parts: camera, plate, and head
Knowing the names helps you move fast and safe when you practice how to attach camera to tripod.
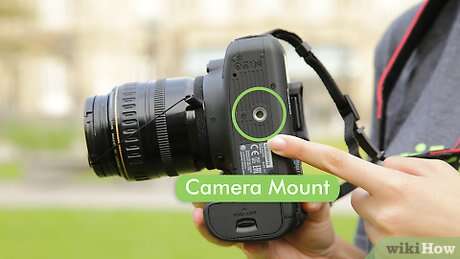
- Camera mount thread. Most cameras use 1/4-20 UNC. Some cinema rigs use 3/8-16.
- Quick release plate. This is the small plate that screws to your camera. Arca-Swiss plates are common and easy to swap.
- Tripod head. Ball heads are fast. Pan-tilt heads are precise. Video fluid heads are smooth for pans.
- Locks and knobs. One knob clamps the plate. One controls tilt. Another controls pan. Many heads also have a tension knob.
- Level or bubble. This helps keep horizons straight.
Match the plate to the clamp. Arca-Swiss fits Arca-Swiss. RC2 fits RC2. Mixed systems will not lock right and may slip.

Step-by-step: how to attach camera to tripod
Follow these steps each time. This is the safest, fastest way to learn how to attach camera to tripod.
- Set up the tripod
- Spread the legs wide. Place one leg under the lens direction for balance.
- Extend thicker leg sections first. Thin sections are less stable.
- Lock each leg firmly. Check the ground. Avoid soft soil or slick floors.
- Prep the head
- Set the head to level if you can.
- Loosen the clamp so the plate can slide in, but do not open it fully.
- Attach the plate to the camera
- Align the plate with the camera base. Keep the plate arrow facing the lens if marked.
- Insert the 1/4-20 screw into the camera thread. Tighten with a coin or hex key.
- Check for twist. If the plate rotates by hand, add a thin rubber pad or a plate with anti-twist flanges.
- Mount the camera to the head
- Keep the camera strap on your wrist or neck.
- Slide the plate into the clamp until it stops. Center it before you lock.
- Tighten the clamp fully. Use a positive click if your head has a safety pin.
- Balance and test
- Let go slightly and feel for dip. Slide the plate forward or back to balance long lenses.
- Lock tilt and pan. Tap the camera. It should not wobble.
- Take a test shot. Zoom in to check sharpness.
Once you do this a few times, how to attach camera to tripod will feel like muscle memory.

Compatibility and quick release systems
This is where most people get stuck with how to attach camera to tripod. Not all plates and clamps match.
- Arca-Swiss. This is an open style used by many brands. Plates slide into a dovetail clamp.
- Manfrotto RC2. A popular proprietary plate. It clicks into a specific clamp.
- Video plates. Long plates help front-heavy rigs. They balance on fluid heads.
What to do if parts do not match:
- Use a universal Arca clamp with a 3/8-16 to 1/4-20 adapter on the head.
- Add an L-bracket that fits your camera and matches your head system.
- Avoid stacking many adapters. Each layer can add flex.
This small planning step makes how to attach camera to tripod smooth on any job.

Safety checks and best practices
Your camera is valuable. These habits protect it while you practice how to attach camera to tripod.
- Carry the camera strap on your wrist when mounting and unmounting.
- Keep one hand on the camera while you tighten the clamp.
- Tighten knobs to firm, not brute force. Over-tightening can strip parts.
- Lock the center column down. High columns shake in wind.
- Use a bag hook to add weight in wind. Keep the weight from swinging.
- Never walk with the tripod over your shoulder with the camera mounted. It is a fast way to hit a door frame.
Pro note: On cliffs and decks, I face a tripod leg toward the drop. It stops the rig from tipping forward.

Special setups: phones, action cams, long lenses, and vertical shots
Real shoots need flexible setups. Here is how to attach camera to tripod in special cases.
Phones
- Use a phone clamp with a 1/4-20 socket. Mount it like a plate.
- Turn off image stabilization for long exposures if you see blur.
Action cameras
- Use the brand mount to a 1/4-20 adapter. Then use a plate. Keep mounts tight because small cameras vibrate fast.
Long lenses
- Use the lens collar foot as the mount point, not the camera base.
- Slide the long plate to balance front to back. This stops tilt droop.
Vertical shots
- Use an L-bracket. It keeps the weight over the tripod.
- If you tilt the ball head to the side, keep a leg under the lens for balance.
Video rigs
- Use a fluid head and a long plate. Balance so it stays put when you let go.
- Set drag low for light cameras and higher for heavy rigs.

Common mistakes and how to fix them
Here are the errors I see most when folks learn how to attach camera to tripod.
- Plate is loose. Use a coin or hex key. Add a rubber pad or anti-twist plate.
- Clamp mismatch. Check if it is Arca or RC2. Swap to the right plate.
- Wobble on hardwood floors. Lower the center column. Spread the legs wider.
- Droop after you compose. Increase friction or use a stronger head.
- Wind blur. Hang a bag from the hook. Shield the rig with your body.
On my first wedding shoot, I rushed the plate and it slipped mid-ceremony. Since then, I do a two-second tug test before every shot.

Care and maintenance
A little care keeps every part safe and helps with how to attach camera to tripod on busy days.
- Wipe sand and grit from the clamp and plate grooves.
- Keep threads clean. A soft brush works well.
- Check screws every few shoots. A drop of medium thread locker can help on plates you never remove.
- After rain or sea spray, rinse legs with fresh water and dry fully.
Small habits prevent big slips.
Troubleshooting wobble, slip, and shake
If it still feels off, use this checklist while you repeat how to attach camera to tripod.
- Is the plate tight to the camera? If not, tighten more or swap plates.
- Is the clamp fully locked? Turn until it stops. Listen for a click if it has one.
- Is the tripod on solid ground? Move a leg to firm ground or use spikes.
- Is the center column high? Lower it. Use a wider leg stance.
- Is the load too heavy for the head? Check the head rating. Upgrade if needed.
A minute of checks can save the shot.
Frequently Asked Questions of how to attach camera to tripod
Do all cameras use the same tripod screw?
Most cameras use a 1/4-20 thread. Some big cinema rigs and heads use 3/8-16. Use an adapter if needed.
Can I mix Arca-Swiss and Manfrotto RC2 plates?
No, they are not cross-compatible. Use the same system or add a universal clamp.
How tight should I make the plate screw?
Tighten to firm with a coin or hex key. It should not twist by hand, but do not over-tighten.
How do I stop the camera from drooping after I frame?
Increase friction on the head and lock the tilt knob. Balance the plate under heavy lenses.
Is the center column bad for stability?
It is fine at low height. At full height, it adds shake. Use wider legs instead.
Can I attach a phone to a tripod?
Yes. Use a phone clamp with a 1/4-20 socket, then mount it like a camera.
What is the fastest way to switch between horizontal and vertical?
Use an L-bracket with an Arca-Swiss clamp. It keeps the weight centered and stable.
Conclusion
You now know how to attach camera to tripod with speed, safety, and confidence. Match the plate to the clamp, tighten with care, balance the load, and do a quick tug test. These small steps lead to sharper shots and smoother video.
Put this guide to work on your next shoot. Practice the steps at home so they feel natural in the field. Want more tips on gear and technique? Subscribe for fresh guides, or drop a question in the comments.

Jamie Lee is a seasoned tech analyst and writer at MyTechGrid.com, known for making the rapidly evolving world of technology accessible to all. Jamie’s work focuses on emerging technologies, product deep-dives, and industry trends—translating complex concepts into engaging, easy-to-understand content. When not researching the latest breakthroughs, Jamie enjoys exploring new tools, testing gadgets, and helping readers navigate the digital world with confidence.