Use the camera's HDMI, USB, composite, or wireless output and match it to the TV input.
I have worked with cameras and home video systems for years, helping people link their gear reliably. This guide explains how to connect a video camera to a TV step by step, with practical tips, common fixes, and real-world advice from my experience. Read on to learn which cable or adapter to choose, how to set up your camera and TV, and how to avoid the mistakes I’ve made so you get crisp video fast.
Understand the common connection types for cameras and TVs
Knowing the available ports makes connecting fast and error-free. Here are the main connection types you may encounter when you try to connect a video camera to a TV.
- HDMI
- Digital signal for video and audio in one cable. Best quality and simplest setup.
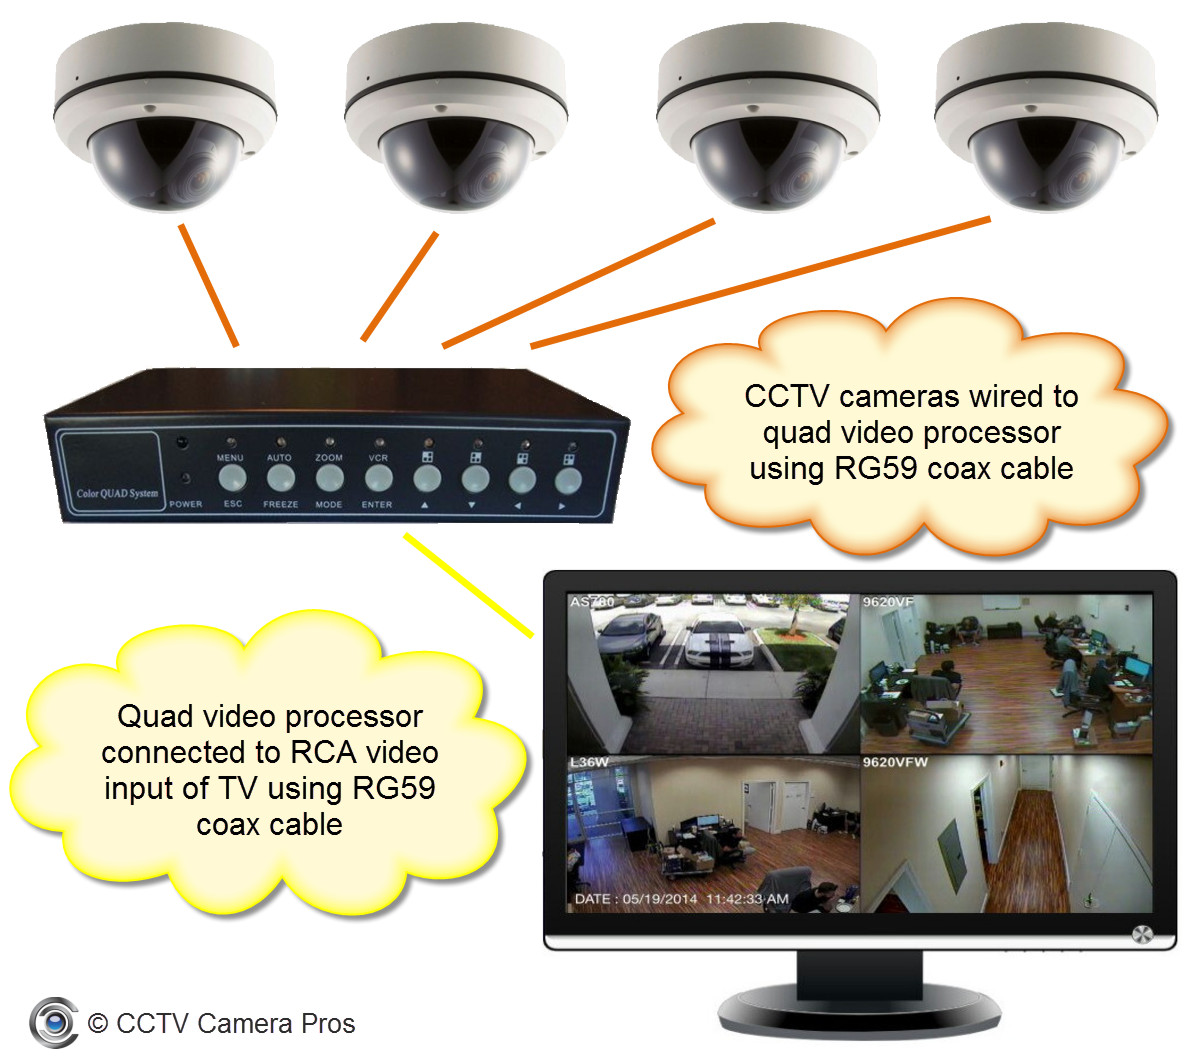
- Composite (RCA)
- Analog yellow video plus red and white audio. Common on older cameras and TVs.
- Component
- Three cables for video (red, green, blue) and two for audio. Better than composite.
- S-Video
- Older analog option that separates luminance and chrominance for better clarity.
- USB
- Some cameras stream or act as mass storage over USB. Works for viewing files or live webcam mode.
- Wireless (Wi-Fi or Bluetooth)
- Modern cameras can stream to smart TVs or through an app on the same network.
When you know which ports you have, connecting becomes a quick match-and-play task. The key is matching the camera output to a TV input or using an adapter if needed.
What you need before you start
Gather these items so you don’t run into surprises when you connect a video camera to a TV.
- The camera and its power supply or fully charged batteries.
- The TV and its remote to switch inputs.
- Appropriate cables: HDMI, composite RCA, component, or S-Video.
- Adapters if ports don’t match, for example HDMI-to-USB capture or RCA-to-HDMI converter.
- User manuals or notes on camera output mode for live view or playback.
- Optional: tripod or stable surface for the camera, and a small tool kit.
Having everything ready cuts setup time. I always lay parts out and test cables before routing them behind furniture.
How to connect a video camera to a TV — step-by-step by connection type
Below are clear steps for each method. Use the method that matches your camera and TV ports.
HDMI (recommended when available)
- Turn off both camera and TV.
- Plug the HDMI cable into the camera’s HDMI OUT port.
- Plug the other end into the TV’s HDMI IN port.
- Turn on the TV and camera.
- Use the TV remote to select the matching HDMI input.
- Set the camera to playback or live-output mode if required.
HDMI gives the best picture and sound and usually works instantly. If you see no signal, try a different HDMI port or cable and confirm the camera's HDMI output is enabled.
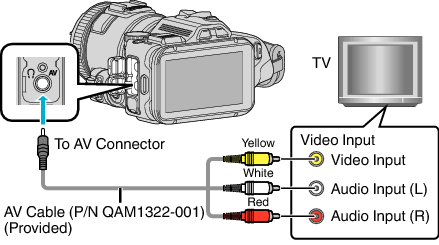
Composite RCA (yellow + two audio)
- Turn off devices.
- Connect the yellow video plug to the TV’s yellow VIDEO IN.
- Connect red and white plugs to audio inputs on the TV.
- Power on the camera and TV, then select the AV input on the TV.
- Select camera playback or live mode if needed.
Composite is common on older gear. Expect lower resolution and color quality than HDMI.
Component (YPbPr) plus audio
- Connect green, blue, and red video cables to matching component inputs on the TV.
- Connect red and white audio cables to the TV audio inputs.
- Power on both devices and choose the component input on the TV.
- Configure the camera output if it has component settings.
Component can deliver near-DVD-quality video if both devices support it.
S-Video
- Plug the S-Video cable into the camera and TV S-Video ports.
- Hook up audio with red and white RCA cables.
- Turn on both devices and select the S-Video / AV input.
S-Video is better than composite for sharpness but is now rare on new equipment.
USB (file playback or webcam mode)
- Connect the camera to the TV with the camera’s USB cable.
- Set the camera to USB mass storage or PC mode if prompted.
- On the TV, open the media player app or select USB input to view files.
- For live webcam mode, a compatible smart TV or USB capture device may be required.
Many TVs only read stored files over USB. To use a camera as a live source, use HDMI or a USB capture device.
Wireless streaming (Wi-Fi)
- Connect the camera and TV to the same Wi-Fi network.
- Use the camera’s app or TV app to detect the camera.
- Follow on-screen pairing steps to begin streaming.
- Select the app or input on your TV to view the camera’s feed.
Wireless is convenient but can add latency. For live events, wired HDMI is more reliable.
Troubleshooting common problems and fixes
If you run into trouble, try these quick checks and fixes when you attempt to connect a video camera to a TV.
- No signal on the TV
- Confirm both devices are powered on. Switch TV input to the correct port. Try a different cable or port.
- Poor picture quality
- Use HDMI if possible. Check cable condition and ensure correct output resolution on the camera.
- No audio
- Verify audio cables are plugged in or that HDMI carries audio. Check camera audio settings or mute options on the TV.
- TV won’t read USB
- Ensure the camera is in the correct USB mode and that the TV supports the file format. Try copying files to a USB drive as an alternative.
- Wireless lag or dropouts
- Move devices closer to the router, use 5 GHz when possible, or switch to a wired connection for stability.
I once spent an hour debugging a no-signal issue only to find the camera was set to a different HDMI profile. Always check camera menus for output options.
Best practices, settings, and optimizations
Small settings can improve playback and make the process smoother when you connect a video camera to a TV.
- Set camera output resolution to match TV native resolution for best quality.
- Use short, high-quality cables to reduce signal loss.
- Label HDMI ports on the TV if you switch inputs often.
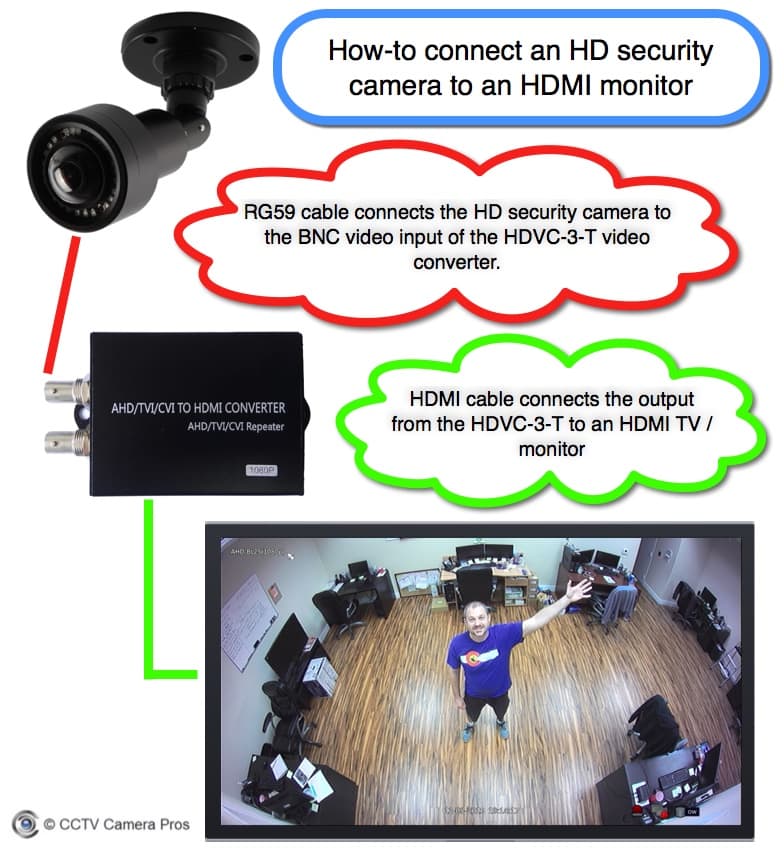
- If converting analog to digital, use a powered converter box to maintain signal strength.
- Update firmware on both camera and smart TV for better compatibility.
I recommend testing a short clip first. This quick test saves time and avoids surprises during important playback.

My experience, mistakes to avoid, and practical tips
I have hooked cameras to TVs in homes, studios, and events. Here are lessons I learned and want you to avoid.
- Mistake: assuming USB supports live video on all TVs.
- Tip: Use HDMI or a capture device for live feeds.
- Mistake: buying cheap adapters without checking specs.
- Tip: Choose well-reviewed HDMI converters and check for HDCP compatibility.
- Mistake: not securing cables, causing accidental disconnects.
- Tip: Use cable ties and leave slack to prevent stress on ports.
- Practical tip: keep a small kit with common adapters (HDMI, RCA, USB), spare batteries, and a compact manual.
These small habits made my setups faster and more reliable. When you connect a video camera to a TV, preparation matters more than luck.
Safety and maintenance
Protect your gear and preserve signal quality with simple safety steps.
- Turn off devices before plugging or unplugging cables to prevent short circuits.
- Avoid bending or kinking cables; store them coiled loosely.
- Keep camera firmware and TV software current for compatibility and security.
- Use surge protectors to guard equipment from power spikes.
A little care extends the life of your camera and TV and keeps video playback trouble-free.

Frequently Asked Questions of how to connect a video camera to a tv
How do I know which cable to use?
Check the ports on both the camera and TV. Match HDMI to HDMI first, then component, then composite, or use an adapter if necessary.
Can I use a USB cable for live camera output?
Most TVs use USB to read files, not to receive live video. To stream live, use HDMI or a USB capture device designed for live video.
What if my camera has no HDMI port?
Use component, composite, S-Video, or buy a quality converter that changes your camera’s output to HDMI. Ensure the converter supports the camera’s signal format.
Why is the picture fuzzy on my TV?
Fuzzy images often come from analog composite or low-resolution settings. Switch to HDMI or increase the camera’s output resolution to match the TV.
How do I get audio from the camera to the TV?
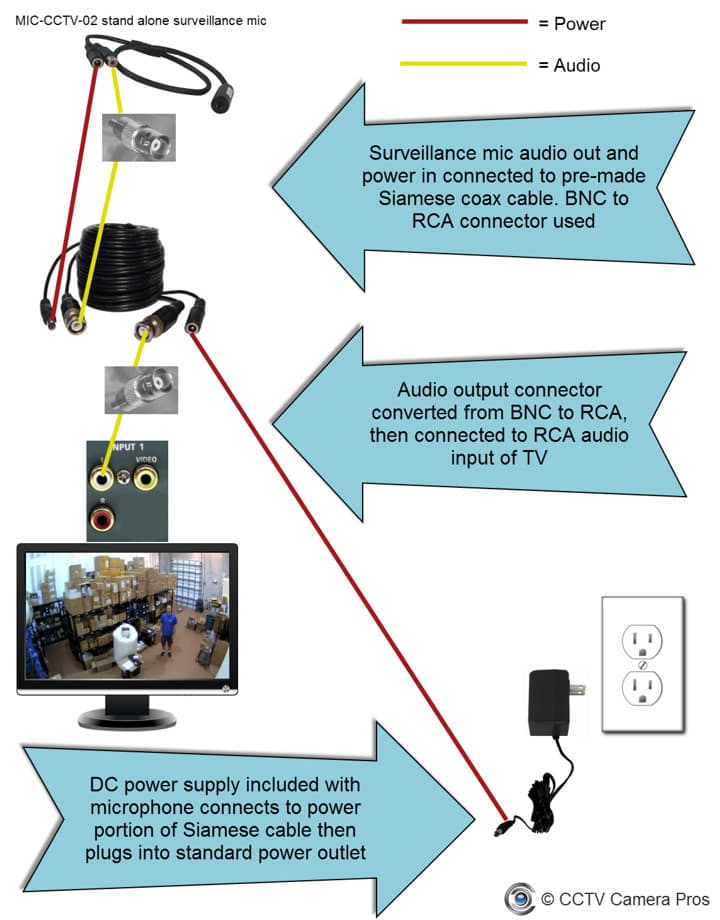
If using HDMI, audio should transmit automatically. For analog connections, connect the red and white RCA audio cables to the TV’s audio inputs.
Conclusion
Connecting a video camera to a TV is straightforward when you understand ports, carry the right cables, and follow simple setup steps. Start by matching the camera output to the TV input, test a short clip, and use HDMI for the best quality when possible. Take small precautions like updating firmware, securing cables, and carrying essential adapters to avoid common problems. Try the connection steps now and leave a comment about your setup or questions — I’ll help troubleshoot and optimize your configuration.

Everett Ashford is a tech reviewer at mytechgrid.com specializing in SSDs, cameras, TVs, earbuds, headphones, and other consumer electronics. He provides honest, data-driven reviews based on hands-on testing and real-world performance analysis. Everett simplifies complex tech details to help readers make smart, confident buying decisions.