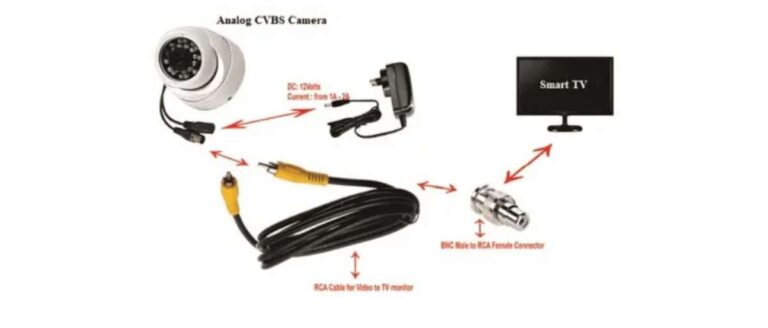
Connect the camera to the reverse light power, ground the unit, and run the video cable to your display.
I have installed rear view systems on dozens of cars and trucks, and this guide walks you through exactly how to connect rear view camera systems safely and reliably. You will get clear, step-by-step wiring instructions, mounting tips, testing and troubleshooting advice, and real-world lessons from hands-on installs. By the end, you will confidently understand how to connect rear view camera equipment to most vehicles and avoid common mistakes.

Tools and parts you need before you start
Before you learn how to connect rear view camera, gather the right tools and parts. Planning saves time and prevents damage.
- Basic toolkit: socket set, wire strippers, crimpers, screwdrivers, electrical tape.
- Camera kit: camera, video cable (RCA or proprietary), power pigtail, mount or bracket.
- Power items: fuse tap or add-a-circuit, inline fuse, ring terminal, heat-shrink tubing.
- Optional items: wireless transmitter/receiver, multimeter, panel trim tools, silicone sealant.
I always keep a multimeter and heat-shrink on hand. They cut troubleshooting time in half and make connections last. Knowing how to connect rear view camera starts with the right kit.

Step-by-step wiring: how to connect rear view camera to power and display
Follow these wiring steps for a wired camera. Wireless kits will skip the video cable step but follow power steps the same.
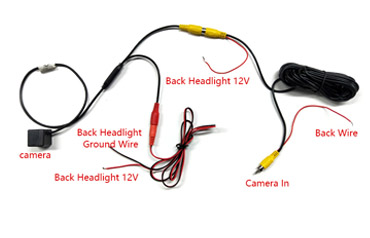
- Identify camera wires
- Red or yellow wire is usually power (reverse trigger).
- Black wire is ground.
- RCA video plug or colored video wire sends video to the monitor.
- Find the reverse light power
- Open the trunk or tail lamp housing and locate the reverse light wire.
- Use a multimeter to confirm the wire is live only when the car is in reverse.
- Make the power connection
- Splice the camera power lead to the reverse light positive wire using a secure crimp or solder and heat-shrink.
- Add an inline fuse near the connection point if your camera didn’t include one.
- Ground the camera
- Attach the camera ground to a clean metal chassis point with a ring terminal.
- Scrape paint to bare metal to ensure a solid connection.
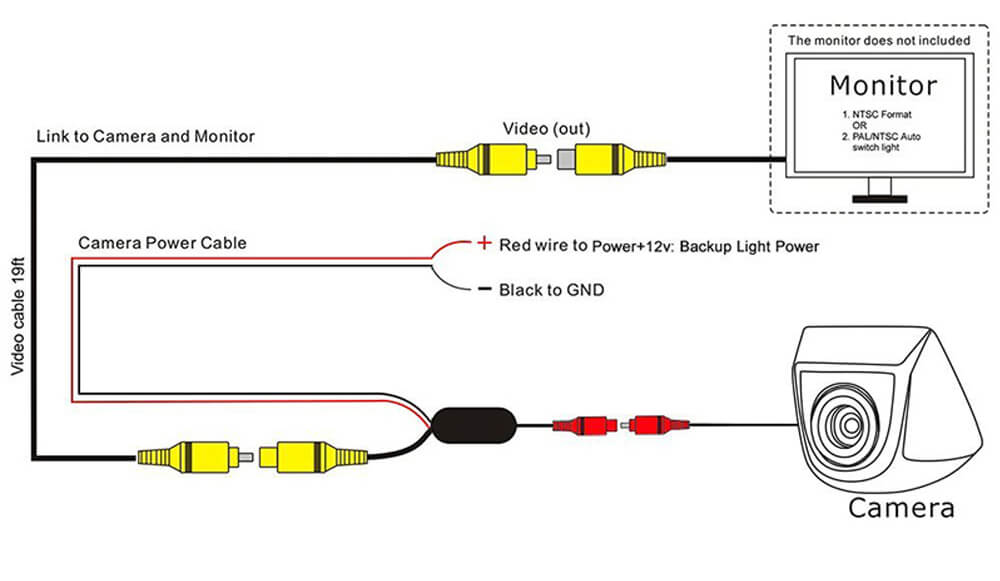
- Run the video cable to the monitor
- Route the RCA or video cable through the trunk, under trim panels, and into the cabin.
- Avoid running the video cable alongside high-current wiring like speaker or power wires to reduce interference.
- Connect to the monitor
- Plug the video cable into the monitor’s rear camera input.
- If the monitor has a reverse trigger wire, connect it to the same reverse light positive so the monitor switches when reversing.
- Test before finalizing
- With the car in reverse, confirm the camera powers on and the image appears on the display.
- If no image appears, recheck power, ground, and video cable connections.
I made the mistake of not using heat-shrink on my first install. The connection worked at first but failed after rain. Proper sealing is part of how to connect rear view camera reliably.
Mounting the camera and routing the cable safely
A secure mount and neat routing keep the camera working for years. This section covers common mounting options and routing tips.
-
Mounting location choices
-
Above the license plate for a wide view and easy wiring access.
-
In the rear bumper for a hidden look and central sightline.
-
On a tailgate or hatch for trucks and SUVs to get a higher vantage point.
-
Mounting tips
-
Use the supplied bracket or a universal kit that fits your vehicle.
-
Seal screw holes with silicone to prevent rust and leaks.
-
Aim the camera slightly downward to show the bumper and ground close to the vehicle.
-
Cable routing best practices
-
Tuck cable under trunk liners and along factory clips.
-
Use zip ties to secure cable every 12–18 inches.
-
Keep cable away from sharp edges and heat sources.
When I installed a camera on an older pickup, I routed the cable through an existing grommet near the tail light. That kept the install clean and reduced water intrusion risk. This practical thinking is central to successful how to connect rear view camera work.
Testing and troubleshooting common problems
Testing is vital. If something fails, these checks find the issue quickly when you learn how to connect rear view camera systems.
-
No power to camera
-
Check the reverse light fuse and the inline fuse.
-
Verify the reverse light wire actually has voltage when in reverse.
-
No video signal
-
Confirm video cable is plugged in and not cut.
-
Swap the monitor input or test the camera on another display.
-
Interference or static on the image
-
Re-route video cable away from alternator and speaker wires.
-
Use a grounded shielded video cable if interference persists.
-
Camera image is upside down or rotated
-
Many cameras can be flipped through a small switch or menu in the monitor.
-
Intermittent signal after weather exposure
-
Inspect seals and wiring for corrosion. Replace corroded terminals and re-seal.
I once traced a flicker to a loose ground under a bumper bracket. Tightening the ground cured the problem. Good troubleshooting focuses on power, ground, and video path—those are the key steps in how to connect rear view camera systems successfully.

Tips, safety and legal considerations
Follow these tips and safety notes when you connect a rear view camera.
-
Safety first
-
Disconnect the negative battery terminal before cutting or tapping wires.
-
Use proper insulated tools to prevent shorts.
-
Legal and privacy notes
-
Check local laws about aftermarket camera placement and rear visibility rules.
-
Avoid recording or broadcasting private areas without consent.
-
Maintenance tips
-
Periodically inspect mounts and seals for corrosion.
-
Clean the lens with a soft cloth and mild cleaner.
-
When to get professional help
-
If your vehicle has complex wiring, cameras tied into CAN bus, or factory camera integration, consult a pro.
I recommend a slow, cautious approach. One tight splice and good seal are better than multiple hasty fixes. This care is part of how to connect rear view camera systems that last.

Frequently Asked Questions of how to connect rear view camera
How do I power a rear view camera?
Tap the camera’s power lead to the reverse light positive wire so it gets power only in reverse. Add an inline fuse near the tap for protection.
Can I use a wireless rear view camera?
Yes. Wireless kits still need a power connection at the camera and the receiver must be powered in the cabin. Wireless avoids running long video cables but may suffer interference.
Do I need a relay to power the camera?
Most cameras draw low current and do not need a relay. Use a relay if you plan to power the camera from an accessory circuit or if the camera draws more than the circuit rating.
How do I avoid a flashing or distorted image?
Avoid routing the video cable near high-current wiring and alternator lines. Use shielded cable and secure grounds to eliminate noise.
Will adding a rear view camera void my warranty?
Adding an aftermarket camera can affect warranty if it damages factory wiring. Use proper connectors and avoid cutting factory harnesses to reduce risk.
Conclusion
You now have a clear, practical roadmap for how to connect rear view camera systems: gather the right parts, tap the reverse light for power, ground securely, run the video cable neatly, and test thoroughly. Small details like secure grounds, sealed connections, and careful routing make the difference between a temporary fix and a long-term install. Take your time, use the right tools, and don’t hesitate to consult a professional for complex vehicles. Try one step today—inspect your wiring plan, gather parts, or perform a simple test—and share your results or questions below to keep learning.

Everett Ashford is a tech reviewer at mytechgrid.com specializing in SSDs, cameras, TVs, earbuds, headphones, and other consumer electronics. He provides honest, data-driven reviews based on hands-on testing and real-world performance analysis. Everett simplifies complex tech details to help readers make smart, confident buying decisions.