Use Blender's camera, keyframes, graph editor, and constraints to create smooth, cinematic moves.
I have worked with Blender for years and taught camera work to students and pros. This guide breaks down how to do camera movement in Blender step by step. You will learn basics, intermediate tips, and advanced tricks. I will share hands-on examples, common mistakes I made, and clear workflows you can use right now. Read on to master camera moves that sell mood, guide the eye, and improve every scene you make.

Why camera movement matters in Blender
Camera movement drives story and mood. A good move guides the viewer, reveals detail, and adds energy. In Blender, the camera is both a tool and a storytelling device.
I often start a scene with the camera in mind. That choice shapes blocking, lighting, and timing. Think of the camera like a character. Plan its path before you animate. This makes your work faster and more focused.

Types of camera movement in Blender
Knowing the main move types helps you pick the right tool. Here are the moves I use most.
- Dolly. Move the camera forward or backward on a straight path.
- Truck. Slide the camera left or right.
- Pan. Rotate the camera on its yaw axis.
- Tilt. Rotate the camera on its pitch axis.
- Pedestal. Move the camera up or down.
- Arc. Move the camera on a curved path around the subject.
- Orbit. Rotate the camera around a focal point, often using a path.
- Handheld. Add subtle noise to simulate a handheld rig.
- Crane. Combine dolly and pedestal with smooth arcs for cinematic shots.
Each move can be done with keyframes, constraints, or path animation. Learning when to use each method is part of how to do camera movement in Blender well.
Step-by-step: How to do camera movement in Blender
Follow these clear steps to create reliable camera animation.
- Set up your scene
- Place your camera and objects. Keep scale and units correct.
- Enable a safe frame and composition guides. This helps framing.
- Choose a method
- Keyframes for simple moves. Set location and rotation keys.
- Parent to an empty for rigs. Animate the empty for easier control.
- Animate along a path for smooth arcs. Convert path to follow for consistent speed.
- Use the camera view
- Press 0 on the numpad to enter camera view.
- Frame your shot, then insert a keyframe with I → Location or Rotation.
- Keyframing basics
- Move to a frame. Adjust camera. Press I to set keyframes.
- Use linear interpolation for robotic moves. Use Bezier for smooth moves.
- Keep keyframes sparse. Add only what you need.
- Smooth motion with the Graph Editor
- Open the Graph Editor. Select camera channels.
- Use handles to ease in and out. Adjust curves to remove pops.
- Use the F-Curve smoothing tools to refine motion.
- Use constraints for complex tasks
- Track To constraint keeps the camera pointed at a target.
- Follow Path constraint moves the camera along a curve.
- Damp Track gives soft follow behavior for more natural motion.
- Add secondary motion
- Parent the camera to an empty. Animate both for layered motion.
- Use noise modifiers for subtle handheld feel.
- Add rotation offsets during fast pans to sell speed.
- Polish with motion blur and post
- Enable motion blur in Render settings for realistic streaks.
- Render to layers or passes and composite for final color and blur tweaks.
These steps show how to do camera movement in Blender from setup to final polish. My experience shows that planning and using the right tools saves time and yields cleaner moves.

Tools and panels you will use often
Familiarity with these Blender tools makes animation faster.
- Timeline. Set and scrub frames easily.
- Dope Sheet. Move and retime keyframes quickly.
- Graph Editor. Refine speed and easing with curves.
- NLA Editor. Layer and blend camera actions.
- Constraints panel. Add Track To, Follow Path, or Damp Track.
- Properties camera tab. Adjust focal length, sensor size, and depth of field.
I often toggle the focal length while animating to see how field of view affects motion. Small lens changes can make a move look very different.

Tips, tricks, and common mistakes
Use these practical tips from real projects.
- Plan first. Storyboard or block moves before keyframing.
- Keep short keyframes. Too many keys make motion noisy.
- Use reference. Shoot a quick phone video of the move you want.
- Watch timing. Fast cuts need tighter easing in Graph Editor.
- Avoid gimbal lock by animating via rotation modes or using constraints.
- Use an empty as a target. It simplifies complex rigs and retiming.
- Preview with viewport playblast for speed checks.
- Use depth of field sparingly. It can hide motion errors but also block clarity.
I once animated a long dolly in one pass and missed a tiny bump. A playblast would have shown that error and saved hours. Learn from that: preview early and often.
Advanced techniques and creative ideas
Push your shots beyond basics with these methods.
- Path follow with fixed orientation. Use Follow Path plus Track To for clean orbits.
- Camera rig with nested empties. One empty controls position, another controls rotation. This gives studio-style rigs.
- Drivers for procedural moves. Drive camera properties with object transforms or math nodes.
- Motion capture for complex handheld motion. Clean the data in the Graph Editor.
- Blend camera animations in NLA to reuse moves across scenes.
- Use the Cinematic Camera add-on or custom rigs for film-like controls.
- Combine cloth or physics events with camera timing to enhance drama.
These methods are part of advanced workflows I use when the camera must interact with simulated elements.

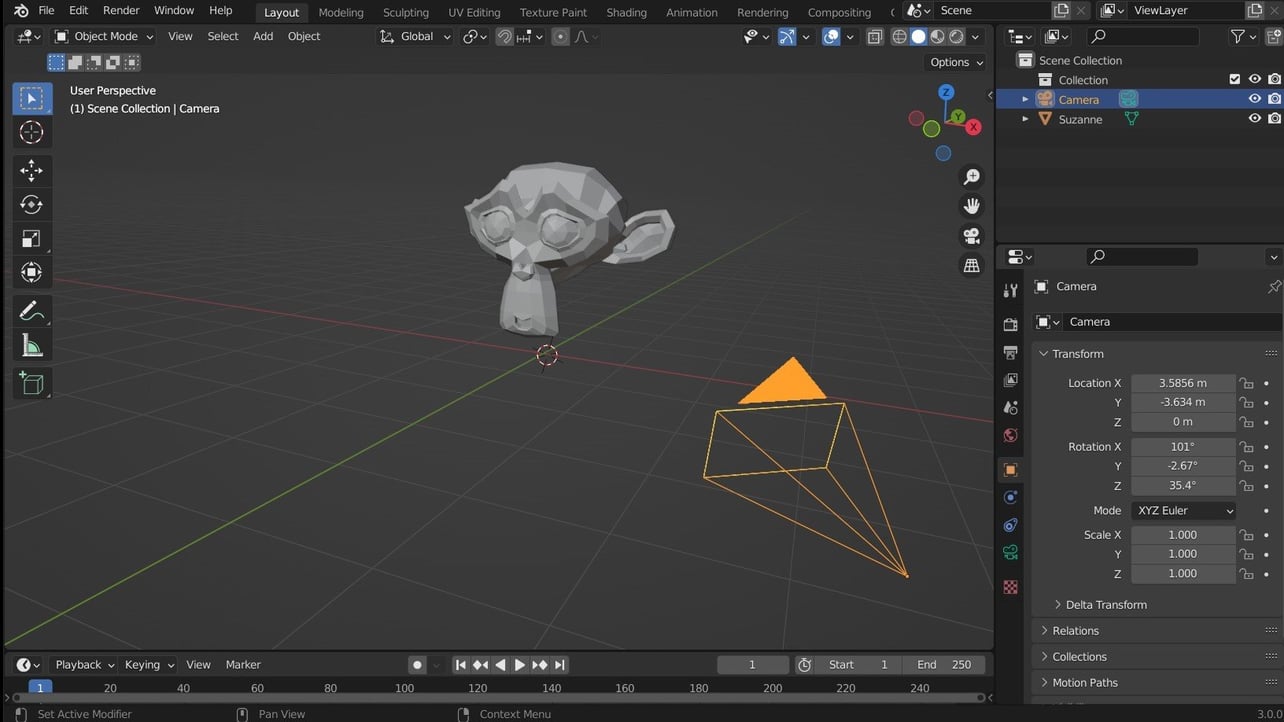
Workflow example: Simple cinematic reveal
Here is a short, tested workflow to make a smooth reveal. I used this on a recent short.
- Block the shot
- Place camera at start and end positions. Set keys at frame 1 and frame 90.
- Create a path
- Add a Bezier curve. Shape an arc that flows around the scene.
- Parent camera to path
- Select camera, then curve, add Follow Path constraint. Check follow curve.
- Use an empty target
- Create an empty and place it on the subject. Add Track To on camera so it always faces the empty.
- Adjust speed in Graph Editor
- Convert evaluation time to F-Curve. Ease in and out with handles.
- Add subtle noise
- Add noise modifier to location curves for organic motion.
- Preview and tweak
- Playblast and refine keys. Add motion blur and final render.
This method balances control and ease. It is the pattern I return to when I need predictable, cinematic moves.

Frequently Asked Questions of how to do camera movement in blender
What is the easiest way to animate a camera in Blender?
Use keyframes on the camera's Location and Rotation. For smooth arcs, use a curve and add a Follow Path constraint.
How do I make smooth camera motion in Blender?
Refine motion in the Graph Editor. Use Bezier handles and easing. Add subtle noise only after the main curve is clean.
Should I parent the camera to an empty or animate the camera itself?
Parenting to an empty is best for layered control. Animate the empty for broad moves and the camera for fine tweaks.
How do I keep the camera looking at a subject while moving?
Add a Track To or Damp Track constraint and point it to an empty placed on the subject. This keeps the focus steady.
How do I avoid sudden jumps in camera animation?
Remove extra keyframes and smooth curves in the Graph Editor. Check interpolation type and clear any accidental location jumps.
Can I create handheld camera in Blender?
Yes. Add a subtle noise modifier to the camera or its parent empty. Keep the amplitude low to avoid nausea.
When should I use motion blur with camera moves?
Use motion blur for fast moves to sell speed. Keep shutter and sample settings balanced to avoid noisy renders.
Conclusion
Good camera movement makes scenes feel alive. Use clear planning, the right tools, and careful smoothing to get strong results. Start small, test often, and build rigs that let you adjust timing without redoing work. Try one new method from this guide on your next scene, and you will see immediate improvement. If this helped, try the example workflow, leave a comment, or subscribe for more Blender tutorials.

Everett Ashford is a tech reviewer at mytechgrid.com specializing in SSDs, cameras, TVs, earbuds, headphones, and other consumer electronics. He provides honest, data-driven reviews based on hands-on testing and real-world performance analysis. Everett simplifies complex tech details to help readers make smart, confident buying decisions.