Use motion keyframes on an adjustment layer and add motion blur for realistic camera shake.
I have used Premiere Pro for years to craft tight, cinematic shots. This guide shows exactly how to do camera shake Premiere Pro style. You will learn multiple methods, step-by-step settings, and real-world tips I learned on projects. Read on to master how to do camera shake premiere pro and make your shots feel alive and urgent.
Why add camera shake and when to use it
Camera shake adds energy and realism. It can sell action, add tension, or hide small continuity errors. Use camera shake when you want motion to feel organic. Avoid it when a clean, steady look is required.
Why this matters for editors
- It helps match handheld footage to steadier shots.
- It covers minor sync or framing issues.
- It creates a mood without reshooting.
You will see clear, repeatable methods below so you can control strength, frequency, and realism when learning how to do camera shake premiere pro.

How to do camera shake Premiere Pro — Step-by-step: Manual keyframe method
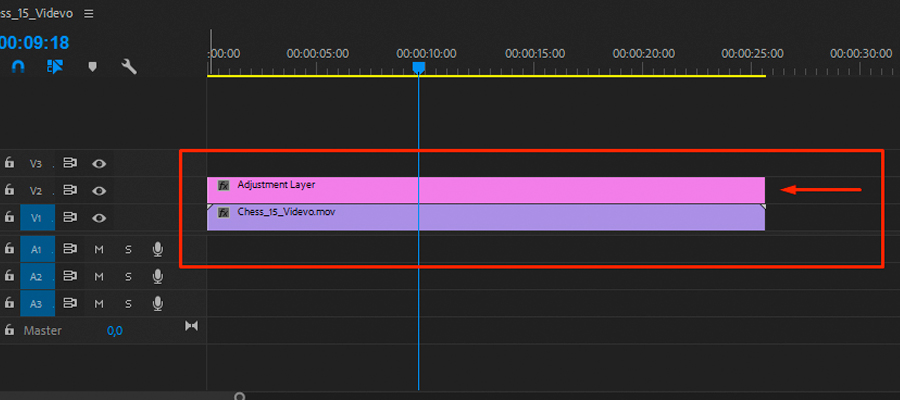
This is the most flexible way to create shake. Use an adjustment layer. It lets you apply the motion to many clips at once.
Steps
- Create an adjustment layer
- Project panel > New Item > Adjustment Layer. Drag it above your clip.
- Select the adjustment layer and open Effect Controls
- Window > Effect Controls.
- Use Motion controls or the Transform effect
- For Motion: tweak Position and Rotation.
- For Transform: use Position, Rotation and set Scale if needed.
- Add keyframes
- Move the playhead every 2–6 frames and set small random Position and Rotation values.
- Smooth and vary the motion
- Use Easy Ease on keyframes for smoother start and stop.
- Vary the distance between keyframes to change frequency.
- Scale up slightly to hide edge flicker
- Set Scale to 102–104% on the adjustment layer.
Practical numbers I use
- Position offsets: 5–30 pixels for light to strong shake.
- Rotation: 0.2–2.0 degrees.
- Keyframe spacing: every 2–6 frames for a jittered look.
This manual method is core to how to do camera shake premiere pro. It gives the best control.
How to do camera shake Premiere Pro — Quick method: Using the Transform effect with randomization
If you want a faster option, use the Transform effect and keyframes. This helps when you need repeatable, tweakable shake.
- Apply an Adjustment Layer.
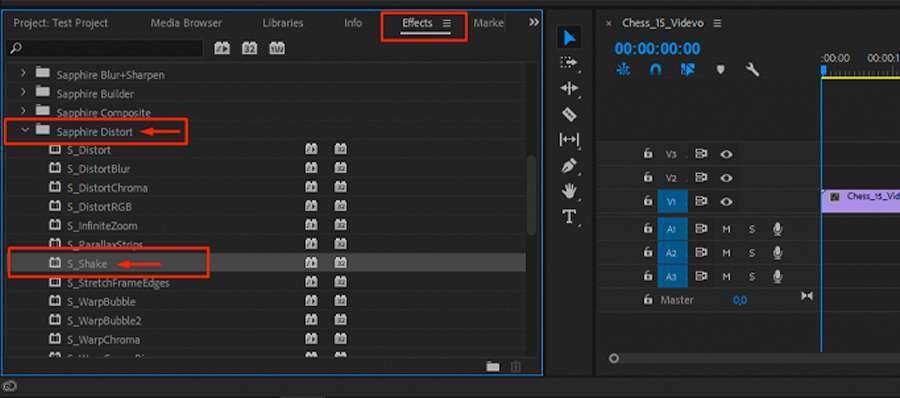
- Effects panel > Video Effects > Distort > Transform. Drag to adjustment layer.
- In Effect Controls, add Position and Rotation keyframes.
- Use short, varied keyframe distances for randomness.
- Optionally, add Directional Blur to exaggerate speed.
Why I use this
- Transform is easy to keyframe across many clips.
- It feels more consistent than keyframming each clip.
- This is a reliable way to make camera shake in Premiere Pro fast.

How to do camera shake Premiere Pro — Add motion blur and polish
Motion blur sells the shake. Without it, jitter looks digital. Premiere offers ways to fake blur.
Tips to add blur
- Use Directional Blur
- Effects > Blur & Sharpen > Directional Blur.
- Match the blur angle to the dominant camera motion.
- Set Blur Length low (5–20) for subtle blur.
- Use repeated frames and small scale up
- Slight scale prevents seeing unwanted edges.
- Layer multiple blurs lightly
- Combine small Directional Blur with a tiny Gaussian Blur for softness.
Real-tip from my edits
- Subtle blur on an adjustment layer looks better than strong blur on the source clip. It blends motion with the whole cut.

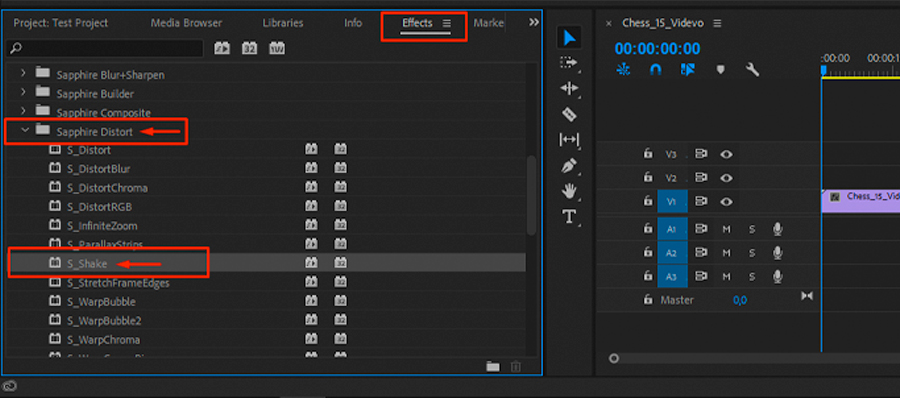
How to do camera shake Premiere Pro — Using presets and plugins
If you edit fast or want consistent results, presets save time. Some plugins add advanced controls.
Native options and third-party
- Built-in: Create your own preset from the adjustment layer setup.
- Marketplace presets: Many free and paid shake presets exist.
- Plugins: Look for plugins that add randomized keyframes, amplitude and frequency sliders.
When to use plugins
- Use them when you need complex shake patterns.
- Use them when you must match camera rigs or VFX plates.
- Use presets when you want fast, repeatable results.
I often build a custom preset for a project. That saves time and keeps a consistent style across scenes.
How to do camera shake Premiere Pro — Troubleshooting and common mistakes
Common issues happen fast. Here are fixes I use.
Problem: Visible edges during shake
- Fix: Increase Scale slightly (102–105%). Use feathered crop if needed.
Problem: Shake looks robotic
- Fix: Vary keyframe timing. Use random offsets. Add small rotation with position changes.
Problem: Motion blur makes clip too soft
- Fix: Reduce blur length. Apply blur to a duplicated, desaturated layer and blend it in.
Problem: Performance lag on long sequences
- Fix: Render the adjustment layer. Work at lower resolution while editing.
Problem: Shake doesn’t match other clips
- Fix: Analyze hand-held footage motion. Match frequency and amplitude. Use markers to sync hits with action.
These tips reflect real edits I did under deadline. They help when learning how to do camera shake premiere pro.
Best practices and creative tips
Small choices make big differences. Follow these to keep the effect believable.
Best practices
- Start subtle. You can always increase strength later.
- Match shake to the shot’s scale. Wide shots need less pixel movement.
- Time shake to hits in the audio or cuts.
- Keep separate presets for “light,” “medium,” and “heavy” shake.
Creative uses
- Use shake only for impact frames.
- Combine shake with color grading shifts for panic scenes.
- Try short bursts of intense shake for stingers.
From my work: I once used a short heavy shake timed with a score hit to sell a sudden explosion. It boosted the scene more than a louder sound alone.

How to do camera shake Premiere Pro — Checklist before export
Final check list
- Preview at full frame rate.
- Render the sequence to confirm motion blur looks right.
- Check edges on all clips with shake applied.
- Test on a reference monitor or phone to confirm feel.
- Save presets for future use.
Following these steps will make your camera shake look pro and repeatable. They summarize how to do camera shake premiere pro in real projects.

Frequently Asked Questions of how to do camera shake premiere pro
What is the fastest way to create camera shake in Premiere Pro?
Use an adjustment layer with the Transform effect or Motion keyframes. Add short, randomized Position and Rotation keyframes every few frames for a quick result.
Should I add motion blur to camera shake?
Yes. Motion blur makes the shake look natural and hides digital jitter. Use Directional Blur and keep the amount subtle.
Can I apply camera shake to multiple clips at once?
Yes. Put an adjustment layer above the clips and apply your shake settings there. This keeps the effect consistent and editable.
How do I avoid visible edges when I add camera shake?
Increase Scale slightly on the adjustment layer or crop edges a little. This prevents black borders from appearing during movement.
Are plugins necessary to make good camera shake?
No. You can achieve strong results with manual keyframes and native effects. Plugins speed up work and offer advanced controls but are not required.
How do I match camera shake to handheld footage?
Analyze the original motion in the handheld clip. Match the shake frequency and amplitude with similar keyframe timing and small rotation values.
Will camera shake affect color grading?
It can. Apply shake before color grading or use an adjustment layer for shake so grading remains consistent. Check the grade after adding motion.
Can I animate shake speed or strength over time?
Yes. Use varied keyframe spacing and amplitude. You can also automate intensity by keyframing scale or opacity of multiple adjustment layers.
Is motion blur necessary for fast cuts?
Not always. For very short cuts, a tiny jitter may be enough. Use blur when the shake crosses multiple frames and looks unnatural without it.
How to save my shake settings for reuse?
Right-click the applied effects on the adjustment layer and choose Save Preset. Name it by intensity so you can load it later.
Conclusion
You now have multiple, tested ways to create camera shake in Premiere Pro. Start with manual keyframes on an adjustment layer for full control. Use Transform or presets to speed up work. Add motion blur and vary timing to make the shake feel real. Try these methods on a short test clip and save a preset. Practice a few times and you will master how to do camera shake premiere pro.
Take action now: apply one method to a recent edit, save a preset, and share your results or questions below.

Everett Ashford is a tech reviewer at mytechgrid.com specializing in SSDs, cameras, TVs, earbuds, headphones, and other consumer electronics. He provides honest, data-driven reviews based on hands-on testing and real-world performance analysis. Everett simplifies complex tech details to help readers make smart, confident buying decisions.