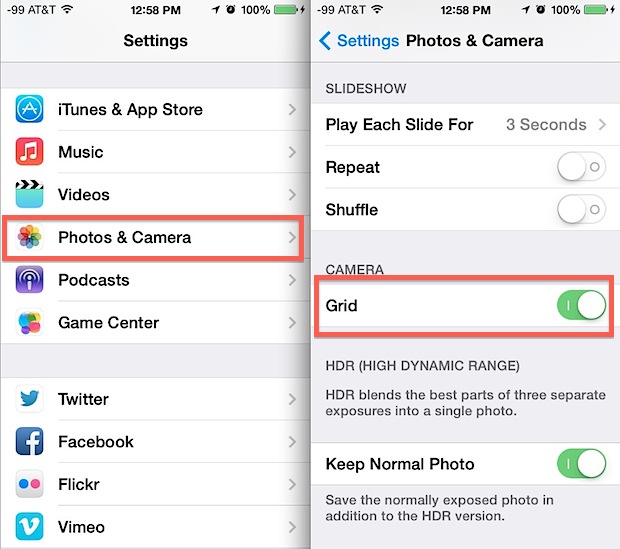
Enable Settings > Camera > Grid to display a rule-of-thirds grid in your iPhone Camera app.
As a photographer and long-time iPhone user, I’ll walk you through how to enable grid on iPhone Camera step by step, explain why it matters, and share practical tips I’ve learned from real shoots. This guide covers every iOS version nuance, troubleshooting if the grid won’t show, and creative ways to use the grid to improve composition. Read on to master how to enable grid on iPhone Camera and shoot cleaner, more balanced photos today.
Why the grid matters for better photos
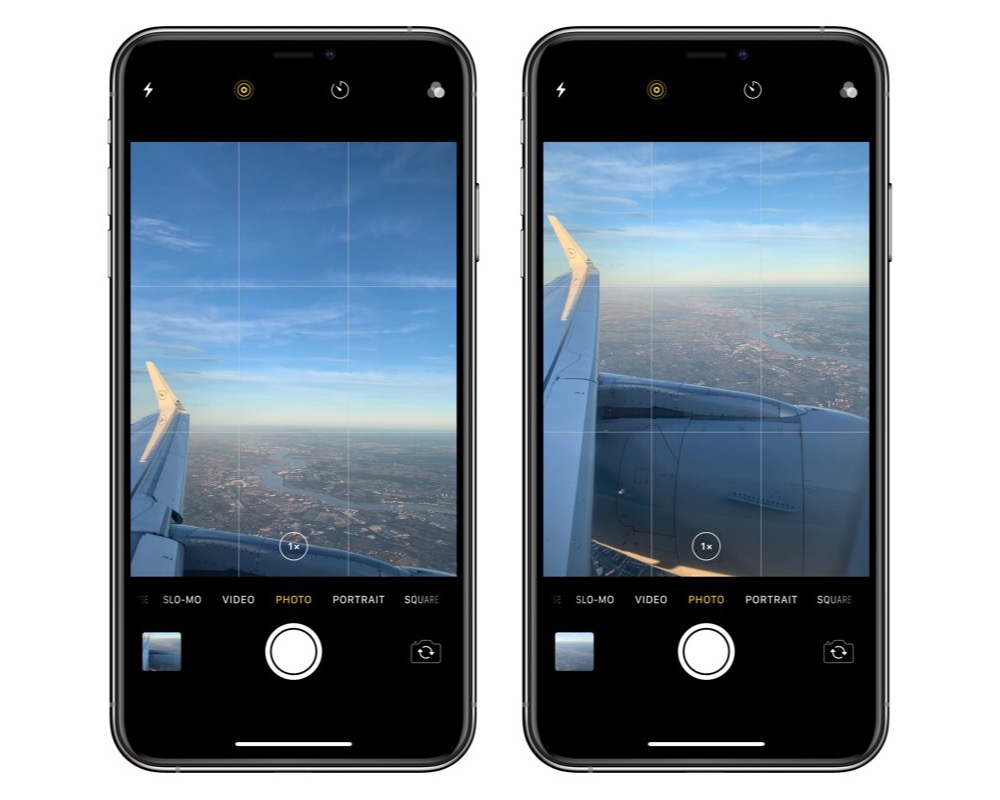
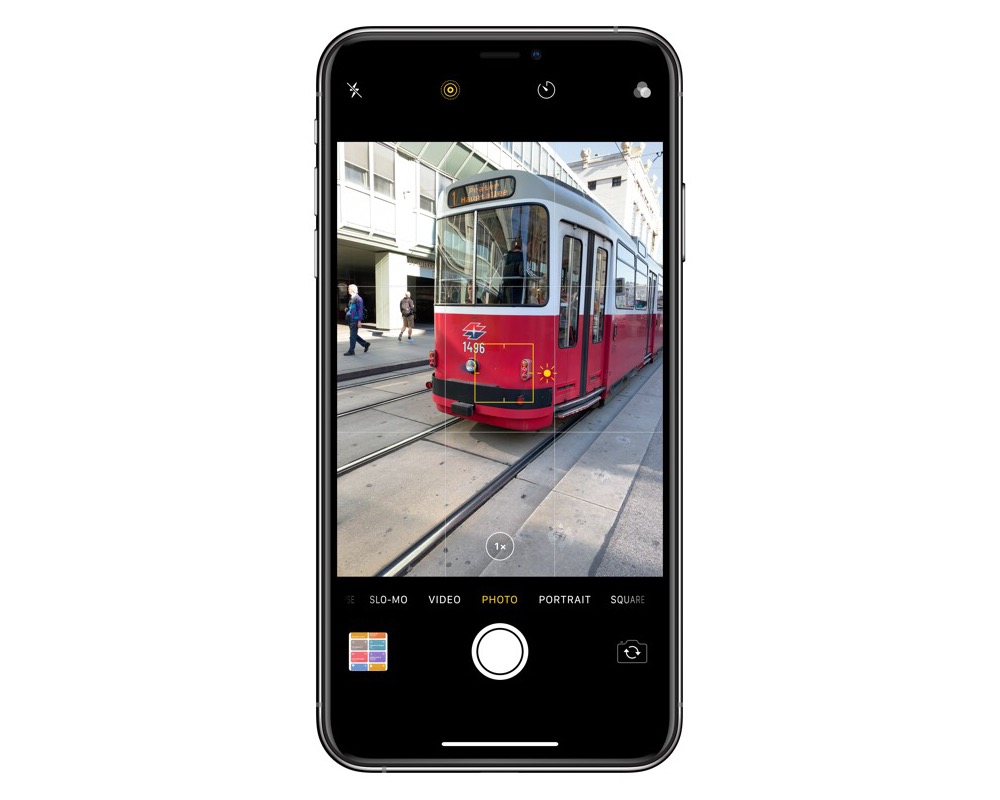
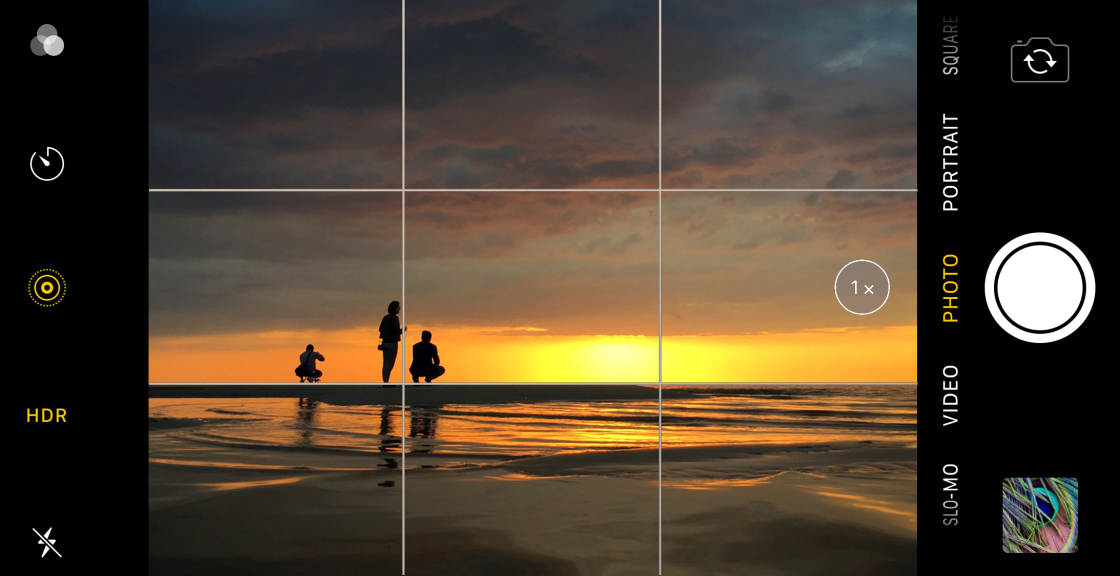
The grid adds a simple overlay of intersecting lines to the Camera app. It helps you compose using the rule of thirds, level horizons, and place subjects where they feel balanced. The grid is low distraction and high impact, especially for quick handheld shots or framing architecture.
Using the grid consistently trains your eye to see stronger compositions. It’s one of those small camera settings that yield big improvements. If you want cleaner shots with minimal editing, learning how to enable grid on iPhone Camera is a smart first step.
How to enable grid on iPhone Camera: step-by-step
Follow these steps to enable grid on iPhone Camera. These instructions work on most modern iPhones and recent iOS versions.
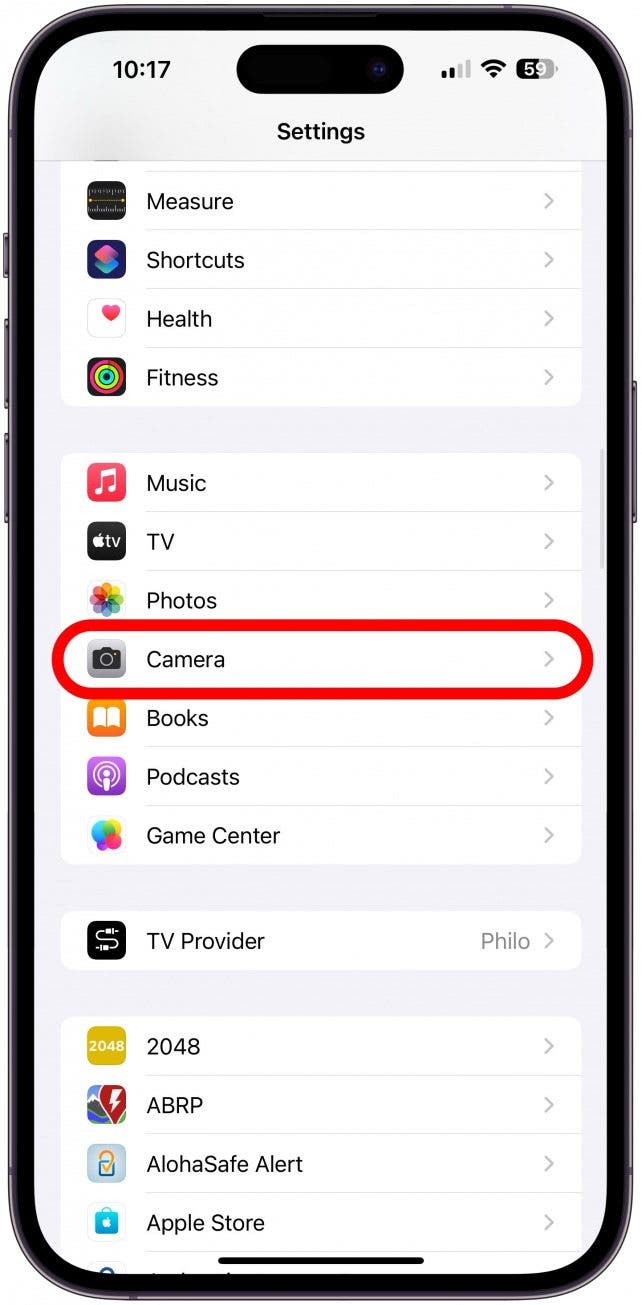
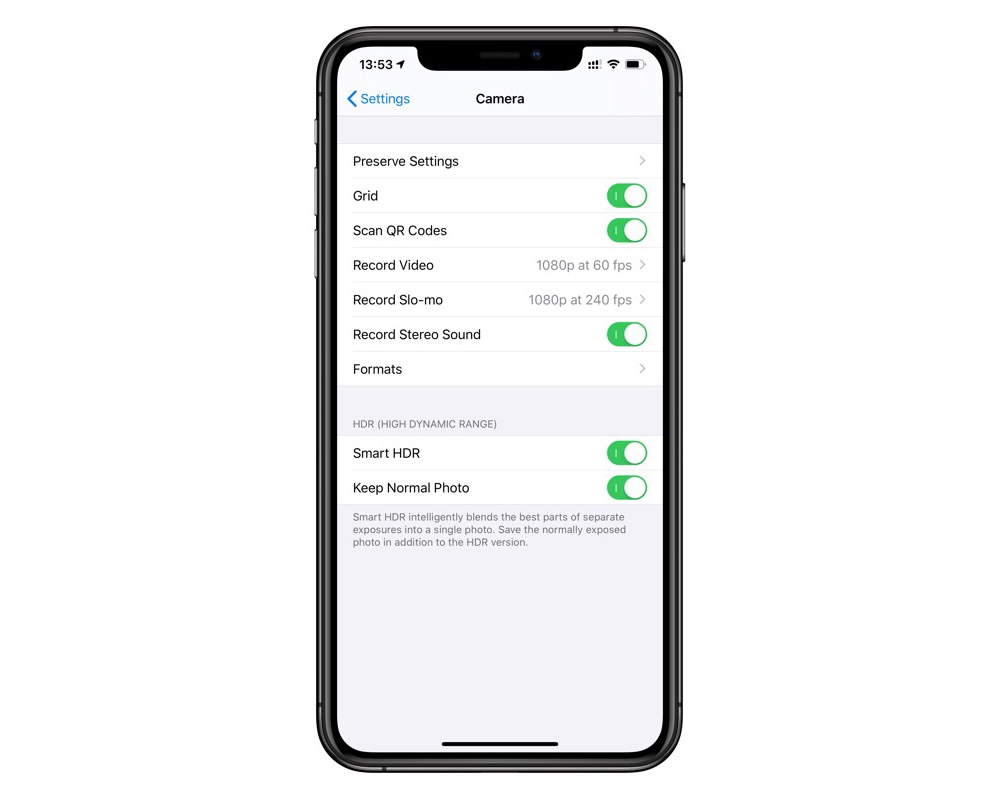
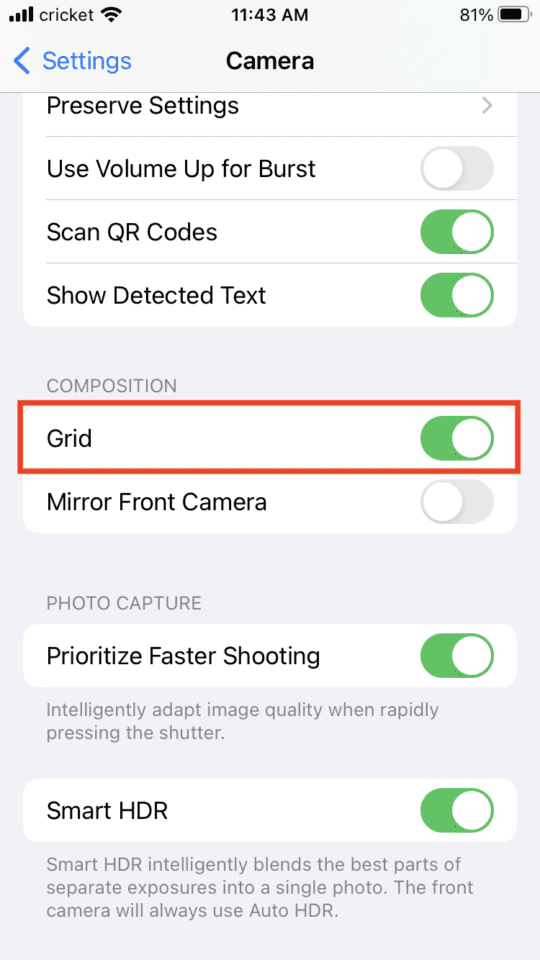
- Open the Settings app on your iPhone.
- Scroll down and tap Camera.
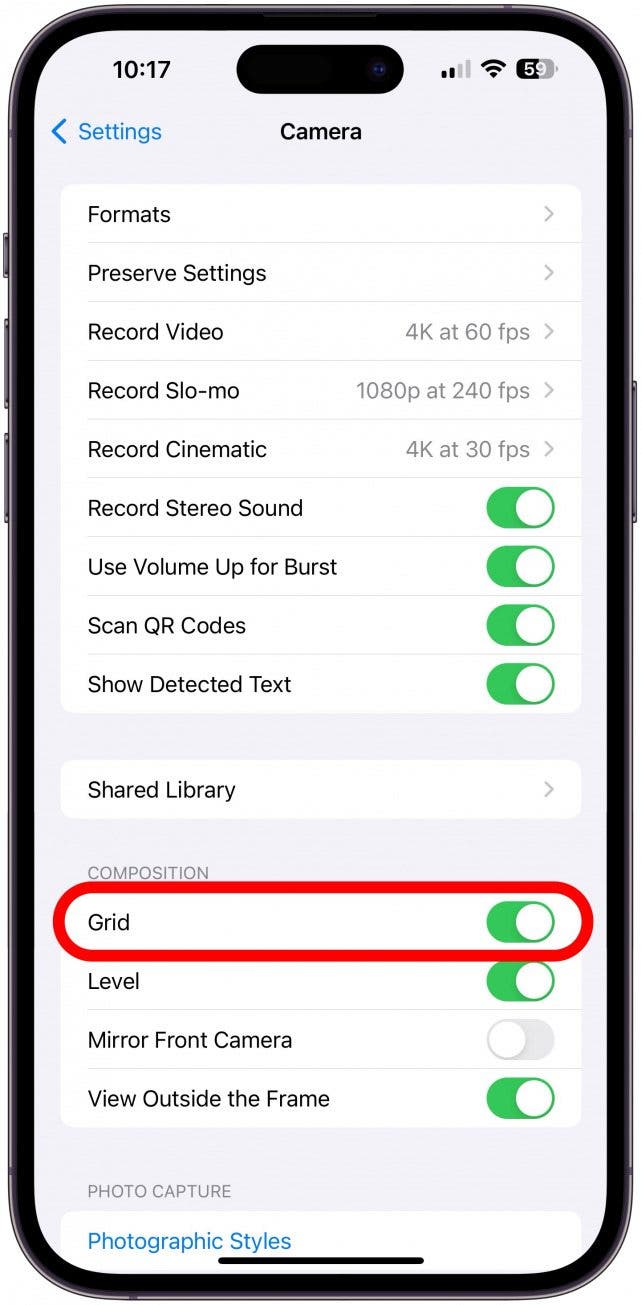
- Toggle Grid to the ON position.
- Close Settings and open the Camera app to see the grid overlay.
If you prefer, you can toggle the grid on and off quickly by leaving Settings open while checking Camera. Learning how to enable grid on iPhone Camera takes less than a minute and becomes second nature once you try it during a few shoots.

iOS differences and where the grid setting lives
The grid setting location has been stable across iOS updates. It is found in Settings > Camera > Grid on modern iPhones. Older iOS versions used slightly different menus, but the concept is the same.
If your iPhone is managed by a school or workplace, a device profile could hide camera settings. In that case, ask the admin. Knowing how to enable grid on iPhone Camera across iOS versions helps you troubleshoot quickly when something feels off.
Troubleshooting: grid not appearing
If you enabled the grid but can’t see it, try these checks.
- Restart the Camera app by swiping it closed and reopening.
- Reboot your iPhone to clear temporary glitches.
- Confirm the Grid toggle is still on in Settings > Camera.
- Remove any device management profile that restricts camera settings, if allowed.
If the grid still does not appear, update iOS to the latest version and test again. Understanding how to enable grid on iPhone Camera includes knowing basic troubleshooting steps to fix common issues.
Practical tips for using the grid effectively
The grid becomes powerful when combined with simple habits. Here are practical ways I use the grid in real shoots.
- Align horizons with the horizontal grid line for straight landscapes.
- Place eyes or main subjects near intersection points for stronger portraits.
- Use vertical lines for architecture to keep columns and edges straight.
- Combine the grid with leading lines to guide the viewer’s eye.
- Turn the grid off occasionally to train composition without guides.
These strategies turn the setting from a technical toggle into a creative tool. Once you know how to enable grid on iPhone Camera, practice by framing ten photos with the grid and ten without to see the difference.
My experience: mistakes and lessons learned
Early on I relied too much on automatic centering. Learning how to enable grid on iPhone Camera made me slow down and frame intentionally. I once shot a set of photos with tilted horizons that I thought were fine until the grid showed the error. Now I shoot with the grid on for landscapes and off for candid moments.
Lesson learned: the grid is a teacher. Use it to learn composition, not as a crutch. Over time you’ll internalize good framing and make faster creative decisions.
Advanced options: apps and overlays
If you want more than a rule-of-thirds grid, third-party camera apps offer different overlays.
- Apps with customizable grids let you add 4×4, golden ratio, or custom guides.
- Some manual camera apps let you lock exposure and use the grid for precise framing.
- Editing apps can display a grid for cropping and final composition adjustments.
Knowing how to enable grid on iPhone Camera is the first step; exploring apps expands creative control when you need specialized guides for professional shots.
Workflow tips for consistent results
Consistency helps you shoot better across different sessions. Try these workflow tips.
- Enable the grid as part of your shooting preset on every shoot.
- Use two quick test frames to check alignment before serious shooting.
- Combine grid use with exposure lock and focus lock for repeatable shots.
- Review shots at 100% zoom to confirm composition and straight lines.
These small habits help you take advantage of how to enable grid on iPhone Camera and turn better frames into a routine.
Frequently Asked Questions of how to enable grid on iphone camera
How do I turn the grid on for my iPhone camera?
Open Settings, tap Camera, and toggle Grid on. Then open the Camera app to see the overlay.
Will enabling the grid change my photos?
The grid is only an overlay; it won’t change exposure, color, or image quality. It helps you compose better shots while shooting.
Does the grid work in video mode too?
Yes. The grid appears in both photo and video modes in the Camera app when enabled in Settings.
Can I change the grid style in the default Camera app?
No. The default Camera app only offers the rule-of-thirds grid. Use third-party apps for other grid styles.
My grid disappears sometimes. What should I do?
Restart the Camera app and your iPhone, confirm the Grid setting is on, and update iOS. Check for device management profiles that may restrict settings.
Conclusion
Mastering how to enable grid on iPhone Camera is a quick, practical step that improves composition and reduces editing time. Turn the grid on, practice framing with the rule of thirds, and adopt simple habits to make better photos consistently. Try enabling the grid on your next shoot and compare the results—then share your progress or ask questions below to keep improving.

Everett Ashford is a tech reviewer at mytechgrid.com specializing in SSDs, cameras, TVs, earbuds, headphones, and other consumer electronics. He provides honest, data-driven reviews based on hands-on testing and real-world performance analysis. Everett simplifies complex tech details to help readers make smart, confident buying decisions.