Check partitions, update firmware/drivers, run manufacturer tools, or reinitialize the SSD to fix capacity errors.
I’ve spent years fixing drives for friends and clients, so I know the frustration when an SSD shows the wrong storage capacity. This guide dives deep into why an SSD shows less (or more) space than it should and walks you through clear, practical steps to fix it. You’ll get easy-to-follow checks, command-line and GUI fixes for Windows, macOS, and Linux, plus prevention tips and real-life troubleshooting lessons from my experience. Read on to resolve the issue confidently and safely.

Why an SSD shows the wrong storage capacity
An SSD can report the wrong capacity for several reasons. Common causes include hidden or leftover partitions, incorrect partition tables, firmware bugs, counterfeit drives that misreport size, and OS or driver issues. Sometimes tools report binary vs decimal units differently, causing apparent mismatches.
Key reasons at a glance:
- Hidden or unallocated partitions consuming space
- Wrong partition table (MBR vs GPT) or corrupted table
- File system metadata occupying reported space
- Firmware bugs or outdated SSD controller drivers
- Counterfeit or fake SSDs that misreport capacity
- Over-provisioning reserved by the manufacturer
- OS reporting differences: decimal (GB) vs binary (GiB)
Understanding the likely cause is the first step to fixing an SSD showing wrong storage capacity. Below we go step-by-step, platform by platform, and include tools and checks you can run.
Quick checklist before you start
Use this checklist to avoid data loss and to narrow down the problem quickly.
- Backup important data before making changes.
- Note the drive model and serial from BIOS or the drive label.
- Check the advertised capacity from the manufacturer.
- Verify the capacity in BIOS/UEFI to rule out OS issues.
- Confirm cable, port, or adapter health by swapping ports.
- Check for firmware updates from the SSD maker.
Run these before major actions. A good backup prevents regret.
Step-by-step fixes for Windows, macOS, and Linux
Follow the platform-specific steps below. I list easy commands and GUI steps so you can choose what fits your comfort level.
Windows
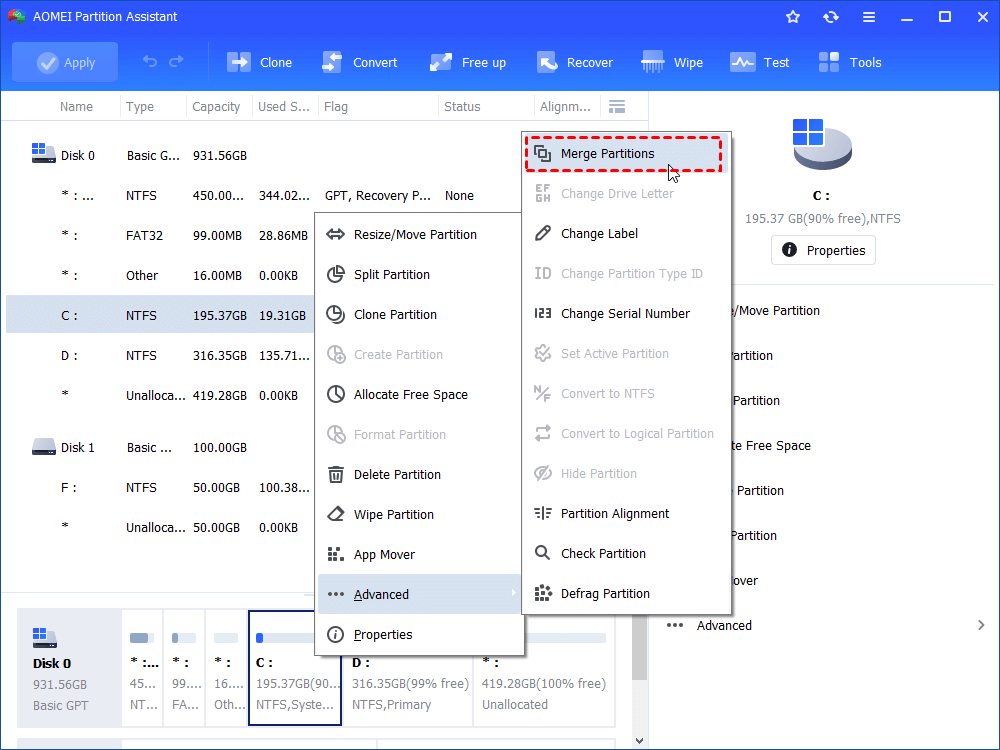
- Open Disk Management (right-click Start > Disk Management). Check if space is shown as unallocated.
- Delete stray or incorrect partitions only after backing up. Right-click partition > Delete Volume to free space.
- If Disk Management shows less capacity than expected, run diskpart:
- Open Command Prompt as admin.
- Run: diskpart
- list disk
- select disk X (replace X)
- clean (this removes partitions; backup first)
- create partition primary
- format fs=ntfs quick
- assign
- If diskpart shows capacity lower than advertised, check for counterfeit drive tools and run a manufacturer utility.
- Update storage controller drivers and Windows updates. Reboot and recheck.
macOS
- Open Disk Utility. Select the SSD and choose View > Show All Devices.
- Erase and reformat the drive using APFS or Mac OS Extended (Journaled) as needed.
- Use Terminal to check raw capacity:
- diskutil list
- diskutil eraseDisk APFS SSDName diskX
- If macOS shows less than advertised, check for firmware updates and verify with the vendor utility.
Linux
- Use lsblk and fdisk -l to inspect raw and partition sizes.
- To reinitialize:
- sudo wipefs -a /dev/sdX (removes signatures)
- sudo parted /dev/sdX mklabel gpt
- sudo parted -a optimal /dev/sdX mkpart primary 0% 100%
- sudo mkfs.ext4 /dev/sdX1
- Use hdparm -I /dev/sdX to check drive identity and capacity from the firmware.
- If fdisk shows a different size than hdparm, the issue may be the partition table or fake reporting.
Always confirm the drive model and serial reported by the OS match the physical label. Counterfeit SSDs often misreport model names and capacity.

Tools and commands to diagnose and fix capacity issues
Use manufacturer tools first. They often include firmware updates, self-tests, and secure-erase functions.
Recommended utilities and commands:
- Manufacturer utilities (Samsung Magician, Crucial Storage Executive, Kingston SSD Manager)
- CrystalDiskInfo for health and firmware status (Windows)
- hdparm for low-level info and secure erase (Linux)
- smartctl (smartmontools) for SMART data and tests
- diskpart (Windows), diskutil (macOS), parted/fdisk/lsblk (Linux)
- bench and verify tools to detect counterfeit drives or degraded performance
Steps to check with tools:
- Run a SMART test for errors.
- Use the vendor tool to check firmware version and update if available.
- Run secure erase from the vendor tool to clear firmware-level data if partitions are corrupted.
- For suspected counterfeit drives, run a full write/verify test to validate real capacity.
Detecting and handling counterfeit SSDs
Counterfeit drives are a real problem. They may show the advertised size but only store a fraction. Signs include the drive reporting the advertised capacity but failing when you fill it.
How to spot them:
- Performance plummets when near "full" capacity.
- The model reported by the OS differs slightly from the vendor label.
- Manufacturer utilities do not recognize the drive or report odd firmware.
- Full-drive write and verify fails or shows repeated data corruption.
If you suspect a counterfeit:
- Stop using the drive for important data.
- Test with a full-write verifier tool to confirm unusable capacity.
- Contact the seller and vendor for replacement or RMA if genuine.
- Report the seller if the drive is confirmed fake.
Personal experience and common mistakes to avoid
I once fixed a client’s laptop where the SSD showed half the capacity. The issue was a leftover recovery partition cloned incorrectly during migration. I cleaned the partition table and restored from backup. Lesson learned: always inspect partition tables after cloning and confirm partition sizes before wiping.
Common mistakes I advise avoiding:
- Rushing to reformat without a backup.
- Running secure erase on a drive with failing NAND—this can speed failure.
- Assuming firmware updates are safe—read release notes first.
- Buying cheap SSDs from unknown marketplaces without verifying serial numbers.
Preventive tips and best practices
Follow these steps to avoid future capacity surprises.
- Buy SSDs from authorized retailers. Keep receipts and serial numbers.
- Update firmware and drivers periodically.
- Use manufacturer tools for secure erase and maintenance.
- Check partitioning after cloning or system migrations.
- Keep backups and test restores so you can act if capacity drops.
These simple habits save time and risk.
PAA-style quick questions
Q: Will reformatting fix an SSD that shows less space?
A: Reformatting can fix partition-level issues but won’t fix counterfeit reporting or hardware-level misreporting. Backup first.
Q: Can firmware updates change reported capacity?
A: Yes. Firmware can fix controller bugs that misreport capacity. Always use vendor firmware utilities.
Q: Is unallocated space the same as lost space?
A: No. Unallocated space is unused and recoverable. Lost space often means hidden partitions or corrupted tables.
Frequently Asked Questions of how to fix ssd showing wrong storage capacity
Why does my SSD show less capacity than advertised?
Often it’s caused by hidden partitions, a corrupted partition table, over-provisioning, or firmware reporting differences. Check BIOS and run a partition tool to see unallocated space.
Will secure erase restore the full capacity?
Secure erase can clear controller mappings and corrupted metadata and may restore capacity. It won’t fix a counterfeit or a physically failing drive.
How do I tell if my SSD is counterfeit?
Run a full-write verify test and compare the reported model, serial, and firmware with the vendor’s records. Erratic performance when nearly full is a strong clue.
Can Windows Disk Management fix the wrong capacity?
Disk Management can resolve partition and formatting issues but won’t fix firmware bugs or counterfeit reporting. Use diskpart or vendor tools for deeper fixes.
Should I update SSD firmware when capacity looks wrong?
Yes, if the vendor has a firmware update that addresses reporting or controller bugs. Read release notes and backup data first.
Conclusion
Fixing an SSD showing wrong storage capacity usually follows a clear path: back up, identify the root cause (partitions, firmware, counterfeit, or OS reporting), use platform-appropriate tools, and proceed with safe fixes like partition cleanup, firmware updates, or secure erase. If the drive still reports the wrong size after those steps, contact the seller or manufacturer for RMA.
Take action now: back up your data, run a quick diagnostic, and use the steps above to restore correct capacity. If this guide helped, leave a comment or share your issue—I’ll help troubleshoot further.

Everett Ashford is a tech reviewer at mytechgrid.com specializing in SSDs, cameras, TVs, earbuds, headphones, and other consumer electronics. He provides honest, data-driven reviews based on hands-on testing and real-world performance analysis. Everett simplifies complex tech details to help readers make smart, confident buying decisions.