You can move Marvel Rivals to an SSD using your game launcher's built-in features or a simple copy-and-paste method. As a dedicated PC gamer, I understand that in a fast-paced hero shooter like Marvel Rivals, loading screens are the enemy. The precious seconds spent waiting to join a match or load into the character select screen can disrupt your flow. Knowing how to move Marvel Rivals to an SSD isn't just a technical task; it's a strategic upgrade for your gaming rig. This comprehensive guide will walk you through several proven methods, ensuring you can complete the transfer quickly and get back into the action with a noticeable performance boost.
Why You Should Move Marvel Rivals to an SSD
The difference between playing a game on a traditional Hard Disk Drive (HDD) versus a Solid-State Drive (SSD) is like night and day. HDDs use spinning platters and a mechanical arm to read data, which is a relatively slow process. SSDs, on the other hand, use flash memory, allowing them to access data almost instantly. This speed advantage translates directly into a better gaming experience.
When you move Marvel Rivals to an SSD, you will notice several key improvements. First, loading times will be drastically reduced. You'll be one of the first players to load into the map, giving you a moment to strategize before the action begins. Second, texture streaming becomes much smoother. In the heat of battle, an SSD ensures that character models, environmental details, and ability effects load without delay, preventing distracting texture pop-in or stuttering. From my own experience, moving competitive shooters to an SSD was the single best upgrade I made for reducing frustration and improving consistency.
Before You Begin: Pre-Move Checklist
Before you start the process of how to move Marvel Rivals to an SSD, a little preparation can ensure everything goes smoothly. Taking a few minutes to check these items will prevent common headaches and get you back to gaming faster.
- Check Your SSD Space: Ensure your SSD has enough free space to accommodate the full game. Check the required disk space for Marvel Rivals on its store page and add an extra 20-30 GB for future updates and patches.
- Confirm SSD Installation: Make sure your SSD is properly installed and recognized by your operating system. You should see it as a drive letter (e.g., D: or E:) in your File Explorer.
- Backup Your Game Saves (Optional): Most modern games, including Marvel Rivals, use cloud saves tied to your account. However, it never hurts to be cautious. If the game stores local configuration files, you might consider backing them up, though it's rarely necessary for a simple move.

Method 1: Using the Steam Client to Move Marvel Rivals
If you have Marvel Rivals on Steam, you are in luck. Steam has a built-in feature designed specifically for moving games between storage drives, making the process incredibly simple and safe. This is the most recommended method for Steam users looking into how to move Marvel Rivals to an SSD.
- Open Your Steam Client: Launch the Steam application on your PC.
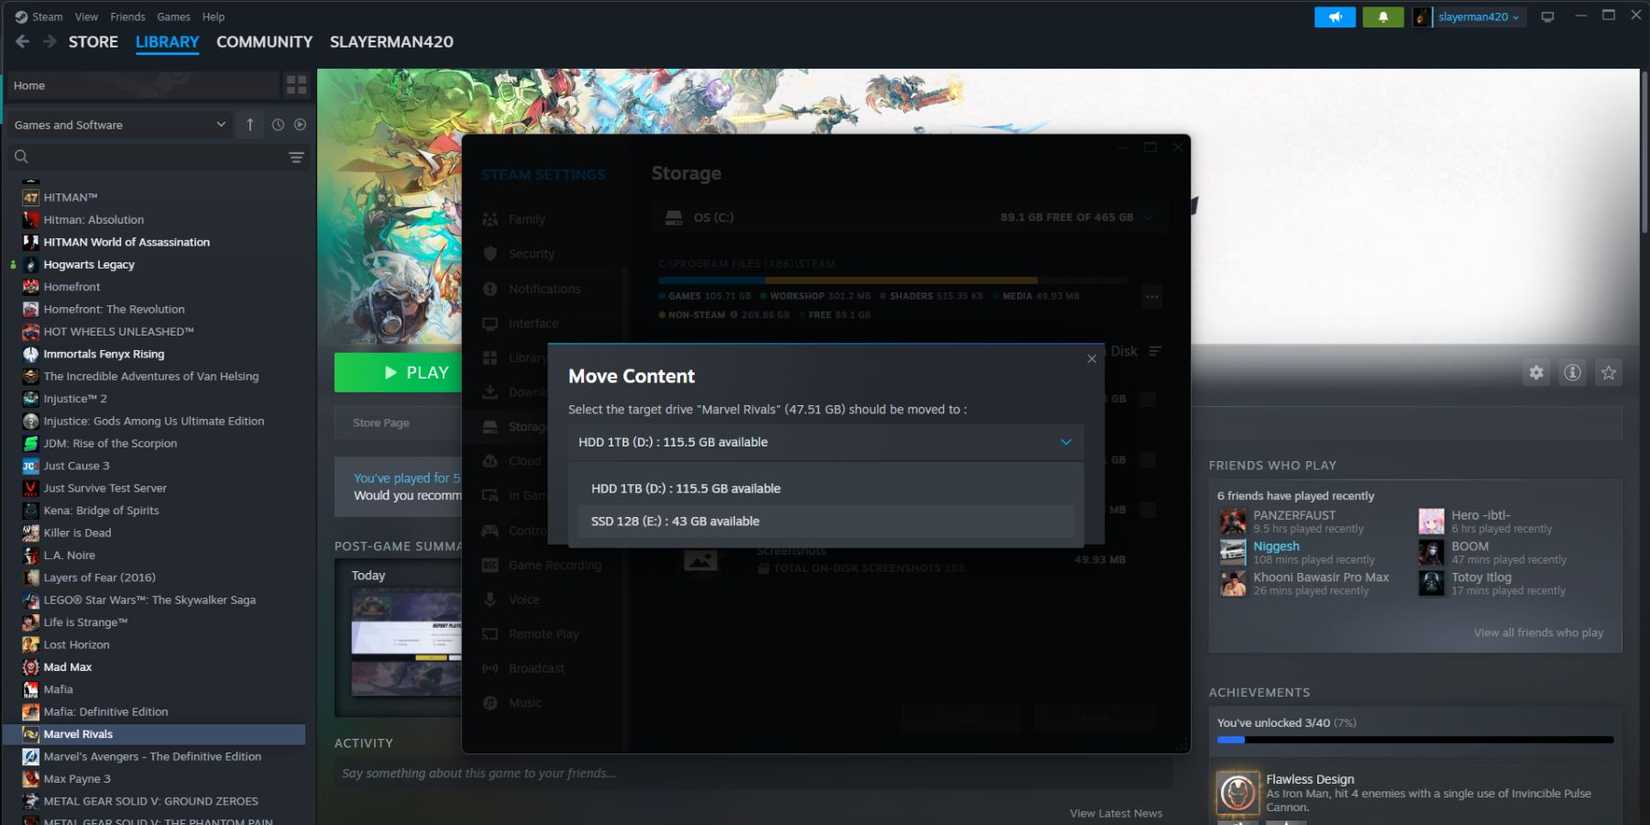
- Create a New Steam Library Folder: In the top-left corner, click on "Steam," then "Settings." Go to the "Storage" tab. Here, you'll see your current drive. Click the "+" button at the top of the window and select your SSD to create a new library folder on it.
- Find Marvel Rivals in Your Library: Navigate back to your main Steam Library. Find Marvel Rivals, right-click on it, and select "Properties."
- Initiate the Move: In the Properties window, go to the "Installed Files" tab. You will see an option that says "Move Install Folder." Click it.
- Select Your SSD: A small window will pop up asking you to choose the new library location. Select the Steam Library folder you just created on your SSD and click "Move." Steam will handle the entire transfer process for you.
Method 2: Moving Marvel Rivals on Other Launchers
If you're playing Marvel Rivals through a different launcher, like the Epic Games Store or another client, the process is often more manual but still very manageable. This method essentially involves copying the files and then telling the launcher where to find them, which avoids a full re-download.
- Copy the Game Folder: Navigate to where Marvel Rivals is currently installed on your HDD. Copy the entire game folder.
- Paste to Your SSD: Go to your SSD and create a new folder where you want to store the game. Paste the copied game folder into this new location.
- Redirect the Launcher: The next step varies slightly between launchers. A common method is to "uninstall" the game from the launcher (this just removes the launcher's record of it, not the files you moved). Then, begin the installation process again, but when it asks for an install location, point it to the folder on your SSD where you just pasted the files.
- Verify the Files: The launcher should recognize that the game files are already there. It will initiate a "Verifying" process instead of downloading everything. Once complete, the game will be ready to launch from its new home on your SSD.

Method 3: Using Third-Party Software for a Seamless Transfer
For those who prefer a more automated solution, several third-party PC migration tools are available. These applications are designed to move programs and games from one drive to another without any manual file copying or registry tweaks. Think of this software as a professional moving service for your digital data.
These tools typically work by having you select the application you want to move (Marvel Rivals) and the destination drive (your SSD). The software then handles the entire process, including copying the files and updating all necessary system paths to ensure the game launcher can find and run the game without any issues. While often not free, this method for how to move Marvel Rivals to an SSD is the most hands-off and is great for users who are not comfortable with manual file management.

Troubleshooting Common Issues After the Move
Even with careful planning, you might encounter a small hiccup. Fortunately, most post-move issues are easy to fix. Here are a few common problems and their solutions.
- The Game Won't Launch: The most common fix for this is to use your launcher's built-in file verification tool. For Steam, right-click the game, go to Properties > Installed Files, and click "Verify integrity of game files." Most launchers have a similar feature that will scan for and repair any corrupted or missing files.
- The Launcher Can't Find the Game: This usually happens with the manual copy-paste method if the launcher wasn't properly redirected. Repeating steps 3 and 4 from Method 2—telling the launcher to "install" to the new location—will almost always solve this.
- Slower Than Expected Performance: If the game feels slow even after the move, ensure your SSD is in good health and that TRIM is enabled in your operating system. TRIM is a command that helps an SSD manage empty space efficiently, and it is crucial for maintaining performance over time.
Frequently Asked Questions of how to move marvel rivals to ssd
Will moving Marvel Rivals to an SSD improve my FPS?
Moving to an SSD will not directly increase your frames per second (FPS), as that is primarily determined by your GPU and CPU. However, it can significantly reduce in-game stuttering and texture loading issues, leading to a much smoother and more stable gameplay experience.
How much space do I need on my SSD for Marvel Rivals?
You should always check the game's official system requirements for the exact file size. As a best practice, ensure you have at least 20-30 GB of extra space on your SSD beyond the game's size to account for future updates and to maintain optimal drive performance.
Do I need to reinstall the game completely to move it?
No, you do not need to re-download the entire game. The methods outlined in this guide are designed to move your existing game files, saving you significant time and bandwidth.
Is it safe to move game files manually?
Yes, it is perfectly safe as long as you follow the steps carefully. Using your launcher's built-in move feature, if available, is the most foolproof method, but the manual copy-and-paste technique also works reliably when done correctly.
Can I move Marvel Rivals back to my HDD?
Absolutely. The process is completely reversible. You can use the same methods described here to move the game files from your SSD back to an HDD at any time if you need to free up space.
Conclusion
Upgrading your gaming experience doesn't always require buying a new graphics card or processor. Making the simple switch to an SSD for a demanding, fast-paced game is one of the most impactful and cost-effective improvements you can make. By following the steps above, you now know how to move Marvel Rivals to an SSD, unlocking faster load times and smoother, more responsive gameplay.
Don't let sluggish hardware hold you back from climbing the ranks. Take a few minutes to transfer the game files today and feel the immediate difference in performance. If this guide helped you, feel free to share your experience in the comments below

Everett Ashford is a tech reviewer at mytechgrid.com specializing in SSDs, cameras, TVs, earbuds, headphones, and other consumer electronics. He provides honest, data-driven reviews based on hands-on testing and real-world performance analysis. Everett simplifies complex tech details to help readers make smart, confident buying decisions.