Use needle-nose tweezers, a thin pin with a dab of superglue, or a small magnet to pull it out.
I’ve removed countless stuck plugs from phones and laptops, and this guide shows clear, safe steps for how to get broken headphone jack out. You’ll learn why jacks break, which method fits your device, tools to use, and how to avoid harm. Read on for step-by-step techniques, real-life tips, troubleshooting, and when to stop and get professional help.

Why headphone plugs break and what that means for removal
Broken headphone plugs usually shear off when pulled while twisted or when the port is dirty. Metal sleeves may stay in the socket while the tip falls out. Tiny clips inside the jack can grab the plug and hold it tight. Knowing this helps you pick a safe method for how to get broken headphone jack out.
Most modern jacks are shallow and fragile. A careless tug can push fragments deeper or damage contacts. When you try to remove a broken plug, you are repairing two things at once: the stuck piece and the port’s integrity. I’ve seen devices ruined by blunt force. Work slowly and choose the right tool.
Safety first: precautions before attempting removal
Turn the device off and remove the battery if possible. This avoids short circuits and accidental power-on while you work.
Work in good light on a soft, flat surface. Small parts drop easily; a tray helps you keep them. Use eye protection. Safety is simple but often skipped when people rush to learn how to get broken headphone jack out.
If you are unsure or the device is expensive, stop and consult a repair shop. The risk of permanent damage is real. I once made a minor scratch that caused intermittent audio because I rushed. That lesson matters.

Tools you’ll need
Gather small, precise tools. The right tool makes removal easy and safe.
- Needle-nose tweezers with a fine tip
- Straight pin, sewing needle, or thumbtack
- Superglue (cyanoacrylate) and a wooden toothpick or thin wire
- Small cylindrical magnet or rare-earth magnet
- Cotton swabs and isopropyl alcohol (90%+)
- Flashlight or magnifying glass
- Compressed air can or small vacuum with narrow nozzle
- Soldering iron (only if you know how to use it safely)
- A steady hand and patience
Label the tools and check that tweezers do not slip. If you don’t have magnets or tweezers, avoid forcing things. These are the basics for how to get broken headphone jack out without damage.

Step-by-step methods to remove a broken headphone jack
Below are tested methods ranked by safety and ease. Try gentler methods first. Repeat the focus phrase where useful — it helps you stay focused on how to get broken headphone jack out.
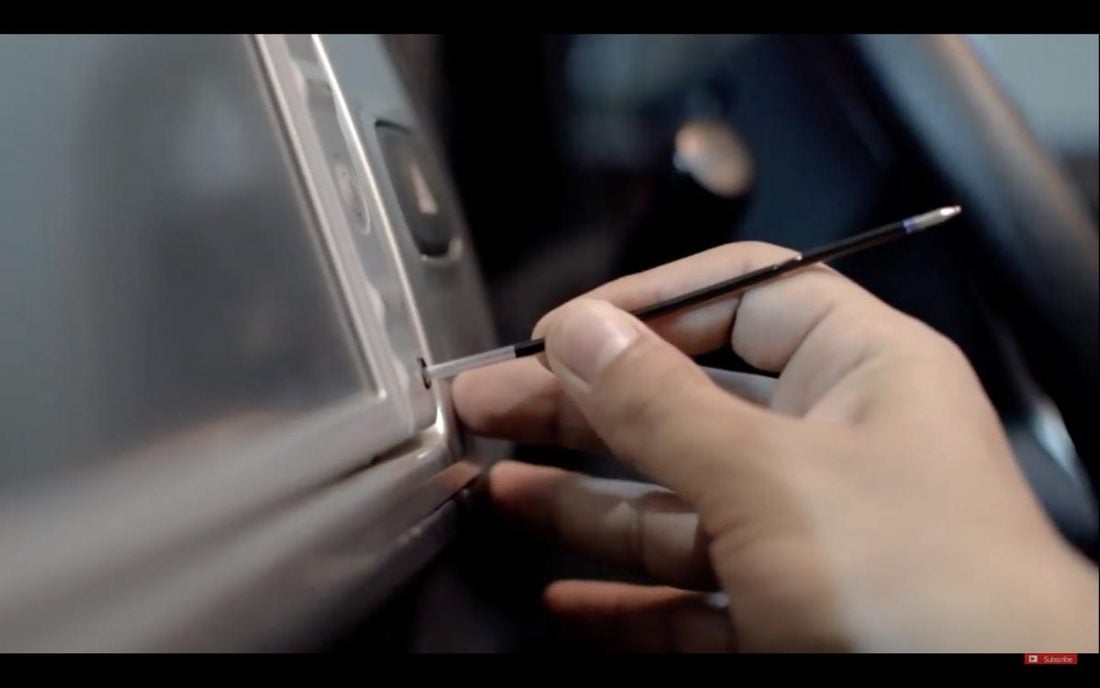
- Tweezers or small pliers (best first try)
- Turn off the device and angle it so you can see the broken piece.
- Use a bright light and tweezers to grip the rim of the metal sleeve.
- Pull straight out with steady pressure. Do not twist violently.
When the sleeve is exposed and accessible, this is fast and low risk.

- Compressed air and vacuum (good if debris holds it)
- Blow compressed air into the jack to dislodge dust.
- Use a small vacuum tip to pull the piece out.
- Combine with tweezers if the part loosens.
This works when lint or dirt is the main cause of the jam.

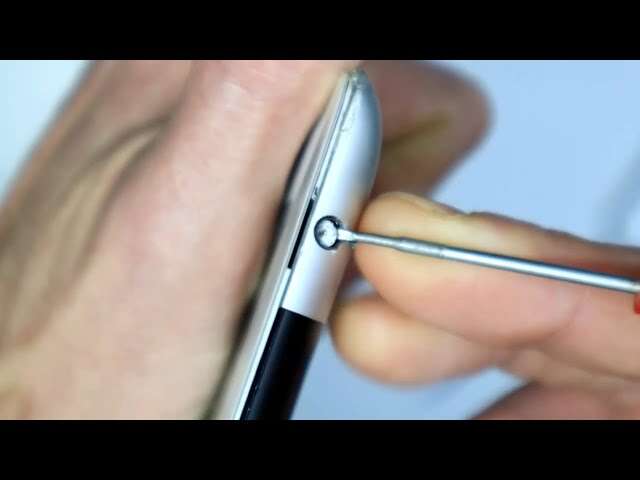
- Superglue on a pin or toothpick (very effective, use carefully)
- Put a tiny drop of superglue on the end of a pin or thin wooden toothpick.
- Carefully touch the glue to the broken plug’s tip. Avoid contact with the jack walls.
- Wait 10–20 seconds until the glue sets light but not fully cured.
- Pull out slowly in a straight line.
Only use the smallest glue amount. Too much glue will bond to the jack. Try this method when a portion of the plug is centered and reachable. I’ve used this trick successfully on a phone twice, but I always practice on scrap parts first.

- Magnet method (best for steel-sleeved plugs)
- Use a small, strong magnet near the port while tilting the device.
- Gently pull as the magnet attracts the metal sleeve.
- Combine with tweezers once it moves.
Magnets work well if the broken portion is ferrous. Do not use a magnet with hard drives or some sensors nearby.
- Push-through and remove from the opposite side (for devices with removable panel)
- If your device has a back panel, open it following manufacturer instructions.
- From inside, push the broken piece out toward the outside.
- Catch it with tweezers.
Only do this if the device is designed for access. Opening sealed units voids warranty and risks damage.
- Soldering iron trick (advanced; do not attempt if inexperienced)
- Heat a thin rod and touch it briefly to the metal sleeve to melt a small bond or stick.
- Pull out immediately with pliers.
This is high risk and can ruin the jack or nearby components. Use only if you have good soldering skills.
- Dental floss or string loop (gentle alternative)
- Create a small loop using strong dental floss or thin thread.
- Slip the loop into the jack and snag the piece.
- Pull straight out.
This works for partial pieces with an edge to catch. It is low risk and worth trying early.
After removal: cleaning, testing, and repair tips
Clean the jack with a cotton swab dampened with isopropyl alcohol. Let it dry fully. This removes grease and small debris left from the broken plug.
Test with a cheap pair of headphones before reusing expensive gear. Wiggle the plug gently to check for intermittent contact. If audio is scratchy or cuts out, you may have damaged the contact pins.
If contacts are bent or loose, get professional repair. Trying to bend pins yourself can make the problem worse. I once fixed a port by gently pressing contacts with a small plastic tool, but only after I had practiced with spare parts.
Preventive measures to avoid future breakages
Treat cables gently and unplug by the plug head. Avoid tugging wires. Keep pockets lint-free by storing earbuds in a case.
Use adapters that lock or retract when not in use. Regularly clean the jack with compressed air to avoid lint buildup. Good habits reduce the chance you’ll need to figure out how to get broken headphone jack out again.
When to seek professional repair or replacement
If the jack is deep and invisible. If the device is under warranty. If removal attempts fail after two methods. If you see internal damage, loose contacts, or persistent audio issues.
Professional shops have specialty tools like extraction hooks and microscopes. They can remove the piece without harming the PCB. I recommend a shop when the device is expensive or irreplaceable.
Troubleshooting: common problems after removal
If audio is intermittent, try cleaning the jack and testing different headphones. If sound is low, check software volume and device audio settings.
If the jack wobbles, it may need soldering or a new jack assembly. If you hear no sound from that port, test other outputs to rule out software. These checks help you know whether how to get broken headphone jack out solved the problem or if more repair is needed.
Frequently Asked Questions of how to get broken headphone jack out
What is the safest way to remove a broken headphone jack?
Use fine needle-nose tweezers to grip and pull the exposed sleeve straight out. Stop if you feel resistance and try a gentler method like compressed air or a magnet.
Can I use superglue to pull out a broken jack?
Yes, a tiny dab on a pin can work well, but use extreme care to avoid gluing the jack itself. Practice on scrap metal first.
Will a magnet work on all headphone jacks?
Only if the broken part is made of ferrous metal. Some plugs use non-magnetic brass or plated metals that magnets won’t attract.
What if the broken jack is deep and invisible?
Stop and consult a repair shop. Opening the device or pushing blindly risks further damage.
Can I fix a damaged jack myself after removal?
Minor contact bends can sometimes be realigned, but most board-level repairs need a technician. If you lack soldering skills, professional service is safer.
Conclusion
You can often remove a broken headphone jack safely with the right tools and a calm approach. Start with the least invasive methods—tweezers, compressed air, or a magnet—and try superglue or floss only if needed. Know when to stop and call a pro to protect your device.
Take action: pick the method that fits your device, prepare your tools, and work slowly. If this guide helped, try these steps carefully or share your experience in the comments.

Everett Ashford is a tech reviewer at mytechgrid.com specializing in SSDs, cameras, TVs, earbuds, headphones, and other consumer electronics. He provides honest, data-driven reviews based on hands-on testing and real-world performance analysis. Everett simplifies complex tech details to help readers make smart, confident buying decisions.