Match 2D footage to a 3D scene by tracking points, solving camera motion, and refining the solve.
I have spent years tracking cameras for commercials, short films, and VR projects. This guide teaches how to do camera tracking step by step. I explain the tools, the shoot choices you must make, and the practical fixes that save hours in post. Read on to learn clear, tested methods to get reliable camera solves and integrate 3D elements into live footage.
![]()
Why camera tracking matters and the core idea
Camera tracking helps you place 3D objects or effects into moving footage. When you know the camera motion and scene geometry, you can match virtual elements perfectly. Learning how to do camera tracking reduces compositing errors and speeds up post workflows.
Most productions need accurate camera solves to avoid sliding elements or wrong parallax. Whether you are compositing a CGI car, placing a sign in a shot, or stabilizing footage, knowing how to do camera tracking is essential. The steps are practical. They follow a predictable workflow from prep to final render.

Core workflow: an overview of how to do camera tracking
Follow a clear pipeline. Each step builds on the last. This keeps solves consistent and fast.
- Plan the tracking during pre-production. This saves time later.
- Shoot with tracking-friendly techniques. Good footage makes tracking easy.
- Choose and prepare software. Tools vary but the steps are similar.
- Track features, solve the camera, and refine the solve with constraints.
- Export camera and scene data to your compositor or 3D app.
This overview shows how to do camera tracking from start to finish. The sections below expand each phase with hands-on tips and examples.

Pre-production: planning to make tracking easy
Good tracking starts before the camera rolls. Plan the shot with tracking in mind.
- Markers and set dressing. Add high-contrast, non-repeating markers if the scene lacks texture.
- Lens and focal info. Log focal length, sensor size, and any lens data you can get.
- Reference objects. Place a known-scale object to help set scale in the solve.
- Camera rig notes. Record tripod type, handheld info, and any lens distortion settings.
From personal experience, taking two extra photos of the empty set with a ruler saved me hours. These small steps make how to do camera tracking far less painful later.

Shooting tips: capture footage for reliable solves
How you shoot directly affects the track. Follow these practical tips.
- Keep exposure stable. Sudden changes make feature tracking fail.
- Avoid motion blur when possible. Faster shutter helps, but balance look.
- Capture extra lead and tail frames. More frames allow better stabilization and solving.
- Use natural parallax. Lateral movement helps derive depth better than pure zooms.
- Add a few distinct markers. If the scene is plain, markers give reliable features.
I once tracked a long handheld corridor shot. Adding a few taped marks on the floor and logging the lens made the solve perfect. That win came from planning how to do camera tracking at the shoot stage.
![]()
Tools and software choices
There are many options for how to do camera tracking. Choose one that fits your budget and pipeline.
- Dedicated match-move apps. They specialize in automated and manual tracking.
- NLE and FX software with built-in trackers. Good for simpler shots and compositing.
- 3D packages that include camera solvers. Useful when you need full scene rebuilds.
- Open-source tools. Great for learning and low-budget projects.
Pick software based on shot complexity. For complex, long takes, use a robust match-move app. For simple inserts, a compositing tracker may suffice.

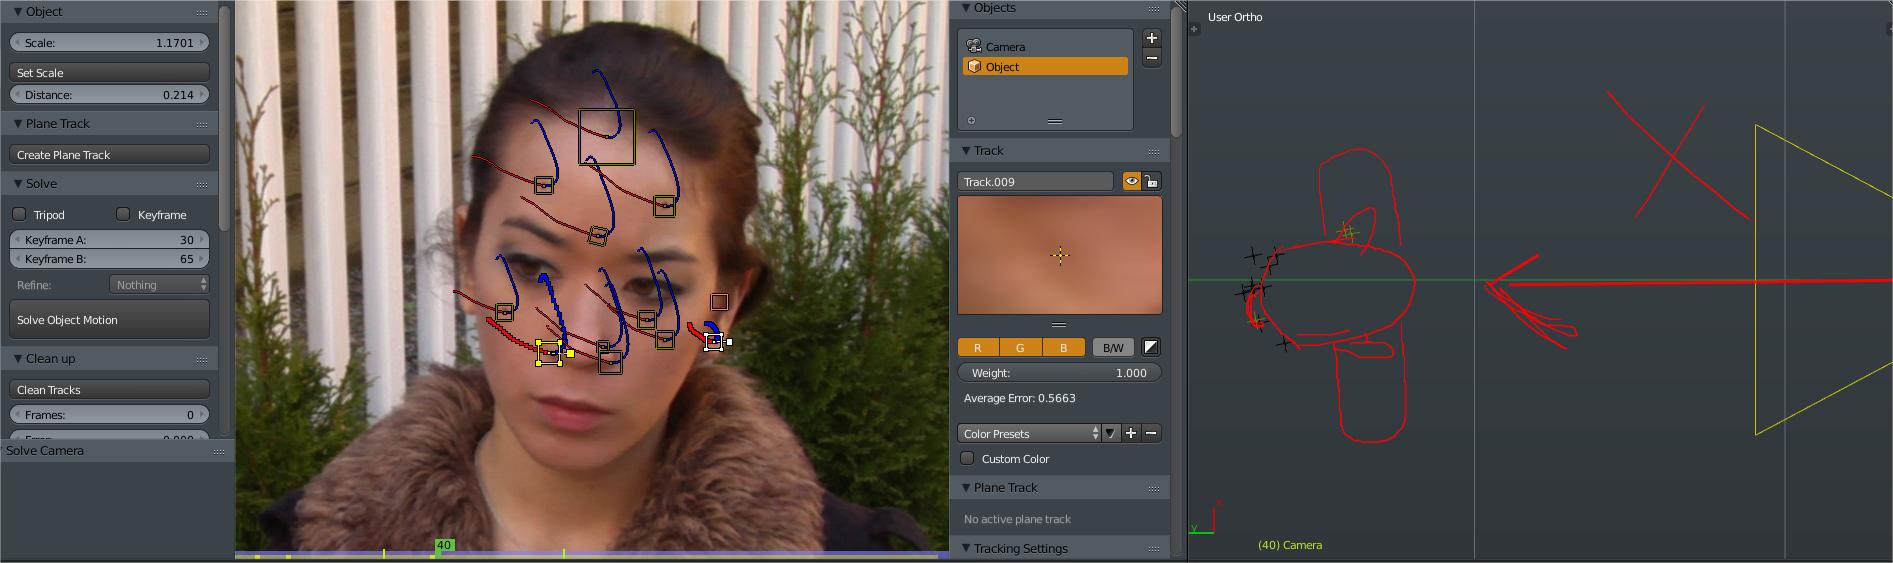
Step-by-step tracking process in software
These are the core actions you will repeat when you learn how to do camera tracking.
- Import footage and set project frame rate and resolution.
- Preprocess: stabilize flicker, correct rolling shutter, and undistort lens.
- Auto-track features across frames or place manual trackers on stable points.
- Solve camera motion from 2D tracks to a 3D camera. Check error metrics.
- Add constraints: fix ground plane, set a reference object, and lock horizon if needed.
- Refine by removing bad tracks and re-solving until reprojection error is acceptable.
- Export camera and point cloud to your 3D or compositing software.
Keep iterations small. Solving early and often helps you spot issues quickly when doing how to do camera tracking.
Common problems and practical fixes
Problems are normal. Here are common issues and how to solve them.
- Flicker or exposure changes. Normalize exposure or use a white balance pass.
- Rolling shutter distortion. Apply rolling shutter correction or use solvers that handle it.
- Repeating patterns. Add manual trackers on unique features or markers.
- Low texture areas. Project painted markers or use distant features.
- Scale ambiguity. Place a known-size prop or use ground constraints to set scale.
A mistake I made early on was trusting every auto-track. Manually removing bad points trimmed down reprojection error quickly. That taught me the value of cleaning tracks when learning how to do camera tracking.

Exporting, integrating, and rendering
Once you have a clean solve, integration is next. These steps keep results tight.
- Export camera, lens, and point cloud in formats compatible with your 3D app.
- Rebuild simple geometry using tracked points to catch occlusion and shadows.
- Light match: use on-set references and image-based lighting where possible.
- Composite using re-projected renders and final color matching.
Always test a short render before committing to a full-length render. Small preview renders help verify that your approach to how to do camera tracking works in the final composite.
Advanced techniques and pro tips
When you feel comfortable with the basics, these techniques improve realism.
- Use stereo or multi-camera solves for complex scenes.
- Combine manual and automatic tracks for best results.
- Bake camera animation into your 3D scene for complex animations.
- Use dense point clouds and photogrammetry for full scene reconstruction.
- Leverage GPU-accelerated solvers for faster iterations.
I once used a tight blend of manual tracks and photogrammetry to recreate a damaged set. That approach showed me how to do camera tracking at a higher level and maintain creative control.
Workflow checklist: quick guide to how to do camera tracking
Keep this checklist at hand on every shoot and edit session.
- Plan markers and log lens data.
- Capture clean, stable plates with extra frames.
- Preprocess footage before tracking.
- Track a mix of auto and manual points.
- Solve and review reprojection error.
- Constrain scale and ground plane.
- Export and test renders.
This checklist saves time and ensures you repeat proven steps when learning how to do camera tracking.
Frequently Asked Questions of how to do camera tracking
What is camera tracking and why should I learn it?
Camera tracking is finding camera motion and scene geometry from footage. Learning it lets you place 3D elements convincingly into live shots.
Which software is best for camera tracking?
The best tool depends on your needs and budget. Pick software that supports lens correction, rolling shutter fixes, and reliable exports.
How do I reduce reprojection error in a solve?
Remove bad tracks, add manual points on distinct features, and apply constraints such as ground or horizon. Iterating solves improves accuracy.
Can I track handheld footage reliably?
Yes. Use many features, stabilize extreme jitter first, and add unique markers where needed. Rolling shutter correction helps too.
How do I set the correct scale in a camera solve?
Include a known-size object in the scene or enter measured distances as constraints in the solver. That sets real-world scale.
What causes tracking to fail on uniform surfaces?
Uniform surfaces lack distinct features for trackers. Add markers, paint temporary texture, or use nearby features with depth.
Conclusion
You now have a practical, step-by-step path for how to do camera tracking. Start with good planning, shoot thoughtfully, and follow a consistent tracking pipeline. Test early and iterate often to catch problems quickly. Apply the checklist and tips above on your next project, and you will see better, faster camera solves. Try one tracked shot this week, share your result, and ask for feedback to keep improving.

Everett Ashford is a tech reviewer at mytechgrid.com specializing in SSDs, cameras, TVs, earbuds, headphones, and other consumer electronics. He provides honest, data-driven reviews based on hands-on testing and real-world performance analysis. Everett simplifies complex tech details to help readers make smart, confident buying decisions.