Most headphone jack issues can be fixed by cleaning, checking software, or replacing the port.
I’ve repaired dozens of devices with faulty jacks, from phones to laptops, and I’ll walk you through clear, safe steps on how to fix headphone jack problems. This guide blends hands-on tips, simple diagnostics, and repair paths so you can decide whether to DIY or seek a pro. Read on for practical fixes, tools to use, and real lessons I learned while repairing headphone jacks in the field.

Why headphone jacks fail
A headphone jack can stop working for many reasons. Common causes include dirt and lint buildup, a bent plug, loose internal solder joints, or software and driver issues. Physical wear from repeated plugs and pulls also weakens contacts over time.
Common failure modes
- Dirt or lint blocking the contact points, preventing a good connection.
- Bent or damaged plug that won’t seat fully.
- Internal switch or contact spring that has lost tension.
- Broken solder joints inside the device after drops or stress.
- Software, settings, or driver problems that disable audio output.
Knowing the cause helps you choose the right fix. If it’s dirty or a software setting, you can usually fix it yourself. If internal hardware is broken, replacement may be needed. How to fix headphone jack depends on diagnosing the real problem first.

Quick checklist: before you start
Do these quick checks to narrow the problem. This saves time and prevents unnecessary repairs.
- Test with multiple headphones to rule out a broken cable or plug.
- Try the headphones on another device to confirm they work.
- Inspect the jack and plug under good light for debris or damage.
- Reboot the device and check audio settings, volume, and mute.
- Check Bluetooth — audio may be routed elsewhere if wireless is paired.
If these steps don’t fix it, proceed to the hands-on cleaning and repair steps below. This process shows how to fix headphone jack issues step by step.

Step-by-step: how to fix headphone jack
These steps move from simple to more involved fixes. Follow them in order.
- Clean the jack safely
- Power off the device and unplug any cables.
- Use compressed air in short bursts to remove loose debris.
- Dampen a cotton swab with 90%+ isopropyl alcohol. Gently insert and rotate to lift grime. Do not soak the swab.
- Use a toothpick or wooden skewer to carefully remove trapped lint. Avoid metal tools that can short contacts.
- Check and straighten a bent plug
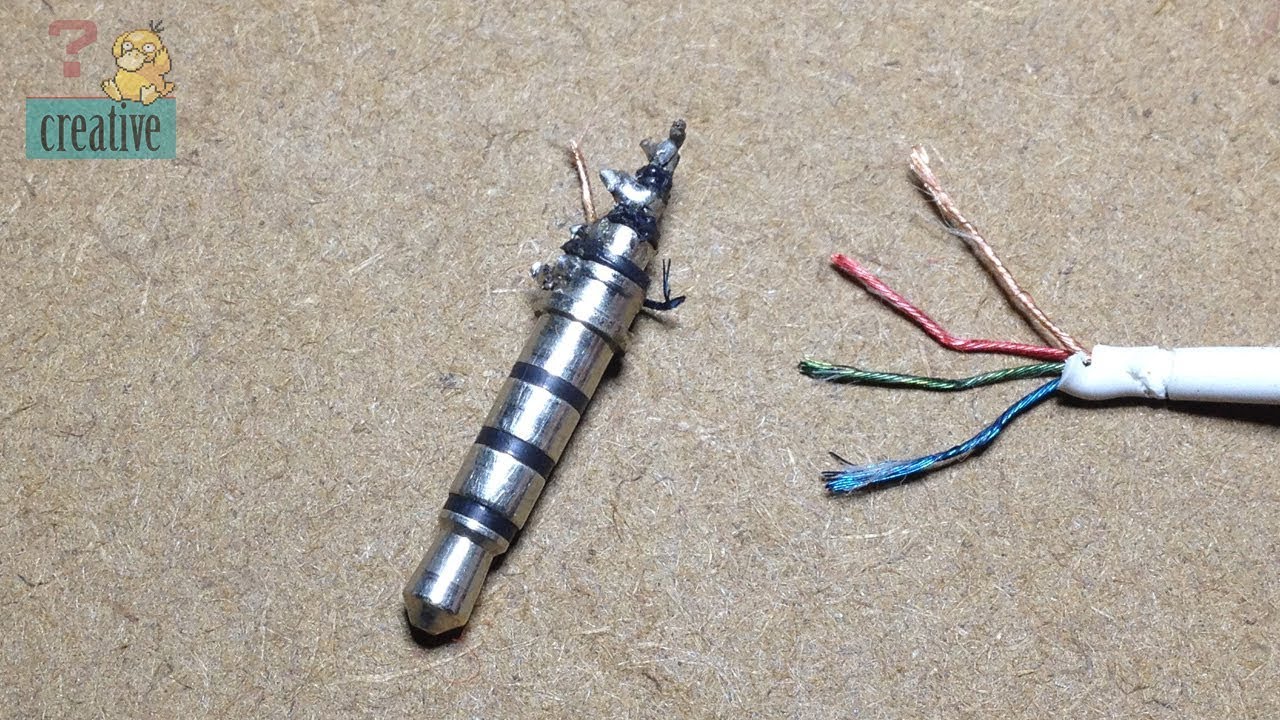
- Inspect the headphone plug. If it’s bent, a new cable or replacement plug is safer than trying to bend it back.
- If the plug has worn insulation, replace or tape it to prevent intermittent contact.
- Test audio settings and software
- On phones, check sound output and disable Bluetooth if active.
- On Windows, open sound settings and choose the correct output device. Update or reinstall audio drivers if needed.
- On macOS, check Sound preferences and the Audio MIDI Setup.
- Try contact realignment
– Sometimes the internal spring contact is pushed out of place. Gently insert and remove a plug a few times to nudge the contact back.
- Use a small non-metallic tool to gently lift the contact if you can access it safely. This is delicate and may not work on sealed devices.
- Use an external workaround
- If internal repair isn’t practical, use a USB-C, Lightning, or USB audio adapter as a temporary or permanent fix.
- Bluetooth adapters are another reliable option for wireless headphones.
These practical steps explain how to fix headphone jack problems from dirty ports to software causes. If the jack still fails, a deeper fix may be required.
Advanced repair: replacing the headphone jack
When cleaning and adjustment fail, replacing the jack is the next step. This is common on older laptops and DIY-friendly devices.
Tools and parts you’ll need
- Replacement jack specific to your device model.
- Small screwdrivers, spudger, tweezers.
- Soldering iron, solder, desoldering braid or pump (for soldered jacks).
- Multimeter for continuity checks.
- ESD mat or wrist strap to protect electronics.
Step-by-step replacement (high level)
- Power off and remove battery if possible.
- Open the device carefully using service guides or teardown videos for your model.
- Locate the headphone jack and inspect mounting and wiring.
- Desolder or unplug the old jack. Note orientation and connections.
- Install the new jack and solder or reconnect wires. Keep solder joints shiny and solid.
- Test audio before reassembling fully.
- Reassemble and test again.
Safety and tips
- If you’re new to soldering, practice on scrap boards first.
- Keep screws organized to avoid mistakes during reassembly.
- If the jack is part of a flex cable or board assembly, consider replacing the whole assembly rather than individual parts.
Replacing the jack is a reliable way to learn how to fix headphone jack issues when the port is physically damaged. If you’re uncomfortable, find a local repair shop.

Alternative fixes and temporary workarounds
Sometimes you need a fast, low-cost workaround. These options work while you decide on a repair.
- Use a USB audio adapter or dongle for immediate audio output.
- Try a Bluetooth audio transmitter or a Bluetooth headphone dongle.
- Repair the headphone plug: cut off the old plug and solder on a new one if you have the skills.
- Use speaker output or built-in speakers until you can repair the jack.
These alternatives let you continue using audio while you plan a permanent fix. They’re useful when learning how to fix headphone jack issues isn’t feasible right away.

Maintenance and prevention tips
Prevention is the easiest fix. Regular care keeps the jack working longer and cuts future repair time.
- Store devices in clean pockets and cases to reduce lint buildup.
- Use a dust plug for devices you carry in bags or pockets.
- Avoid yanking cables; unplug by the plug, not the cord.
- Clean the jack gently every few months with compressed air.
- Use quality cables and connectors to reduce wear on the jack.
Small habits prevent many common failures and reduce how often you must learn how to fix headphone jack problems.
Signs you should see a pro
Some issues require professional help. Watch for these red flags.
- Internal damage from drops or liquid exposure.
- Complex board-level soldering or micro-soldering required.
- Repeated failures after DIY repairs.
- Devices still under warranty — repair shop or manufacturer may be best.
If the device holds important data or is expensive, a pro is often the safest choice when learning how to fix headphone jack problems gets risky.

Frequently Asked Questions of how to fix headphone jack
Why do headphone jacks stop working suddenly?
Most sudden failures come from debris, a bad plug, or software routing. Check the jack, test with another headset, and verify audio settings first.
Can I clean a headphone jack with a paperclip?
Using a paperclip risks scraping contacts or causing short circuits. Use compressed air, a wooden or plastic pick, and isopropyl alcohol on a cotton swab instead.
Is it worth replacing the headphone jack on a phone?
For modern sealed phones, replacing the jack can be difficult and costly. Consider a USB or Bluetooth adapter unless the repair cost is reasonable or you have repair skills.
How long does a headphone jack repair take?
Simple cleaning takes 5–15 minutes. Replacing a jack can take 30–90 minutes depending on device complexity and your skill level.
Will software updates fix headphone jack problems?
Sometimes. Updates can restore audio routing or fix driver bugs. Always check software fixes before doing hardware work.
Conclusion
You can fix many headphone jack problems with careful diagnosis, safe cleaning, and simple adjustments. For deeper hardware issues, replacing the jack or using an external adapter are reliable options. Start with the quick checks and cleaning steps, and move toward replacement only when needed. Try the steps, apply the preventative tips, and if you’re unsure, seek a professional to avoid further damage. If this guide helped, leave a comment, share your repair story, or subscribe for more practical device-fix tutorials.

Everett Ashford is a tech reviewer at mytechgrid.com specializing in SSDs, cameras, TVs, earbuds, headphones, and other consumer electronics. He provides honest, data-driven reviews based on hands-on testing and real-world performance analysis. Everett simplifies complex tech details to help readers make smart, confident buying decisions.