Gently lift an edge, peel slowly with soft tools, then clean adhesive residue carefully.
I’ve removed dozens of camera lens protectors across phones, mirrorless cameras, and action cams, so I know what works and what to avoid. This guide explains how to remove camera lens protector safely, step by step. You’ll learn the right tools, simple techniques, common problems and fixes, and when to stop and get professional help. Read on and you’ll feel confident removing a protector without scratching glass or ruining coatings.
What a camera lens protector is and why you might remove it
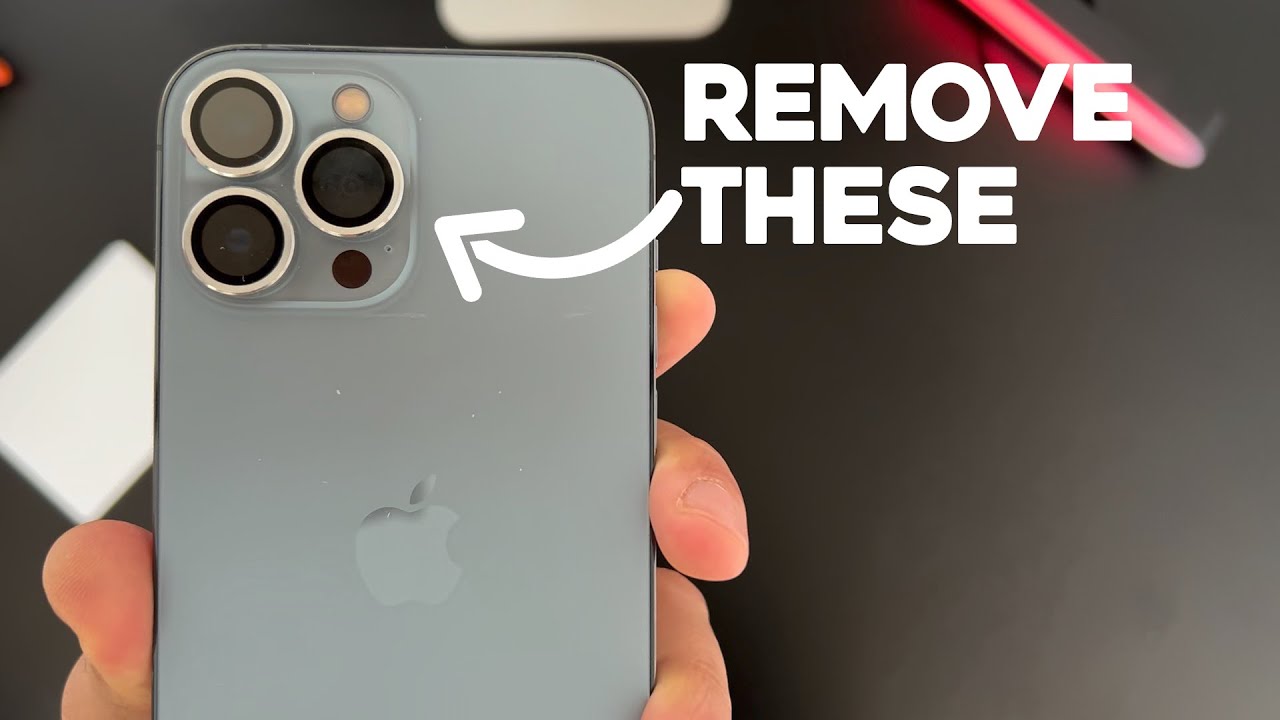
A camera lens protector is a thin film or tempered glass placed over a lens to prevent scratches, smudges, and impact damage. Protectors come as clear adhesive films, tempered-glass inserts, or snap-on caps. Removing a protector is often necessary when it is scratched, cloudy, misaligned, or interfering with autofocus and image quality.
Common reasons to remove a protector:
- It has scratches, bubbles, or dirt affecting photos.
- It’s peeling or collecting dust under the edge.
- You want to replace it with a better protector.
- It was installed incorrectly and needs repositioning.
Understanding the type of protector helps you choose the safest removal method. Soft film peels differently than rigid tempered glass. Knowing that distinction is key when learning how to remove camera lens protector.

Tools and materials you’ll need before starting
Prepare a calm, well-lit workspace. Gather these simple items:
- Soft microfiber cloth for cleaning.
- Plastic pick, toothpick, or fingernail for lifting an edge.
- Isopropyl alcohol 70% or higher for adhesive residue.
- Cotton swabs or lint-free wipes.
- Small piece of tape (clear packing tape works).
- Optional: hairdryer on low heat or a gel-based adhesive remover for very stubborn glue.
Using soft tools prevents scratching the lens coating. Avoid metal picks or razor blades unless you are experienced, because they can cut coatings or glass.

Step-by-step: how to remove camera lens protector safely
Follow these steps slowly. Rushing increases the risk of scratches or cracked protectors.
1. Inspect the protector and lens
Look for cracks, lifting corners, trapped debris, or lubricant residue. Work in natural light. If the protector is cracked, take extra care to avoid glass shards.
2. Clean the area around the protector
Blow away dust or use a dry microfiber cloth to remove loose particles. This reduces the chance of pushing grit under the edge while peeling.
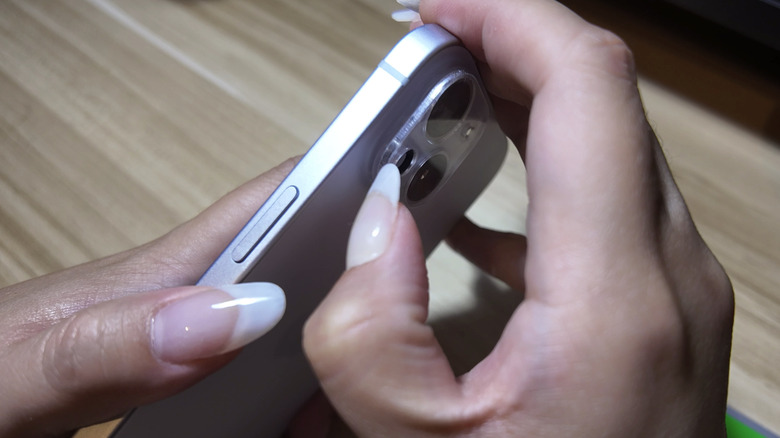
3. Loosen an edge gently
Use a fingernail, plastic pick, or a piece of tape folded sticky-side out to catch the protector edge. Lift slowly. If the protector resists, apply low heat for 5–10 seconds from a hairdryer held at least 6 inches away. Heat softens adhesive.
4. Peel back slowly and evenly
Pull at a low angle, not straight up. Keep steady pressure and go slow to avoid tearing or cracking. If you feel strong resistance, stop and reheat slightly.
5. Remove remaining adhesive
Dampen a cotton swab with isopropyl alcohol and roll it over adhesive residue. Let alcohol sit for a few seconds, then wipe away with a microfiber cloth. Repeat as needed.
6. Final clean and inspection
Wipe the lens with a clean microfiber cloth. Inspect for any small particles or streaks. If clear, consider applying a fresh protector or leaving the lens bare when appropriate.
These steps show how to remove camera lens protector without harming your lens. Practice on a spare protector if you can.
Troubleshooting common problems and fixes
You’ll likely meet one of these issues while learning how to remove camera lens protector. Here’s how to handle them.
Problem: Protector cracks during removal
- Stop peeling immediately.
- Use tape to pick up loose shards.
- Clean carefully with alcohol and a soft cloth to remove tiny glass pieces.
Problem: Stubborn adhesive won’t budge
- Warm the area gently with a hairdryer.
- Apply a small amount of isopropyl alcohol and let it soak before wiping.
- If adhesive persists, use a gel-based adhesive remover safe for optics, applied with a swab.
Problem: Dust trapped under replaced protector
- Remove the protector and work in a dust-free area.
- Use anti-static cloths and alignment tools to reapply.
Problem: Coating looks hazy after alcohol
- Use a lens-specific cleaner and a fresh microfiber cloth.
- Avoid abrasive cloths or paper towels that can scratch coatings.
PAA-style questions (short, direct answers)
Can household tape help lift the edge of a lens protector?
Yes. Fold tape sticky-side-out to create a small tab and lift the protector edge gently. Use low-tack tape to avoid leaving residue.
Is heat safe for removing a lens protector?
Low, indirect heat from a hairdryer is safe when used briefly and at a distance. Avoid overheating; coatings and adhesives can be damaged by excessive heat.
Will isopropyl alcohol damage lens coatings?
Isopropyl alcohol at 70% or higher is generally safe for adhesives but should be used sparingly and wiped off quickly to avoid prolonged exposure.

Safety, mistakes to avoid, and personal tips from experience
I’ve removed protectors from phone lenses and camera bodies for years. Here are lessons I learned the hard way.
Common mistakes to avoid:
- Rushing the peel and pulling straight up.
- Using metal tools or knives near the lens.
- Working in a dusty area.
- Applying excessive heat.
Personal tips that help:
- Use a bright lamp and magnifier for small lenses.
- Keep a small tray for shards if a protector cracks.
- Test tape adhesion on your shirt before using it on the lens.
- When in doubt, take a photo test after removal to confirm image quality.
Experience note: I once rushed removal on a mirrorless camera and left a tiny scratch. I now always use tape to lift and go very slow. That saved me from costly repairs later.

When to seek professional help
Consider professional help if:
- The protector shattered into small glass pieces.
- The lens has deep scratches or coating damage after removal.
- You’re unsure about using solvent or heat on a high-end lens.
Professionals have proper tools and clean benches that reduce risk. If your camera is under warranty or very expensive, professional service is often the safest choice.

Frequently Asked Questions of how to remove camera lens protector
How long does the adhesive residue take to come off?
Most adhesive lifts within seconds of isopropyl alcohol application. Stubborn residue may need repeated gentle swabbing.
Can I use a razor blade to scrape the protector off?
No. Razor blades can easily scratch coatings and glass. Use plastic picks or tape instead to avoid damage.
Is it better to replace the protector or leave the lens bare?
If image quality suffers or the protector is damaged, replace it. If the lens is high-quality and you prefer no barrier, leaving it bare is also fine.
Will removing the protector void my camera warranty?
Removing a protector you installed yourself typically does not void a camera warranty. However, damage caused by improper removal might not be covered.
How often should I replace a camera lens protector?
Replace when it shows scratches, clouding, or damage. For busy field use, check every few months and replace as needed.
Can moisture get under the protector during removal?
Yes, if you use too much liquid. Apply solvents sparingly and use minimal amounts to avoid moisture under seals.
What if the protector interferes with autofocus?
A scratched or poorly aligned protector can affect autofocus. Remove it and test focus; replacing with a better-fitting protector often fixes the issue.
Conclusion
Removing a camera lens protector is a small task that calls for patience and the right tools. Follow the steps above to lift edges gently, peel slowly, and clean residue safely. If a protector shatters or the lens shows damage, seek professional help rather than risk costly mistakes. Try these methods on a spare protector first, and you’ll build confidence quickly. If this guide helped, consider subscribing for more practical camera care tips or leave a comment with your own experience.

Jamie Lee is a seasoned tech analyst and writer at MyTechGrid.com, known for making the rapidly evolving world of technology accessible to all. Jamie’s work focuses on emerging technologies, product deep-dives, and industry trends—translating complex concepts into engaging, easy-to-understand content. When not researching the latest breakthroughs, Jamie enjoys exploring new tools, testing gadgets, and helping readers navigate the digital world with confidence.