Mounting a TV in an RV means finding solid support, using the right mount, and securing the screen for travel.
Learning how to mount TV in RV spaces takes more care than mounting one on a house wall. RV walls can be thin, lightly framed, and filled with wiring or plumbing. This guide explains the safest method, from choosing a wall and mount to testing the finished installation, so you can enjoy movie nights without damaging your RV or television.
Choose the Best Location for Your RV TV
The best place for an RV TV is usually a wall with known structural support. Many RVs have a media cabinet, reinforced entertainment wall, or factory TV bracket area. These locations are designed to carry more weight than ordinary interior panels.
Before you start learning how to mount TV in RV interiors, inspect the area carefully. Look for signs of support, such as cabinet framing, screws from an old bracket, or a manufacturer label showing the recommended TV size.


Consider these points:
• Choose a viewing position that does not block a window, door, vent, or storage hatch.
• Make sure the TV will not hit a slide-out, cabinet door, or entry door.
• Check the viewing angle from the main seating area.
• Keep the screen away from direct sunlight when possible.
• Leave space around the TV for ventilation.


• Confirm that the mount will not interfere with curtains or window shades.
A TV that looks perfect when parked may become a problem when the RV is moving. Open every nearby cabinet and slide-out before drilling. This simple check can prevent an expensive mistake.

Check the RV Wall Before Drilling
RV walls are not built like standard residential walls. A typical RV wall may include thin plywood, aluminum framing, fiberglass, insulation, wiring, and plumbing. The visible wall surface alone may not provide enough strength for a television bracket.
Use the RV owner’s manual, wall diagrams, or manufacturer support information if available. Some RV makers list approved TV mounting points. These factory locations are the safest starting point.
You should also check for:
• Electrical wires leading to outlets, lights, or entertainment equipment.
• Water lines near kitchen, bathroom, and exterior wall areas.
• Gas lines, especially near appliances and utility compartments.
• Aluminum or wood studs behind the wall.
• Exterior panels that could be damaged by long screws.
A stud finder can help, but it may not work well through thick RV wall coverings. Tapping the wall can provide clues, but it is not proof of structural support. A small inspection hole in a hidden area may be safer than guessing and driving several screws into an unknown cavity.
If you cannot confirm the wall structure, use a factory mounting plate or ask an RV service technician to inspect it. A few minutes of expert advice can protect the wall, wiring, and television.

Select the Right TV Mount
The mount must support the TV’s weight and match its VESA pattern. VESA refers to the spacing between the mounting holes on the back of the television. Common patterns include 100 by 100 millimeters, 200 by 200 millimeters, and 400 by 400 millimeters.


Read both the TV manual and the mount instructions. Do not rely only on screen size. Two 32-inch TVs can have very different weights and mounting patterns.
The most useful RV TV mount types include:
Fixed TV mounts
A fixed mount keeps the TV close to the wall. It has less movement and creates less force on the wall during travel. This is often the safest choice for a strong, permanent mounting location.
Tilting TV mounts
A tilting mount helps reduce glare and improves the viewing angle. It still stays fairly close to the wall, which makes it a good choice for many RV bedrooms and living rooms.
Full-motion TV mounts
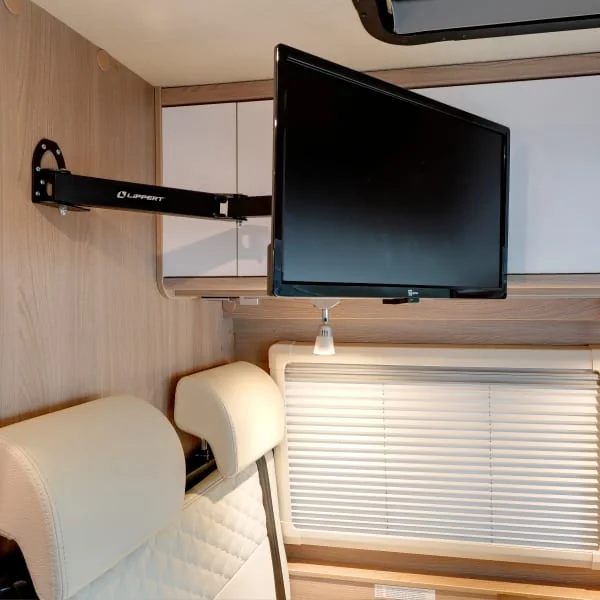
A full-motion mount can extend, swivel, and tilt. It offers great flexibility, but the extended arm creates more leverage. This extra force can loosen fasteners or damage a thin wall during travel.
Use a full-motion mount only when the wall has strong reinforcement and the mount includes a secure travel-locking system.
Locking RV TV mounts
A locking RV mount is made for movement. It often includes a latch, strap, or pin that holds the TV against the wall while the RV is in motion. This feature is highly useful because the mount should not carry the full load of a moving television.
For most RVs, a low-profile or locking mount is better than a long, flexible arm. Think of the mount as a seat belt. It should hold the TV firmly, not allow it to swing around.

Gather the Tools and Hardware
The correct tools make how to mount TV in RV safer and easier. Prepare everything before drilling so you do not need to improvise halfway through the job.
You may need:
• TV wall mount rated for the television’s weight.
• Mounting screws or bolts approved for the wall structure.
• Washers sized for the fasteners.
• Stud finder or inspection tool.


• Drill and drill bits.
• Screwdriver or socket set.
• Level.
• Measuring tape.
• Painter’s tape.
• Pencil.
• Wire fish tape.
• Cable ties or adhesive cable clips.
• Stud-mounted backing plate, if required.
• Thread-locking compound approved for the fastener type.
Use the hardware supplied with the mount only when it suits the RV wall. Hardware made for a wood stud may not be safe in a thin panel or aluminum frame.
Avoid using drywall anchors unless the mount manufacturer and RV structure specifically allow them. Many common drywall anchors are not designed for the vibration and repeated movement of an RV.

Measure and Mark the Mounting Position
Careful measuring is one of the easiest ways to prevent a bad installation. Hold the TV or a cardboard template against the wall before making any holes.
Mark the following:


• The center of the viewing area.
• The top and bottom of the television.
• The location of the wall bracket.
• The position of the mounting holes.
• The path for power and signal cables.
Use a level on the bracket, not only on the TV. If the bracket is crooked, the television will look uneven even if the RV is parked on level ground.
Measure from the floor and nearby cabinets. Leave enough room to remove the TV later. Some mounts use safety tabs or locking screws that are difficult to reach when the screen sits too close to a cabinet.
A useful method is to tape the cardboard outline to the wall and sit in your usual chair. Check the height from the actual viewing position. Many people mount the TV too high because they measure while standing.
Install Wall Reinforcement When Needed
If the wall does not have strong support at the mounting points, add reinforcement before installing the bracket. This step is often the difference between a secure TV and a damaged RV wall.
One approach is to attach a plywood backing plate across known studs or structural members. The bracket then spreads the load over a larger area. The plate should be sealed, securely fastened, and sized to fit behind or around the bracket.
Another option is a factory-style mounting board installed inside a cabinet or wall cavity. This may require access through a cabinet panel. An RV technician can help when the wall has aluminum framing or limited access.
Keep these safety rules in mind:
• Never drill into a wall without checking what is behind it.
• Do not use screws long enough to reach the exterior skin.
• Do not crush thin wall panels by overtightening bolts.
• Use washers to spread pressure when the wall material allows it.
• Seal any hole that opens into an exterior or damp area.
• Do not weaken a structural member by drilling several large holes.
In my experience helping with RV installations, the most common mistake is treating the wall like household drywall. RV construction saves weight, so load distribution matters. A wide backing plate often works better than a few large screws.

Mount the Bracket to the RV Wall
Once the support is confirmed, place the bracket on the marks and install the fasteners. Ask another person to hold the bracket if possible. This keeps the bracket level and reduces the chance of shifting while you drill.
Follow this process:
-
Place painter’s tape over the drilling marks.
-
Drill small pilot holes suited to the wall material.
-
Check the holes for unexpected resistance or hidden material.
-
Attach the bracket with the correct screws, bolts, and washers.
-
Tighten the fasteners evenly.
-
Confirm that the bracket is level.
-
Test the bracket by applying gentle hand pressure.
Do not hang the TV immediately if the bracket moves, bends the wall, or makes cracking sounds. Remove it and solve the support problem first.
The goal is firm contact, not extreme tightening. Over-tightening can strip aluminum, crush plywood, or create a dent in the wall. If the mount instructions specify a torque value, use a torque wrench.

Attach the TV to the Bracket
Most modern TVs use four mounting holes on the back. Select the correct screw size and spacer from the mount kit. The screw should engage the TV’s threaded insert without bottoming out.
A screw that is too short may pull out. A screw that is too long can damage internal components. Never force a screw into the back of the TV.
Before lifting the television:
• Attach the mounting rails to the TV.
• Connect cables that will be hard to reach later.
• Keep cables loose enough to avoid sharp bends.
• Check that the rails face the correct direction.
• Confirm that all screws are tight but not over-tightened.
Lift the TV with two people, even if it feels light. Align the rails with the wall bracket and engage the safety lock. Then gently pull the lower edge of the TV to confirm it is seated.
A small gap between the TV and wall is normal on some mounts. Do not remove spacers or modify the bracket to make the TV sit flatter.

Manage Power and Cables Safely
Good cable management improves both safety and appearance. It also prevents cables from pulling on the TV as the RV moves.
Route cables with gentle curves. Avoid sharp bends, hot appliance surfaces, moving slide-out parts, and areas where cabinet doors can pinch them.
You can use:
• Low-profile HDMI cables.
• Right-angle power or HDMI adapters.
• Adhesive cable clips rated for the wall surface.
• Split wire loom for exposed cable sections.
• Cable ties placed loosely enough to avoid crushing wires.
Do not run a permanent cable through a wall until you know what is inside. If you must pass a cable through a panel, use a proper grommet to protect it from sharp edges.
Plug the TV into an approved RV receptacle. Avoid overloaded power strips and low-quality extension cords. If the RV uses an inverter, check whether the television’s power demand is suitable for that system.
Never connect a TV directly to RV wiring unless you understand the electrical system and follow the required safety rules. When in doubt, use a qualified RV electrician.

Secure the TV for Travel
A TV mount can hold a screen on a parked RV, but travel adds vibration, bumps, and sudden movement. Securing the television for travel is a separate step.
Before driving:
• Engage the mount’s locking pin or latch.
• Use a travel strap if the mount supports one.
• Push the TV fully against the wall.
• Remove loose devices from the top of the TV.
• Check that HDMI cables are not under tension.
• Make sure cabinets and doors cannot hit the screen.
• Confirm that the mount has not loosened.
A full-motion arm should never be left extended while driving. The arm acts like a lever and can multiply the force placed on the wall. If the mount has no travel lock, consider adding a padded strap or replacing it with a locking RV mount.
Do not place heavy objects against the screen. A blanket may protect the panel from light contact, but it is not a replacement for a mechanical lock.
Test the Installation Before Your First Trip
Testing helps reveal problems before they become expensive. Start with the RV parked and connected to safe power.
Check the following:
-
Turn the TV on and test every connected device.
-
Move the mount through its full range if it is adjustable.
-
Watch for cable strain or pinching.
-
Apply gentle pressure to the TV in different directions.
-
Listen for wall movement, creaks, or loose hardware.
-
Open nearby doors, windows, and slide-outs.
-
Engage the travel lock and inspect the fit.
After the first short drive, inspect the mount again. Look for loose screws, cracked trim, wall dents, or changes in the TV’s position. Continue checking the hardware after the first few trips.
This is one of the lessons I value most from RV projects: vibration finds weak points that a stationary test may miss. A five-minute inspection after driving can prevent a broken screen or torn wall.
Common Mistakes to Avoid
Many failed installations come from small oversights rather than difficult technical problems. Avoid these common errors when learning how to mount TV in RV settings.
• Mounting to thin paneling without reinforcement.
• Choosing a mount by TV size instead of weight and VESA pattern.
• Using long screws without checking the wall depth.
• Drilling near wiring or plumbing.
• Leaving a full-motion arm unlocked during travel.
• Mounting the TV where a slide-out can hit it.
• Over-tightening fasteners.
• Hiding cables before testing the equipment.
• Installing the TV too high for comfortable viewing.
• Forgetting that the RV may lean or move when parked.
• Using a mount without a travel-locking feature.
A cheap mount can become costly if it damages the wall or drops the TV. Choose a mount with a clear weight rating, solid hardware, and reliable locking parts.
When to Hire an RV Professional
Some installations are simple, especially when the RV has a factory mounting plate. Others require access to hidden framing, electrical changes, or reinforcement inside the wall.
Hire an RV technician or qualified electrician when:
• You cannot identify studs or structural support.
• The wall contains suspected wiring, plumbing, or gas lines.
• The TV is large or unusually heavy.
• You need a new electrical outlet.
• You plan to mount the TV on an exterior wall.
• The wall flexes under light pressure.
• The installation involves an aluminum frame or laminated wall.
• The mount must support a large articulating arm.
Professional installation costs more than a DIY project, but it can protect the RV’s warranty and prevent hidden damage. Always follow the TV and mount manufacturer’s instructions. If those instructions conflict with general advice, the product instructions should guide the installation.
Frequently Asked Questions About How to Mount TV in RV
Can I mount a TV directly to an RV wall?
You can mount a TV directly to an RV wall only when the wall has enough structural support. Thin paneling alone is usually not strong enough, so use a reinforced mounting point, backing plate, or factory bracket.
What type of TV mount is best for an RV?
A low-profile, tilting, or locking RV TV mount is usually the best choice. Full-motion mounts are useful but place more leverage on the wall and must be locked securely during travel.
How do I find studs in an RV wall?
Start with the RV manual, factory mounting points, cabinet framing, and visible fasteners. Stud finders may be unreliable through RV materials, so confirm support carefully and avoid drilling until you know what is behind the wall.
Should I remove the TV before driving the RV?
You do not always need to remove a properly mounted TV, but you must secure it for travel. Engage the mount lock, use a travel strap when recommended, and keep a full-motion arm fully retracted.
Can I use drywall anchors to mount a TV in an RV?
Standard drywall anchors are usually a poor choice for RV travel because vibration can loosen them. Use fasteners connected to framing or a properly installed reinforcement plate instead.
How high should an RV TV be mounted?
Mount the TV at a comfortable seated viewing height, with the center of the screen near eye level. Check the position from your favorite seat before drilling, since RV furniture and wall layouts vary.
Can I mount a TV above an RV fireplace?
You can, but heat and viewing height must be considered. Confirm that the fireplace does not send excessive heat toward the TV and that the screen will not be uncomfortable to watch from the seating area.
Conclusion
Knowing how to mount TV in RV spaces starts with finding real structural support, selecting a suitable mount, and planning around travel movement. Use the correct hardware, protect hidden wiring and plumbing, manage cables carefully, and secure the TV before every trip.
A careful installation can turn an unused wall into a comfortable entertainment area without risking your screen or RV. Measure twice, drill once, and ask a professional when the wall structure is unclear. Explore your RV’s manual and mount instructions before starting, and share your own installation tips in the comments.

Everett Ashford is a tech reviewer at mytechgrid.com specializing in SSDs, cameras, TVs, earbuds, headphones, and other consumer electronics. He provides honest, data-driven reviews based on hands-on testing and real-world performance analysis. Everett simplifies complex tech details to help readers make smart, confident buying decisions.