Install the SSD by opening the back panel, locating the drive bay or M.2 slot, and securing the new drive.
I have installed upgrades in many PCs and all-in-one desktops. This guide explains how to install ssd in all in one desktop pc with clear steps, safety tips, and real-world troubleshooting. I will show compatibility checks, tool lists, cloning vs fresh install choices, BIOS settings, and post-install checks. Read on if you want a fast, reliable upgrade that feels like new life for your all-in-one.

Why upgrade to an SSD in an all-in-one desktop PC
Upgrading to an SSD speeds boot, apps, and file access. Many all-in-one desktops come with slow hard drives or small factory SSDs. Replacing or adding an SSD gives a big performance boost without buying a new machine.
I have seen machines boot in under 20 seconds after an SSD swap. The change is dramatic and cost-effective. If you value speed, this upgrade is one of the best.

Check compatibility and choose the right SSD
Start by checking your model specs. Some all-in-one PCs have a 2.5-inch SATA bay. Some have an M.2 slot that supports SATA or NVMe. A few models let you fit both.
How to check:
- Look at the service manual or spec sheet. It lists drive types.
- Open the back panel to inspect slots and connectors.
- Note the drive thickness and mounting points.
Choose an SSD type:
- 2.5-inch SATA SSD — common and easy to fit.
- M.2 SATA SSD — compact, uses M.2 slot but slower than NVMe.
- M.2 NVMe SSD — fastest option if supported.
How to decide:
- If you need top speed and your board supports NVMe, choose NVMe.
- If you need a simple swap and the PC has a SATA cable and bay, choose 2.5-inch SATA.
- If space is tight, M.2 is the best physical fit.
I once fitted an M.2 NVMe in an all-in-one that only needed a tiny bracket. It cut photo export times by half. That kind of real gain is common.

Tools and preparation
Gather tools and files before you start. Working clean and calm saves time.
Essential items:
- Phillips screwdriver of the correct size.
- Plastic pry tools to open trim safely.
- Anti-static wrist strap or grounded surface.
- External drive enclosure or USB-to-SATA cable if cloning.
- Backup drive or cloud storage for your data.
Pre-install checks:
- Back up your files. Always back up before hardware work.
- Charge or unplug the device and remove power cables.
- Note product warranty. Some manufacturers void warranty if you open the case.
My tip: I label screws with tape and take photos as I disassemble. It makes reassembly quick and error-free.
Step-by-step: installing SSD in an all-in-one desktop PC
Follow these steps to learn how to install ssd in all in one desktop pc. Read all steps first. Then act slowly.
- Power down and unplug
- Shut down the PC. Unplug all cables. Wait five minutes.
- Open the back panel
- Lay the all-in-one face down on a soft towel. Remove screws and gently pry open the panel. Keep screws organized.
- Locate the drive area
- Find the existing drive bay or M.2 slot. Note connectors and any brackets or caddies.
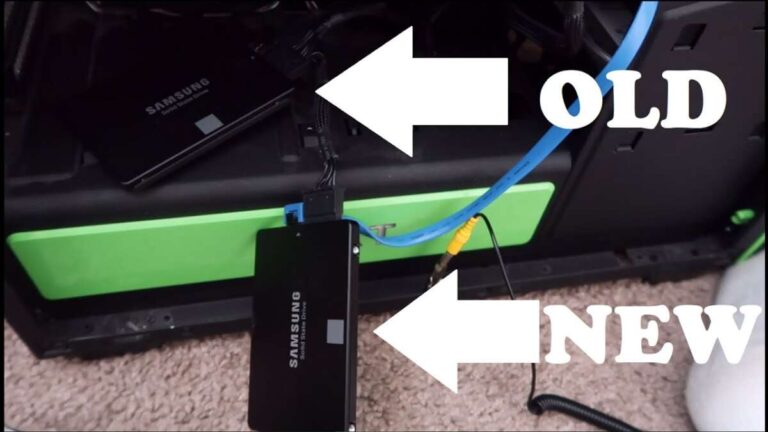
- Remove the old drive (if replacing)
- For 2.5-inch drives, disconnect the SATA and power cables and remove screws.
- For M.2 drives, remove the small screw holding the drive at an angle, then slide out the module.
- Install the new SSD
- For 2.5-inch SATA: place the SSD in the caddy, secure with screws, and reconnect the SATA cable and power.
- For M.2: insert the M.2 SSD into the slot at an angle, push down gently, and secure with the tiny screw.
- Reassemble the case
- Replace cover and screws. Reconnect power and peripherals.
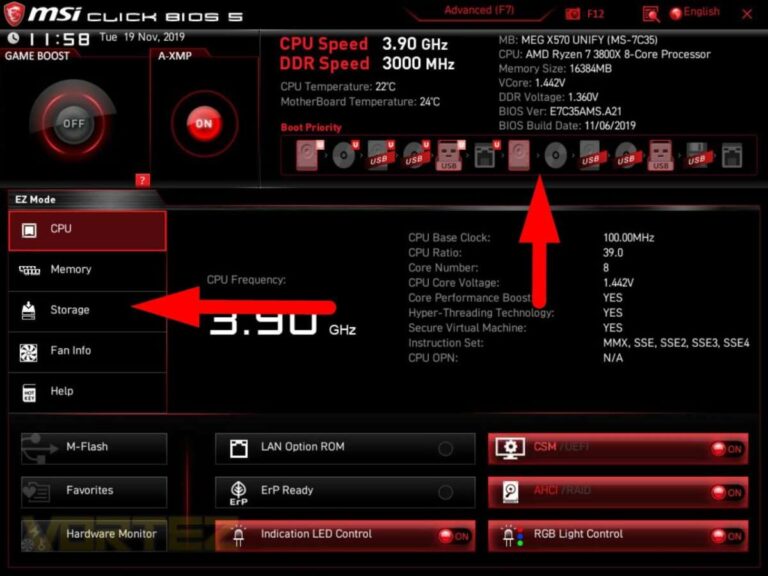
- Power on and enter BIOS/UEFI
- Check that the BIOS detects the new SSD. If not, re-open and check connections.
These are the core physical steps for how to install ssd in all in one desktop pc. Move to software steps for cloning or clean install next.

Cloning vs fresh install: setting up the OS
Decide whether to clone your current drive or do a fresh OS install. Both work for how to install ssd in all in one desktop pc.
Cloning pros and cons:
- Pros: Keeps settings and apps. Faster to get back to work.
- Cons: Carries old clutter and possible software issues.
Fresh install pros and cons:
- Pros: Clean system, better long-term performance.
- Cons: Requires reinstalling apps and copying files.
Cloning process short:
- Use cloning software and an external adapter. Clone the old drive to the SSD. Then swap drives and boot.
Fresh install process short:
- Create a USB installer for your OS. Boot from it and install to the new SSD. Restore files from backup.
I prefer a fresh install for older systems. Cloning is great for quick upgrades when the old system is healthy.

Post-install checks and BIOS/UEFI settings
After installation, do these checks to ensure everything runs well.
Checks to run:
- Confirm the SSD appears as the boot device in BIOS/UEFI.
- Enable AHCI mode for SATA drives if not already set.
- For NVMe drives, ensure the firmware and BIOS support NVMe boot.
System setup:
- If you cloned, run disk management to resize partitions if needed.
- Enable TRIM in Windows for SSD health: run "fsutil behavior query DisableDeleteNotify" in a command prompt; you want a zero result.
- Install SSD firmware updates when available.
These steps help keep your SSD fast and healthy after how to install ssd in all in one desktop pc.

Troubleshooting and tips
Common problems and quick fixes for how to install ssd in all in one desktop pc.
If the SSD is not detected:
- Recheck cables and the M.2 screw. Reseat the drive.
- Try another SATA port or check for a disabled connector in BIOS.
If the system is slow:
- Confirm TRIM is enabled and the SSD is not near full capacity.
- Update drivers and firmware.
Other practical tips:
- Use a reputable SSD brand and check warranty.
- Keep at least 10–20% free space on the SSD for best performance.
- Be gentle with connectors. All-in-ones can use delicate ribbon cables.
From my experience, many issues come from loose cables or missed tiny screws. Take your time, and you will avoid those mistakes.
Frequently Asked Questions of how to install ssd in all in one desktop pc
Can I add an SSD to any all-in-one desktop?
Most all-in-ones can accept an SSD, but some very thin models lack slots. Check the spec sheet or open the back to confirm.
Should I choose SATA or NVMe for my all-in-one?
Pick NVMe if the motherboard supports it for top speed. Choose SATA for wider compatibility and simpler swaps.
Do I need to reinstall Windows after installing an SSD?
Not always. You can clone your drive to avoid reinstalling. A fresh install gives the cleanest, fastest result.
How do I check if my all-in-one supports M.2 NVMe?
Look in the manual or open the case to find an M.2 slot labeled NVMe or PCIe. BIOS settings may also list NVMe drives.
Will installing an SSD void my warranty?
It depends on the manufacturer. Check warranty terms first. Some brands allow upgrades; others restrict opening the case.
Conclusion
Upgrading an all-in-one with an SSD is one of the best ways to boost speed and extend life. Check compatibility, pick the right SSD, back up your data, and follow careful steps to install. Take your time, test the drive, and choose cloning or a fresh install based on your needs. Ready to speed up your all-in-one? Try the upgrade and share your results or questions below.

Everett Ashford is a tech reviewer at mytechgrid.com specializing in SSDs, cameras, TVs, earbuds, headphones, and other consumer electronics. He provides honest, data-driven reviews based on hands-on testing and real-world performance analysis. Everett simplifies complex tech details to help readers make smart, confident buying decisions.