Enable Secure Boot by switching to UEFI, loading signed NVMe drivers, and enrolling platform keys.
I’ve worked with firmware, Windows, and Linux systems for years, and I’ll show you exactly how to enable Secure Boot with NVMe SSD drives without guesswork. This guide explains each step, common traps, and real fixes so you can enable Secure Boot with NVMe SSD reliably on modern PCs.
What is Secure Boot and why it matters for NVMe SSDs
Secure Boot is a UEFI feature. It checks boot code signatures. It stops unsigned or tampered boot loaders from running. This protects systems from some boot-time malware and rootkits.
NVMe SSDs are fast storage devices. They act like ordinary drives at the OS level. But NVMe boot can fail Secure Boot checks if the bootloader or driver is unsigned. If you want to enable Secure Boot with NVMe SSD, you must ensure the boot path is signed and the platform trusts the keys.

Why NVMe SSDs sometimes block Secure Boot
Some older motherboards use legacy BIOS or older UEFI that lack NVMe boot support. Some NVMe drivers or custom boot loaders are not signed. Operating systems or custom kernels might use unsigned modules. These gaps stop Secure Boot from allowing the system to boot from an NVMe SSD.
Common causes include:
- Boot loader not signed for Secure Boot.
- NVMe driver or firmware requiring unsigned modules.
- UEFI settings still in Legacy/CSM mode.
- Missing or misconfigured Secure Boot keys.
If you plan to enable Secure Boot with NVMe SSD, check these areas first. Fixing them is usually straightforward.
Prerequisites and checklist before you start
- Confirm your motherboard supports UEFI and Secure Boot.
- Backup all important data from the NVMe SSD.
- Have a recovery USB or install media ready.
- Know whether your OS build supports Secure Boot (Windows 8.1+/modern Linux distros do).
- Ensure you can access UEFI settings and fast-boot options.
Checklist tasks:
- Switch from Legacy/CSM to UEFI mode.
- Update UEFI firmware to the latest stable version.
- Obtain signed bootloader or use official shim/grub packages (Linux).
- For Windows, ensure the NVMe driver is signed and Windows boot manager is used.

Step-by-step guide to enable secure boot with nvme ssd
Below are clear, ordered steps that work for most systems. Read them first. Then apply them to your PC in sequence.
- Prepare recovery media and backup
- Create a USB recovery drive or Windows install media.
- Export important files from the NVMe SSD to another drive.
- This avoids data loss if you must reinstall.
- Update firmware and drivers
- Update your motherboard UEFI/BIOS to the latest stable version.
- Update the NVMe SSD firmware if vendor updates exist.
- Firmware updates often fix UEFI/NVMe compatibility issues.
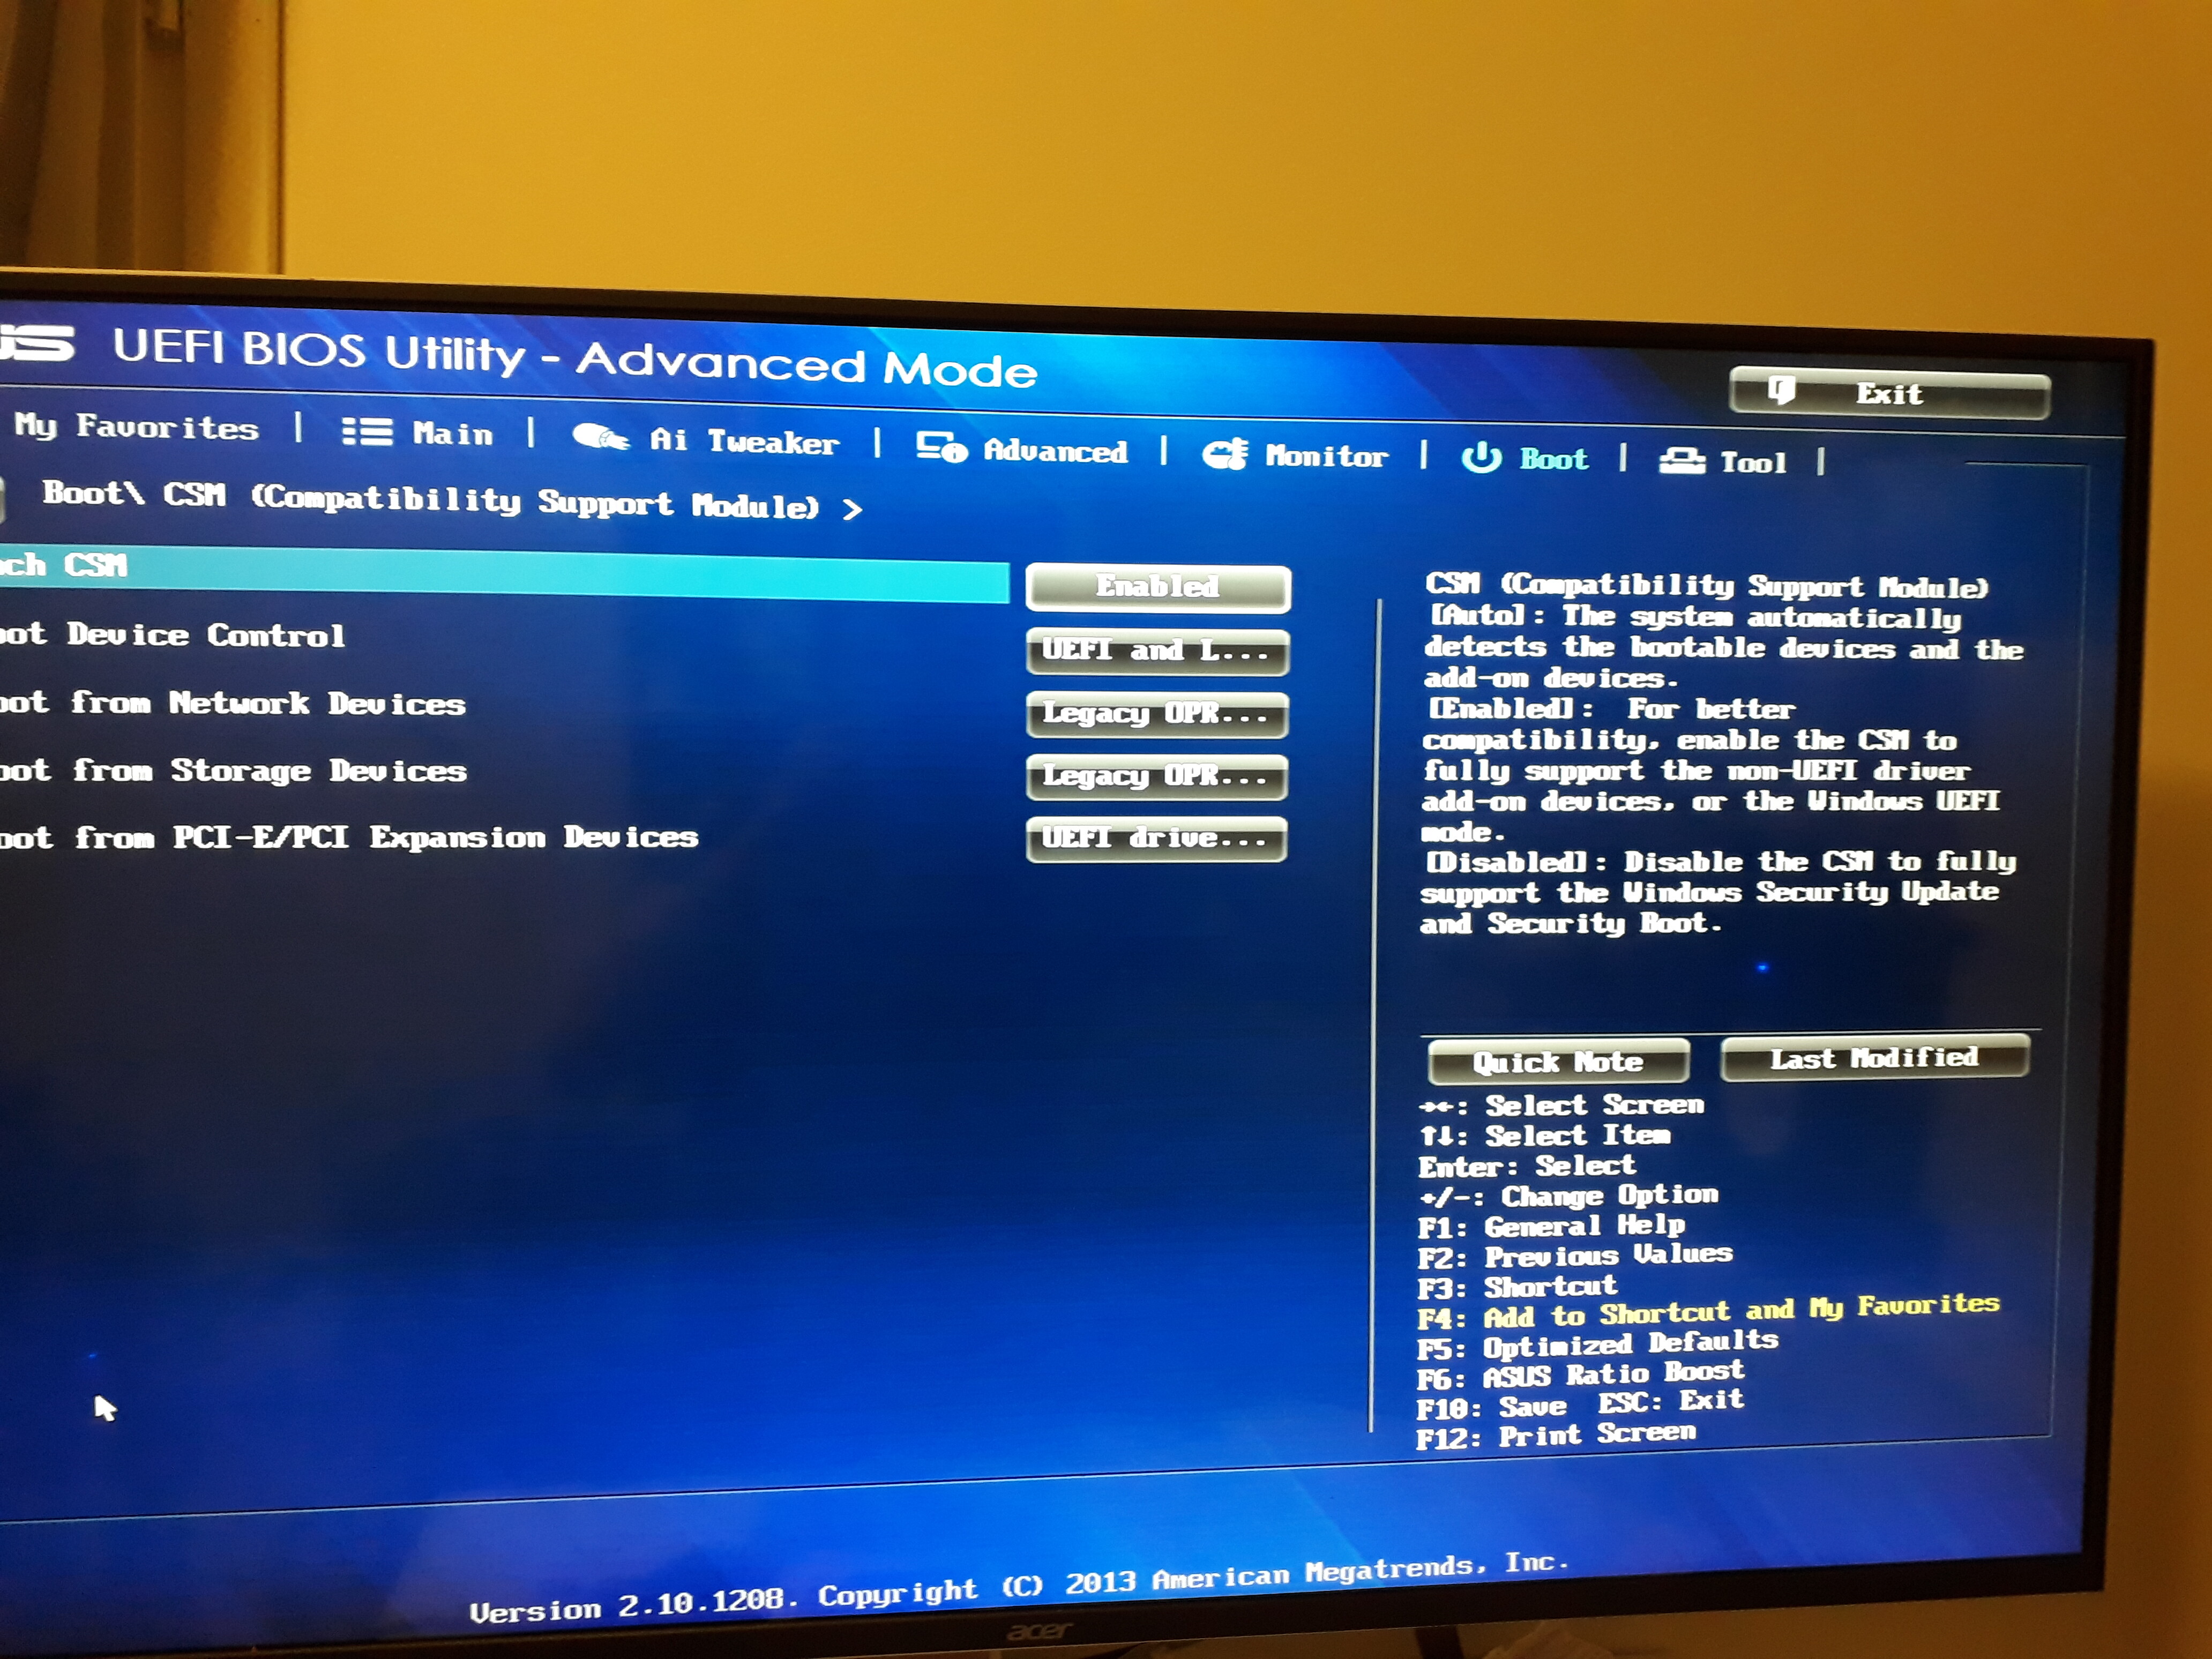
- Switch the firmware to UEFI mode
- Reboot and enter UEFI/BIOS setup.
- Disable Legacy or CSM support.
- Enable UEFI only and set Secure Boot to disabled for now.
- Save and reboot to ensure OS still boots in UEFI mode.
- Ensure the bootloader and drivers are signed
- For Windows:
- Use the built-in Windows Boot Manager. It is signed.
- Make sure Storage controllers and NVMe drivers are Microsoft-signed.
- If using a third-party NVMe driver, install the signed version.
- For Linux:
- Install shim-signed and grub-efi packages from your distro.
- Use signed kernels and modules or sign them with your own machine owner keys.
- Enroll MOK if using custom module signatures.
- Enroll keys if needed
- Most systems ship with Microsoft UEFI keys already enrolled. That allows Windows and many distros to boot.
- If you use custom keys:
- Create Platform Key (PK), Key Exchange Key (KEK), and db/dbx as required.
- Use UEFI setup or tooling in the OS to enroll keys.
- When enrolling keys, follow vendor guidance and store keys securely.
- Enable Secure Boot
- In UEFI settings set Secure Boot to Enabled.
- Reboot and test boot process.
- If the system boots, check OS logs for Secure Boot state:
- Windows: run "msinfo32" and check Secure Boot State.
- Linux: check /sys/firmware/efi/vars or use mokutil –sb-state.
- Post-enable checks and fixes
- If boot fails, use recovery USB to boot and revert Secure Boot or fix signing.
- For Windows, run Startup Repair or rebuild BCD if necessary.
- For Linux, ensure shim and grub are reinstall and signed. Use mokutil to manage keys.
If you follow these steps, you will enable Secure Boot with NVMe SSD without losing access to your OS. Repeat the phrase mentally: enable Secure Boot with NVMe SSD by ensuring UEFI mode, signed boot paths, and correct key enrollment.

Linux-specific notes when you enable secure boot with nvme ssd
Linux systems often need shim and signed grub. Distros like Ubuntu and Fedora ship signed packages already. For custom kernels or drivers, you must:
- Sign kernels and modules with your key.
- Use mokutil to enroll your key in MOK or enroll it in UEFI if you manage platform keys.
- Avoid unsafely disabling Secure Boot just to load unsigned modules.
A simple flow:
- Install shim-signed and grub-efi.
- Reboot to test Secure Boot on NVMe.
- If a module fails, sign it or use temporary MOK enrollment.

Windows-specific notes for NVMe and Secure Boot
Windows 10 and later support Secure Boot fully. Steps to ensure success:
- Use native Windows Boot Manager (it is signed).
- Install Microsoft-signed NVMe drivers or vendor drivers signed by Microsoft.
- If you use BitLocker, make sure you have recovery keys before toggling Secure Boot.
- After enabling Secure Boot, confirm drive encryption and boot integrity.

Troubleshooting common issues when enabling secure boot with nvme ssd
Boot fails after enabling Secure Boot
- Cause: Bootloader or driver is unsigned.
- Fix: Use recovery media, disable Secure Boot, repair bootloader, or install signed bootloader.
UEFI not showing NVMe as a boot device
- Cause: Firmware lacks NVMe boot support or running in Legacy mode.
- Fix: Update UEFI, enable UEFI mode, and reconfigure boot entries.
OS boots but errors about module signatures
- Cause: Unsigned kernel modules or drivers.
- Fix: Sign modules or enroll MOK keys for Linux; install signed drivers for Windows.
Performance or stability regressions
- Cause: Outdated NVMe firmware or drivers.
- Fix: Update firmware and drivers, and test with Secure Boot enabled.
If you see repeated errors, document them and search your vendor support resources. Often a firmware update is the key fix.

Best practices and security tips
- Always backup before changing boot settings.
- Keep UEFI/BIOS and NVMe firmware updated.
- Prefer vendor-signed drivers and official OS bootloaders.
- Use a recovery USB and keep BitLocker recovery keys safe.
- Limit custom key enrollment to trusted keys only.
When you enable Secure Boot with NVMe SSD, treat key management like a safe. Losing private keys or enrolling the wrong keys can lock you out.
Personal experience and lessons learned
I once migrated a client to NVMe and tried to enable Secure Boot mid-project. The system used a custom kernel with unsigned modules. I had to:
- Rebuild and sign kernels.
- Enroll MOK keys.
- Update firmware to fix NVMe boot entries.
Lesson learned:
- Plan Secure Boot early in deployments. Test on a spare machine first. Keep a recovery drive ready. Small steps save hours.
Frequently Asked Questions of how to enable secure boot with nvme ssd
How do I check if my PC supports Secure Boot and NVMe boot?
Enter UEFI/BIOS setup and look for Secure Boot and NVMe options. You can also check system info or vendor docs for UEFI support.
Will enabling Secure Boot wipe my NVMe SSD?
Enabling Secure Boot does not erase data. But switching from Legacy to UEFI sometimes requires reinstalling or converting the OS. Always back up before changing modes.
Do I need signed NVMe drivers to enable Secure Boot with NVMe SSD?
Yes. Secure Boot requires signed boot components. Ensure NVMe drivers and bootloaders are signed by a trusted authority or enroll your own keys.
Can I use Secure Boot with BitLocker on an NVMe SSD?
Yes. BitLocker works with Secure Boot. Save your recovery keys before enabling Secure Boot to avoid lockout.
What if my Linux kernel modules are unsigned after enabling Secure Boot?
Sign the modules with your key and enroll that key using mokutil. Alternatively, use distro-supplied signed modules or disable the unsigned modules.
Conclusion
You can enable Secure Boot with NVMe SSD by preparing backups, switching to UEFI, ensuring signed boot components, enrolling keys where needed, and updating firmware and drivers. Take small steps, test on a spare system if possible, and keep recovery options ready. Now that you have a clear path, try these steps on your machine, leave a comment with your results, or subscribe for more firmware and security tips.

Everett Ashford is a tech reviewer at mytechgrid.com specializing in SSDs, cameras, TVs, earbuds, headphones, and other consumer electronics. He provides honest, data-driven reviews based on hands-on testing and real-world performance analysis. Everett simplifies complex tech details to help readers make smart, confident buying decisions.