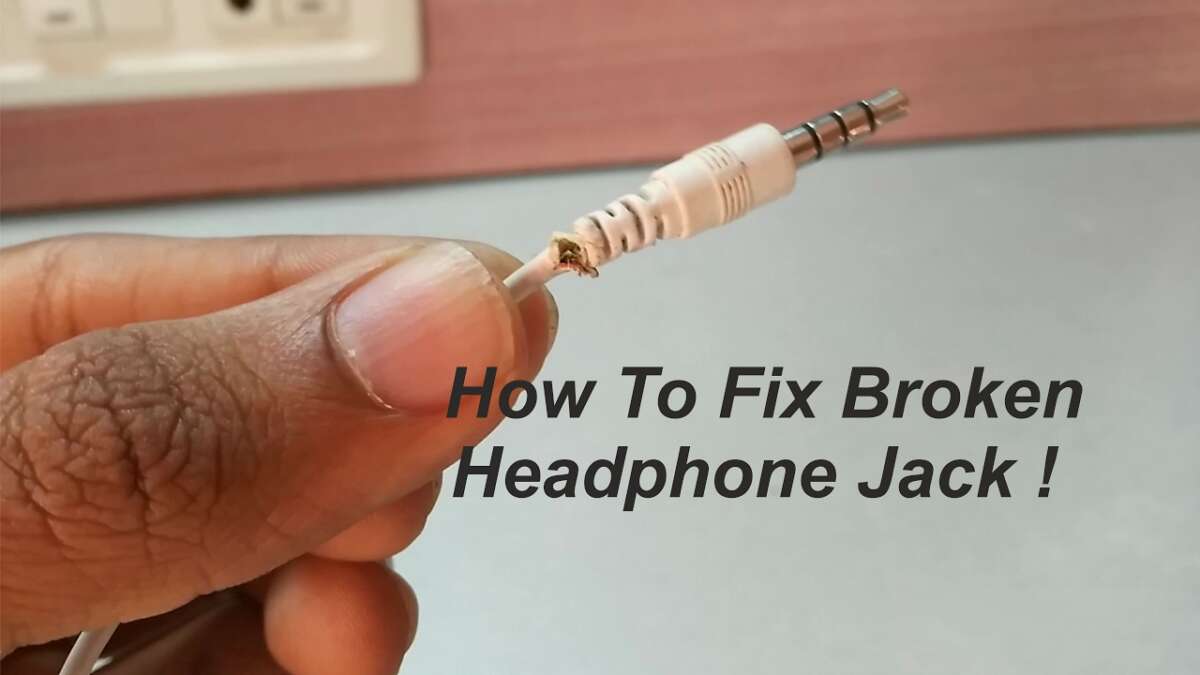
Most headphone cable problems can be fixed with a plug replacement, soldering, or a simple splice.
I’ve fixed dozens of frayed and dead headphone cables in home workshops and on-the-go. This guide explains how to fix headphone cable failures step by step, with clear tools, safe techniques, and real-world tips you can use right now. I’ll show when a quick splice saves the day, when soldering is worth the effort, and when it’s smarter to replace the cable entirely.

What causes headphone cable failure?
Headphone cables fail for a few common reasons. Repeated bending near the plug stresses the inner wires. Sharp tugs, poor strain relief, or manufacturing defects make wires break inside the insulation. Dirt, moisture, and corrosion at jacks and connectors can cause poor contact or intermittent sound. Cheap cable materials also wear faster over time.
Common failure patterns
- Breaks near the 3.5mm plug or remote module where bending concentrates stress.
- Cuts or abrasions along the cable from pockets and zippers.
- Intermittent left/right audio due to a single conductor breaking.
- Static, crackling, or one-sided sound from dirty or corroded connectors.
Why diagnosing matters
- Fixing the wrong symptom wastes time.
- A quick test helps decide between a splice, solder, or full cable replacement.

Tools and materials you’ll need
You don’t need a full electronics bench for basic fixes. Use a compact set that covers most repairs.
Essential tools
- Small wire stripper or precision knife.
- Soldering iron, 20–30W preferred, with rosin-core solder.
- Heat shrink tubing in several sizes.
- Multimeter for continuity testing.
- Replacement 3.5mm plug (stereo) or TRRS plug if your headphones have a mic.
- Electrical tape or fabric cable wrap.
- Helping hands or small clamps.
- Optional: hot glue, crimp butt connectors, thin tweezers.
Safety and workspace
- Work in a well-ventilated area when soldering.
- Use eye protection for snips and hot tools.
- Keep a steady, well-lit surface to avoid accidents.

Quick checks before you start repairing
Do a few simple checks to isolate the problem. These often save time.
Quick tests
- Try the headphones in another device to rule out source issues.
- Wiggle the cable at different points to find where sound cuts out.
- Inspect the plug and jack for dirt or bent pins.
- Check the cable for visible cuts, kinks, or flattened spots.
When the fault is intermittent versus permanent
- Intermittent problems often mean a partially broken conductor near a stress point.
- Permanent silence on one side usually indicates a fully broken inner wire or bad solder joint.

Simple fixes that take minutes
If the damage is minor, try these fast, low-effort fixes.
Clean the jack and plug
- Use isopropyl alcohol and a cotton swab to remove grime.
- Gently clean the device’s headphone port with compressed air.
Temporary repair with tape or wrap
- For minor exterior damage, wrap the area tightly with fabric tape or electrical tape.
- Use this as a short-term fix to prevent further fray until you do a permanent repair.
Re-seat removable plugs or adapters
- Replace or swap adapters; a worn adapter can mimic cable failure.
These quick fixes are useful, but they are not permanent solutions for internal wire breaks.

How to fix headphone cable by splicing (no solder)
Splicing is fast and works when you don’t have soldering gear. It’s ideal for travel repairs.
Step-by-step splice
- Cut out the damaged section with wire cutters. Keep cuts clean.
- Strip 5–8 mm of outer insulation from both cable ends.
- Inside you’ll see 2 or 3 insulated wires (left, right, ground; plus mic for TRRS).
- Strip 2–3 mm from each inner conductor.
- Twist matching wires together tightly: tip to tip (left), ring to ring (right), sleeve to sleeve (ground).
- Cover each twisted conductor with small pieces of electrical tape, or use small heat shrink tubes if available.
- Wrap the whole repair with a larger heat shrink or fabric tape for strain relief.
Pros and cons
- Pros: Quick, no soldering required, useful on the go.
- Cons: Bulkier, less durable, may add noise or fail sooner than soldered joints.

How to fix headphone cable by soldering (recommended)
Soldering creates a strong, low-resistance joint and is the preferred repair for lasting results.
Step-by-step solder repair
- Remove the damaged section and prepare the cable ends as in splicing.
- Slide appropriately sized heat shrink tubing onto one side before soldering.
- Tin the exposed inner wires lightly with solder.
- Join matching conductors by soldering them together. Do not overheat; use quick, steady contacts.
- Slide small heat shrink over each soldered conductor and shrink with a heat source.
- Add a larger outer heat shrink to restore strain relief and protect the join.
Tips for clean solder joints
- Use rosin-core solder and a clean iron tip.
- Tin wires separately before joining to minimize heat time.
- Keep wires separated while cooling to avoid shorts.

Replacing the 3.5mm plug
If the break is at the connector, replacing the plug is often the best fix.
Choosing the right plug
- Select stereo TRS for headphones with no mic.
- Select TRRS for headsets that include a microphone or remote.
How to replace the plug
- Cut off the old plug and strip back the outer insulation.
- Identify inner wires by color: common patterns include red/right, white/left, copper/ground; TRRS adds a mic wire.
- Tin wires, then solder to the correct plug terminals: tip (left), ring (right), sleeve (ground), extra ring (mic for TRRS).
- Reassemble plug housing and test.
Common mistakes to avoid
- Mixing left and right wires.
- Over-tinning which can create solder bridges.
- Not securing strain relief before closing the plug housing.

Heat shrink, strain relief, and finishing touches
A neat finish matters for durability and aesthetics.
Using heat shrink
- Use small pieces over individual conductors and a larger piece over the whole splice.
- Heat evenly to avoid burning insulation.
Strain relief techniques
- Add a short length of stiff tubing or a pen spring around the cable near the plug to reduce bending stress.
- Glue a small bead of hot glue where the cable meets the plug for extra reinforcement.
Final inspection
- Test continuity with a multimeter.
- Play audio and wiggle repaired area to ensure stability.
When to replace the entire cable or buy new headphones
Sometimes replacement is the best choice.
Replace the whole cable when
- Multiple breaks exist along the cable length.
- The cable uses delicate proprietary wiring that’s hard to solder.
- The cost of parts and time exceeds buying a new cable or headphones.
Buy new headphones when
- Driver damage or internal electronics are suspected.
- Headphones are inexpensive and replacement cost is low.
- The warranty covers replacement.
Troubleshooting and testing after repair
Confirm the repair is solid before calling it done.
Testing steps
- Use a multimeter to check continuity for left, right, and ground.
- Listen using a test track with panned channels to confirm stereo separation.
- Move the cable through typical bends while audio plays to catch intermittent faults.
If crackling persists
- Re-check solder joints for cold joints or bridges.
- Inspect the plug seating in the device—sometimes the device jack is the issue.
My experience, tips, and mistakes to avoid
I’ve repaired dozens of cables. Here’s what I learned the hard way.
What worked best for me
- Soldering with proper heat shrink gives the most durable results.
- Replacing the plug is faster than trying to repair complex in-line remotes.
- Carry a small repair kit when traveling: solder pen, heat shrink, small pliers.
Common mistakes I made
- Overheating wires and melting insulation.
- Skipping strain relief, which led to repeat failures.
- Using poor quality replacement plugs that created noise.
Practical advice
- Label and photograph wire colors before cutting. It saves time.
- Replace cheap headphones if parts cost more than new ones.
- Practice on an old cable to build soldering confidence.
Environmental and safety considerations
Keep safety and environmental impact in mind.
Safety tips
- Work in a ventilated area when soldering.
- Dispose of wire clippings and solder residue responsibly.
- Recycle broken electronics when replacement is the best option.
Environmental angle
- Repairing extends product life and reduces waste.
- Replacing only damaged parts uses fewer resources than full replacements.
Frequently Asked Questions of how to fix headphone cable
How do I tell if my headphone cable is broken or the jack is the problem?
Try the headphones on another device; if the issue persists, the cable is likely at fault. Wiggle the cable along its length to locate intermittent faults.
Can I repair a headphone cable without soldering?
Yes. Splicing and using crimp connectors or electrical tape can restore functionality temporarily. Soldering provides the most durable fix.
What wire colors correspond to left, right, and ground?
Common color schemes use red for right, white or green for left, and bare copper or black for ground. Always verify with a continuity test if unsure.
Is it worth repairing expensive headphones?
Yes. For mid-to-high-end headphones, repair is usually cost-effective and preserves audio quality. For low-cost models, replacement is often cheaper.
How long will a repaired cable last?
A well-executed solder repair with proper strain relief can last years. Temporary splices without proper strain relief may fail in weeks.
Conclusion
You can fix most headphone cable problems with a clear diagnosis, the right tools, and a calm step-by-step approach. Start with quick checks, choose between splicing, soldering, or replacing the plug, and always add good strain relief to prevent repeat breaks. Try a small repair on an old cable to build confidence, then tackle your main headphones with the techniques here. If you found this guide helpful, try the steps, leave a comment about your repair, or subscribe for more hands-on fixes and tips.

Jamie Lee is a seasoned tech analyst and writer at MyTechGrid.com, known for making the rapidly evolving world of technology accessible to all. Jamie’s work focuses on emerging technologies, product deep-dives, and industry trends—translating complex concepts into engaging, easy-to-understand content. When not researching the latest breakthroughs, Jamie enjoys exploring new tools, testing gadgets, and helping readers navigate the digital world with confidence.