To scan channels on a smart TV, connect your antenna or cable, open Channel Setup, and start Auto Scan.
Learning how to scan channels on smart TV sets is easier when you know which input and tuner your television uses. I have tested this process on several Samsung, LG, Sony, TCL, and Hisense models, and the same basic steps work across most brands. This guide explains the full process, common errors, and simple fixes that can help you find every available local channel.
What Channel Scanning Does on a Smart TV
Channel scanning lets your television search for broadcast signals from an antenna, cable line, or satellite receiver. The TV stores the channels it finds so you can change them with the remote.


A smart TV can connect to streaming apps through Wi-Fi, but those apps do not replace a channel scan. You need a built-in digital tuner and a working signal source to receive local over-the-air channels.
When you scan channels on smart TV equipment, the television checks several radio frequencies. It saves channels with a strong enough signal and skips channels it cannot detect.
Channel scans can find:
• Local broadcast stations from an indoor or outdoor antenna
• Digital cable channels from a supported cable connection
• HD channels sent over an antenna or cable line


• New channels added after a station changes its frequency
A channel scan does not usually find channels from a cable box, Roku device, Apple TV, or streaming service. Those devices use their own menus and inputs.

Before You Scan for Channels
A few checks can prevent most scanning problems. Start by confirming that the coaxial cable is connected firmly to the TV’s ANT IN, RF IN, or Cable/Antenna port.
If you use an antenna, place it near a window or on a high wall. Large metal objects, thick walls, hills, and tall buildings can weaken the signal.
If you use cable, connect the cable line directly to the TV for the scan. A cable box usually sends channels through HDMI, so the TV will not find those channels through its own tuner.
Check these items before you begin:
• Turn on the TV and remove any protective cover from the antenna.
• Connect the coaxial cable securely.
• Select the TV, Live TV, Antenna, or Broadcast input.
• Confirm whether your signal source is Antenna or Cable.
• Keep the TV connected to power during the scan.
• Make sure the remote has working batteries.
Your TV may ask for a country, ZIP code, or broadcast region. Enter the correct details because some televisions use this information to set the proper channel list.


How to Scan Channels on Smart TV
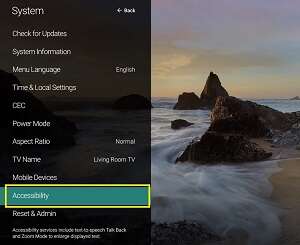
The exact menu names differ by brand and software version. Still, the general process is very similar. Use these steps to scan channels on smart TV models from most major brands.
-
Press the Home or Menu button on your remote.
-
Open Settings.
-
Select Channels, Broadcasting, Live TV, or Channel Setup.
-
Choose Auto Program, Auto Tuning, Auto Scan, or Channel Search.
-
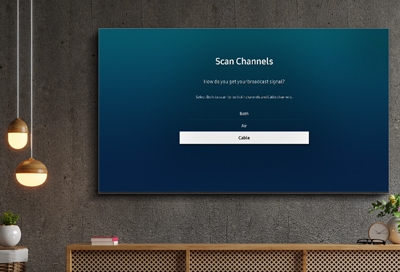
Select Antenna or Cable.
-
Choose Digital, Digital and Analog, or the option recommended by your provider.
-
Select Start, Scan, Search, or Tune.
-
Wait until the scan reaches 100 percent.
-
Select Done, Close, or Save.
The scan can take a few minutes. Avoid pressing buttons while the TV searches. Interrupting the process may leave you with an incomplete channel list.
If you use an antenna, choose Antenna rather than Cable. This is one of the most common mistakes I see. The wrong setting can make a working antenna appear broken because the TV searches different frequencies.
Samsung smart TVs
On many Samsung models, open Settings, then All Settings, Broadcasting, and Auto Program. Choose Air for an antenna or Cable for a cable connection, then start the scan.
Some Samsung televisions hide Broadcasting until the TV input is selected. If you cannot see the menu, press Source and select TV before opening Settings.
LG smart TVs
On many LG models, open Settings, select All Settings, General, Channels, and Channel Tuning. Choose Auto Tuning, select the correct signal type, and begin the search.


LG menus can vary between webOS versions. Look for Live TV, Channels, or Program Tuning if the wording is different.
Sony smart TVs
On many Sony models, open Settings, select Channels and Inputs, Digital Tuning, and Digital Auto Tuning. Choose Antenna or Cable, then confirm the scan.
Sony Google TV models may place channel settings under Settings, Channels and Inputs, and Channels. The menu can also change based on your region.
TCL and Hisense smart TVs
For many TCL televisions, open Settings, select Channel, and choose Channel Scan or Auto Channel Search. On Hisense models, look under Settings, Channel, Auto Scan, or Auto Channel Search.
If your menu does not match these steps, search the TV’s built-in help guide for “auto scan” or “channel tuning.” The names change, but the function remains the same.

How to Choose Antenna or Cable Mode
The signal setting tells your TV what kind of broadcast it should search for. Choosing the right mode is essential when you scan channels on smart TV devices.
Choose Antenna, Air, or Terrestrial when:
• You use an indoor or outdoor antenna.
• You want free local broadcast channels.
• The coaxial cable runs directly from the antenna to the TV.
Choose Cable when:
• You connect a cable provider’s coaxial line directly to the TV.
• Your provider gives you a cable channel plan.
• You do not use a separate cable box for those channels.


Choose Digital or Digital and Analog based on your provider and location. Modern broadcasts are mostly digital, but some older cable systems may still carry analog signals.
Satellite service usually does not use the TV’s built-in channel scan. Connect the satellite receiver with HDMI, then select the correct HDMI input on the TV.

How Long Does a Smart TV Channel Scan Take?
Most channel scans take between two and ten minutes. The time depends on the TV model, signal type, number of frequencies, and local broadcast environment.
An antenna scan may take longer than expected if the TV checks both digital and analog frequencies. Some televisions also perform a second pass to identify channel names and program data.
Do not assume a longer scan means something is wrong. Let the process finish unless it stays frozen for more than 20 minutes.
After the scan ends, test several channels. Check both low and high channel numbers, as well as stations that previously worked. This helps confirm whether the TV stored the complete list.

What to Do If the TV Finds No Channels
If your television finds zero channels, the problem usually involves the signal source, cable connection, or scan mode. Start with the simplest checks before buying new equipment.
Try these steps:
• Unplug the coaxial cable and reconnect it tightly.
• Confirm that the cable is connected to ANT IN or RF IN, not an HDMI port.
• Select Antenna if you use an antenna.
• Move the antenna near a window or higher location.
• Remove signal splitters and test the antenna directly.
• Restart the TV and run the scan again.
• Check whether your area has local broadcast coverage.
• Test the same antenna with another television if possible.
A damaged coaxial cable can look normal while blocking the signal. If you have another cable, use it for testing.
I once spent time adjusting an antenna when the real problem was a loose connector behind the TV. A quick cable check saved more time than repeated scans. Always inspect the physical connection before changing advanced settings.

What to Do If the TV Finds Only Some Channels
Finding some channels means the TV is receiving a signal, but the signal may be weak or uneven. Different stations can transmit from different towers, so one channel may work while another disappears.
• Moving the antenna to a higher location
• Pointing the antenna toward nearby broadcast towers
• Keeping the antenna away from routers and large metal objects
• Removing unnecessary splitters
• Replacing a thin or damaged coaxial cable
• Trying a powered antenna if the cable run is long
• Running the scan again after moving the antenna
An amplifier may help with a long cable run, but it cannot create a missing signal. In some cases, a poor amplifier adds noise and makes reception worse. Test the system without the amplifier first.
Weather can also affect weak signals. Heavy rain, storms, and strong winds may cause temporary interruptions, especially with outdoor antennas or satellite equipment.

How to Rescan Channels After a Station Change
Broadcasters sometimes change frequencies while keeping the same familiar channel number. Your TV will not always update the channel list by itself.
Run a new scan when:
• A local station announces a frequency change.
• You install a new antenna.
• You move the TV to another city or home.
• Your cable provider changes its channel lineup.
• A channel disappears after a TV reset.
• You receive a message telling you to rescan.
A new scan may remove old channel entries and replace them with current ones. This is normal. It may also change the order of channels, depending on the TV’s software.
If you want to preserve a custom channel list, check whether your TV offers manual tuning or favorite channels before starting a full scan.
Manual Tuning and Channel Editing
Auto scan is the fastest option, but manual tuning can help when one station is weak. Manual tuning lets you enter a known channel or frequency instead of searching the entire range.
This feature is useful when:
• A station is missing after an auto scan.
• You know the station’s physical broadcast channel.
• You want to test signal strength.
• You need to add one channel without replacing the full list.
After scanning channels on smart TV systems, you can often edit the list. Common options include hiding channels, deleting duplicate entries, and adding channels to a favorites list.
Do not delete a channel just because its number looks unusual. Digital stations may use a virtual channel number that differs from the physical frequency used for transmission.
How to Get Better Antenna Reception
A good antenna location often matters more than the antenna price. Start with placement before replacing equipment.
For better results:
• Place an indoor antenna near a window.
• Keep it away from metal shelves and electrical devices.
• Use a longer coaxial cable if it lets you place the antenna higher.
• Avoid sharply bending the cable.
• Use an outdoor antenna for rural or weak-signal areas.
• Ground outdoor equipment according to local electrical safety rules.
You can use a signal map to learn which direction local towers are located. The Federal Communications Commission provides public broadcast coverage information, but actual reception can differ because of buildings, trees, terrain, and weather.
A signal amplifier is not always the answer. It may help compensate for cable loss, but it will not fix a poorly placed antenna or a blocked signal.
Smart TV Channel Scan Problems to Avoid
Small setup errors can make a healthy TV system seem faulty. Avoid these common mistakes when you scan channels on smart TV models.
• Scanning while the TV is set to HDMI
• Choosing Cable when using an antenna
• Connecting the antenna to a cable box instead of the TV
• Stopping the scan before it finishes
• Using a splitter during the first test
• Expecting streaming apps to appear in the antenna list
• Running repeated scans without moving a weak antenna
• Assuming every channel uses the same broadcast tower
The biggest lesson is to change one thing at a time. If you move the antenna, replace the cable, and change the scan mode at once, you will not know which action solved the problem.
When a Factory Reset May Help
A factory reset can fix unusual software behavior, but it should not be your first step. Resetting the TV removes saved settings, apps, accounts, picture choices, and channel lists.
Consider a reset only when:
• The channel menu is missing or stuck.
• The TV repeatedly loses its channel list.
• A software update caused a serious tuning error.
• The manufacturer’s support team recommends it.
Before resetting, write down your Wi-Fi password and streaming account details. After the reset, update the TV software and run the channel scan again.
A reset will not repair a damaged antenna, faulty cable, weak tower signal, or provider restriction. It only clears the TV’s stored settings.
How to Keep Channels Organized
Once you scan channels on smart TV equipment, organize the list so daily viewing feels easier. Most models let you create a favorites list or hide channels you never watch.
Useful options include:
• Add favorite local stations.
• Hide shopping or duplicate channels.
• Place news and weather stations near the top.
• Use the channel editor to remove blank entries.
• Check the guide after scanning.
Some TVs show a channel guide only after the television receives program data. The guide may take time to fill, especially after a new scan or software update.
If a channel appears with the wrong name, wait a few hours and check again. Program data comes from the broadcaster and may not update at the same time as the picture.
Frequently Asked Questions About How to Scan Channels on Smart TV
How do I scan channels on a smart TV with an antenna?
Connect the antenna to the TV’s ANT IN or RF IN port. Open Settings, choose Channels or Broadcasting, select Auto Scan, choose Antenna or Air, and start the search.
Why is my smart TV not finding any channels?
The TV may use the wrong scan mode, have a loose cable, or receive a weak signal. Check the connection, select Antenna for an antenna setup, move the antenna, and run the scan again.
Do I need to scan channels on a smart TV with a cable box?
Usually, no. A cable box sends its signal through HDMI, so select the correct HDMI input and use the cable box guide instead of the TV’s built-in channel scan.
How often should I scan channels on my smart TV?
Scan when you install the TV, move the antenna, change cable providers, or hear that a local station changed frequencies. You do not need to scan every day.
Will scanning channels delete my saved channels?
A new auto scan can replace the existing channel list, depending on the TV model. Your favorite list may also change, so check the channel editor after scanning.
Can a smart TV scan free local channels without Wi-Fi?
Yes. An antenna and the TV’s built-in tuner can receive free over-the-air channels without an internet connection. Wi-Fi is needed for streaming apps and online program guides.
Why does my TV show channels with strange numbers?
Digital stations often use virtual channel numbers. The number shown on the TV may not match the physical frequency used to send the broadcast.
Conclusion
Scanning channels on a smart TV usually takes only a few minutes. Connect the antenna or cable directly to the correct port, choose Antenna or Cable, run Auto Scan, and let the process finish.
If channels are missing, check the signal source, cable, antenna position, and scan mode before trying advanced fixes. Take one step at a time, and you will find the cause much faster.
Try these steps on your TV today, then explore your channel editor and favorites list for a cleaner viewing experience. If this guide helped, share it with someone setting up a smart TV for the first time.

Everett Ashford is a tech reviewer at mytechgrid.com specializing in SSDs, cameras, TVs, earbuds, headphones, and other consumer electronics. He provides honest, data-driven reviews based on hands-on testing and real-world performance analysis. Everett simplifies complex tech details to help readers make smart, confident buying decisions.