Use a dedicated SSD as a cache to store hot data and dramatically speed up your HDD.
I’ve built and tested many PCs and storage setups, and I’ll walk you through how to use ssd as cache drive for hdd in clear, practical steps. You’ll get the why, the options, the step-by-step setups for both Windows and Linux, and real tips I learned the hard way. Read on to learn how to safely speed up an HDD using an SSD as cache and what to expect from the results.
Why use an SSD as cache for an HDD?
Using an SSD as cache lets a small fast drive hold the data you use most. The HDD keeps your large files and archives. The SSD serves the hot reads and quick writes. This gives you much of an SSD’s speed without replacing large storage.
Benefits include:
- Faster boot and app load times.
- Better responsiveness for everyday tasks.
- Lower cost than a full SSD-only storage pool.
- Extended usable life of older HDD systems.
I’ve used this setup to revive older laptops and bulk-storage desktops. The result often feels like a new machine, especially for boot and app-heavy workflows. If you care about speed on a budget, learning how to use ssd as cache drive for hdd is one of the best upgrades.
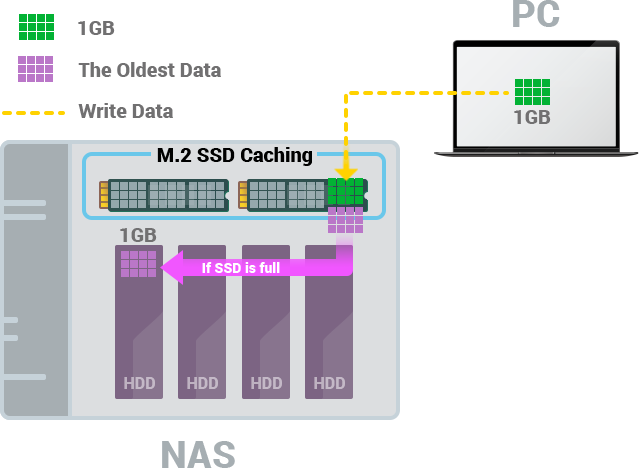
How SSD caching works
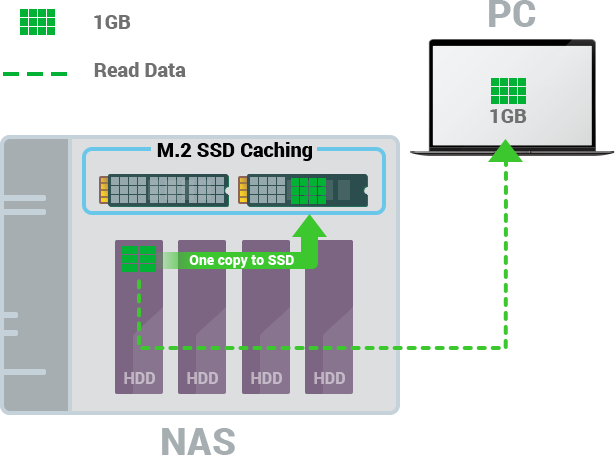
At its core, caching keeps copies of the most used data on the fastest medium. The cache sits between the OS and the HDD. When the OS requests a file, the system first checks the SSD cache. If the file is there (a cache hit), the SSD serves it. If not (a cache miss), the HDD provides it and the SSD may store a copy for next time.
Key points:
- Cache stores frequently accessed data, not everything.
- Cache policies decide what to keep and what to evict.
- Some caches are read-only; others cache writes too.
- Write caching increases speed but needs safe handling to avoid data loss.

Source: allurelakestorey.com
Methods to use SSD as cache drive for HDD
There are several ways to implement SSD caching. Choose one that fits your OS, hardware, and risk tolerance.
Software caching options:
- Windows with Intel Rapid Storage Technology or vendor tools. This is common on many consumer motherboards.
- Windows Storage Spaces with tiering on newer Windows Pro/Server versions.
- Linux with bcache, dm-cache, or FlashCache. These give fine control and strong performance.
- Third-party tools exist for some platforms, but check compatibility.
Hardware options:
- RAID controllers that support SSD caching or tiering.
- NAS devices that offer SSD read/write caching.
- Hybrid drives with built-in flash caching (less flexible but easy).
If you want clear instructions on how to use ssd as cache drive for hdd, pick software or hardware based on your system. For general users, vendor tools or built-in OS features are safest. For power users, Linux tools offer the best customization.
People also ask (quick answers)
How much faster will my HDD be with SSD caching?
- Expect large gains for repeated reads and boot times. Single large sequential transfers still hit HDD speeds.
Can I use any SSD as cache?
- Most SATA and NVMe SSDs work, but endurance and interface matter. Use a reliable drive with decent write endurance.
Will caching increase SSD wear?
- Yes. Caching can increase writes. Choose an SSD with good TBW and size it appropriately.
Is it safe to cache system files?
- Yes if the caching solution supports safe write policies and power-loss protection. Prefer write-through for critical data.
Source: allurelakestorey.com
Choosing the right SSD and cache size
Pick an SSD that balances price, endurance, and speed.
Guidelines:
- Cache size of 10–20% of frequently used data often works well. For a 2 TB HDD, 120–256 GB SSD is common.
- Use an SSD with higher endurance for write-heavy workloads.
- NVMe is faster than SATA, but benefits depend on your motherboard and workload.
- Avoid tiny low-end USB flash drives. They are slow and have poor endurance.
From experience, a 250 GB SSD is a sweet spot for many single-drive desktop setups. It stores OS files, apps, and a working set of data without being expensive. If you use big media projects, step up to 500 GB or more.
Cache modes: write-through vs write-back
Choose how the cache handles writes. This affects speed and safety.
Write-through:
- Writes go to both SSD and HDD or only HDD with reads from SSD.
- Safer because data is always on the HDD.
- Slight speed boost for reads only.
Write-back:
- Writes acknowledge once on the SSD and later flush to the HDD.
- Much faster for write-heavy tasks.
- Requires safe flush mechanisms. Risk of data loss on power failure.
For system drives, I prefer write-through unless the controller has strong protection. For non-critical cache with a UPS, write-back can give big wins.
Step-by-step: Example setup — Windows with Intel RST
This is a common path on many Intel-based systems. Note: exact steps vary by vendor and driver.
Steps:
- Install or update the Intel Rapid Storage Technology driver and app.
- Install the SSD and the HDD in the system, and ensure both appear in BIOS.
- Open the Intel RST app and choose the option to enable acceleration or SSD caching.
- Select the SSD as the cache device and the HDD as the accelerated device.
- Choose cache size and mode (read-only, write-back, or write-through).
- Enable caching and reboot as prompted.
Tip: Back up data before beginning. I once lost settings after a firmware update. Backups saved me.
Step-by-step: Example setup — Linux bcache
Linux bcache offers strong performance and flexibility. It needs some command-line work.
Steps:
- Install necessary packages and kernel modules for bcache.
- Prepare your SSD: create a bcache backing device with make-bcache -C /dev/sdX.
- Prepare your HDD as the backing device with make-bcache -B /dev/sdY.
- Register the devices and attach the SSD cache to the HDD.
- Mount the bcache device and tune caching parameters, such as writeback or writethrough.
I used bcache for an archival server and saw big gains on repeated read workloads. Keep a snapshot or backup before converting a live disk.
Best practices, tips, and mistakes to avoid
Avoid common pitfalls when you learn how to use ssd as cache drive for hdd.
Do:
- Back up before making changes.
- Use a reliable SSD with good endurance.
- Monitor cache hit rates and health.
- Use UPS for write-back caching.
Don’t:
- Use tiny low-quality USB drives as cache.
- Assume all vendor tools are equal; read docs.
- Forget firmware updates for SSDs and controllers.
From my experience, the biggest mistake is skipping backups. SSD caching can protect speed but not data if something goes wrong.
Performance expectations and testing
Set realistic goals and test results.
What to expect:
- Faster boot and app start times.
- Large sequential transfers still limited by HDD throughput.
- Dramatic improvements on repeated random reads.
How to test:
- Use simple real-world tests: boot time, app launch, file open times.
- Measure cache hit rate in your caching tool.
- Run synthetic tests if you want numbers, but real tasks show practical benefit.
I measured a 40–70% reduction in boot time on older systems after enabling caching. Results vary by workload.
Frequently Asked Questions of how to use ssd as cache drive for hdd
How large should my SSD be for caching?
Aim for 10–20% of your active data set. For general use, 120–500 GB works well. Larger caches help with diverse workloads.
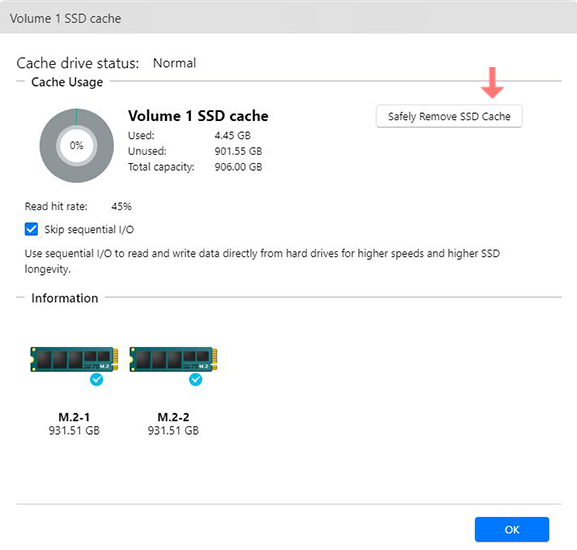
Can I remove the SSD after caching is enabled?
Not safely. Removing an active cache can corrupt data. Disable caching properly and move data back before removal.
Will caching improve large file transfers?
Not much. Large sequential transfers mainly use HDD bandwidth. Caching shines for random reads and repeated access.
Is SSD caching compatible with all motherboards?
Not always. Some motherboards include vendor caching features; others require software. Check your hardware and drivers.
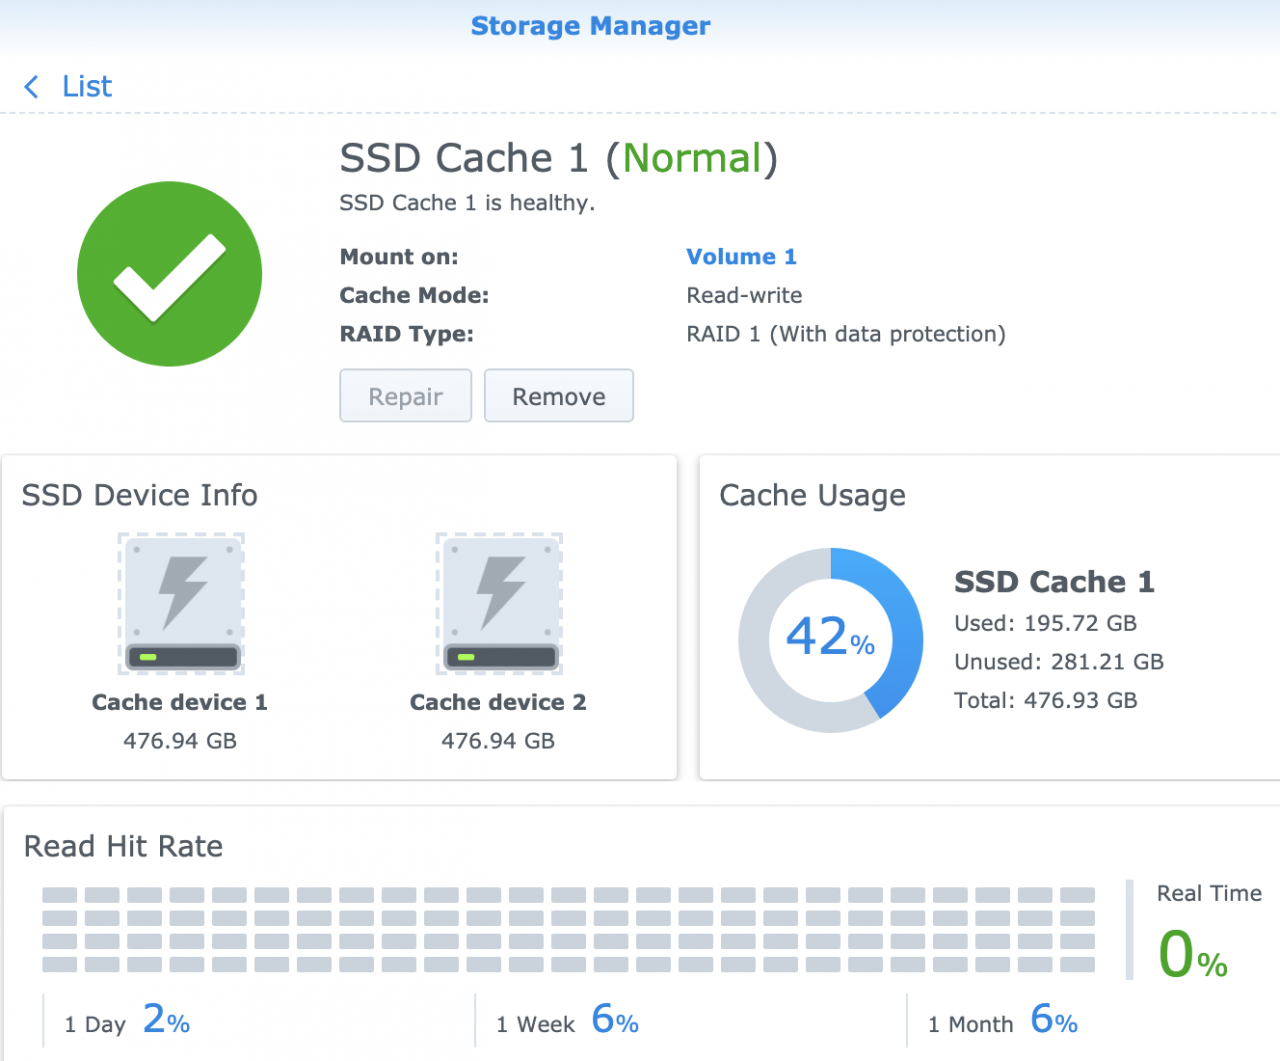
How do I monitor cache performance?
Use the caching tool or OS utilities. Look for cache hit rate, writeback queue, and SSD health stats. These metrics show real benefits.
Conclusion
Using an SSD as cache for an HDD is a smart, cost-effective way to get faster everyday performance while keeping large storage capacity. You learned the main methods, the trade-offs between write-through and write-back, and clear steps for Windows and Linux setups. Back up first, pick a good SSD, and test your setup to find the right cache size and mode. Try it on an older machine and see the speed jump for yourself — then share your results or ask questions below.

Everett Ashford is a tech reviewer at mytechgrid.com specializing in SSDs, cameras, TVs, earbuds, headphones, and other consumer electronics. He provides honest, data-driven reviews based on hands-on testing and real-world performance analysis. Everett simplifies complex tech details to help readers make smart, confident buying decisions.