To activate an SSD, connect it, initialize it, format it, and assign a drive letter.
If your computer does not show a new solid-state drive, the hardware may be fine but the disk may still need setup. I have worked through many SSD upgrades where the fix was not a faulty drive, but an uninitialized disk, a missing partition, or a loose cable. This guide explains how to activate an SSD on Windows, macOS, and Linux, while helping you avoid data loss and common setup mistakes.
What “activate an SSD” really means
The phrase “activate an SSD” can mean several different things. Most often, it means making a new or unused SSD ready for file storage. A computer may detect the drive but still show no usable space in File Explorer or Finder.
To activate an SSD, you may need to complete some or all of these tasks:


- Connect the SSD correctly.
- Confirm that the computer detects it.
- Initialize the disk.
- Select a partition style.
- Create a volume or partition.
- Format the drive with a file system.
- Assign a drive letter on Windows.
- Mount the drive on Linux.
- Install an operating system if the SSD will be a boot drive.
A new SSD is like an empty room. The computer can see the room, but it needs a door, a layout, and a label before you can use it.

Before you activate an SSD
Preparation prevents most SSD setup problems. Before you activate an SSD, check whether it contains important data. Initialization, partitioning, and formatting can erase files on some drives.
Use this checklist first:
• Back up important files from the SSD if it was used before.
• Shut down the computer before installing an internal SSD.


• Check whether the SSD is SATA or NVMe.
• Confirm that your motherboard supports the SSD type.
• Use the correct cable and power connector for a SATA SSD.
• Read the motherboard manual before installing an M.2 NVMe SSD.
• Keep your operating system updated.
• If the SSD is external, test another USB port and cable.
An M.2 SSD is not always an NVMe drive. Some M.2 drives use the SATA protocol, while others use PCIe NVMe. They may look similar, but the motherboard slot must support the correct type.
In my experience, a loose SATA data cable is one of the simplest causes of an “SSD not detected” problem. Reseating both ends of the cable often fixes the issue in less than a minute.
How to activate an SSD in Windows
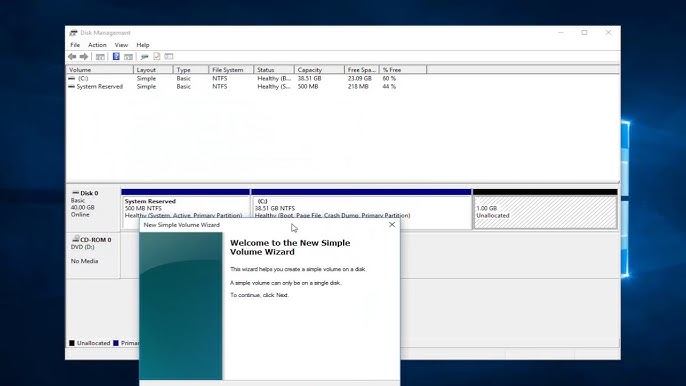
Windows includes a built-in tool called Disk Management. It can initialize a new SSD, create a partition, format it, and assign a drive letter.
Step 1: Open Disk Management
- Press Windows key + X.
- Select Disk Management.
- Wait for the disk list to load.
- Find the SSD by checking its storage size.
Do not choose a disk based only on its position in the list. Compare the capacity carefully. Selecting the wrong disk could erase your Windows installation or personal files.
Step 2: Initialize the SSD
If Windows identifies the drive as “Unknown” or “Not Initialized,” right-click its disk label and select Initialize Disk.
Windows may ask you to choose between these partition styles:
• GPT: The best choice for modern computers, UEFI systems, and drives larger than 2 TB.
• MBR: Useful for older computers that rely on Legacy BIOS, but it has limits and is usually not the best option for a new system.


Choose GPT unless you have a specific reason to use MBR. Modern Windows installations generally work best with GPT and UEFI.
Step 3: Create a new volume
After initialization, the SSD may show as unallocated space. Right-click the unallocated area and choose New Simple Volume.
The setup wizard will ask you to:
- Select the volume size.
- Assign a drive letter.
- Choose a file system.
- Name the volume.
- Complete the format.
If you want one large storage area, use the full available size. If you prefer separate areas for work, games, and backups, you can create more than one volume.
Step 4: Format the SSD
For normal Windows storage, choose NTFS. It is the standard file system for internal Windows drives and supports permissions, large files, and system features.
Use exFAT if you need to move the SSD between Windows and macOS. Avoid FAT32 for modern storage unless you need compatibility with a specific device, because FAT32 cannot store a single file larger than 4 GB.
Quick format is normally enough for a new SSD. A full format takes much longer and writes across the drive. It is not usually needed for routine SSD setup.
Step 5: Confirm the drive
Open File Explorer and select This PC. The SSD should appear with its new drive letter and name.
You can now copy a small test file to the drive. If the file opens normally after you restart the computer, the SSD is ready for regular use.

How to activate an SSD as a Windows boot drive
Activating an SSD for storage is different from using it as the main boot drive. A boot SSD must contain a working operating system and the correct boot files.
If you are replacing an old system drive, you have two main choices:
Clean installation
A clean installation removes the old system from the target drive and installs Windows from scratch. This often gives the best performance and the fewest software problems, but you must back up your files and reinstall your applications.
The general process is:
- Create a Windows installation USB.
- Shut down the computer.
- Install the new SSD.
- Start the computer and open the boot menu.
- Start from the Windows USB.
- Select the target SSD.
- Delete old partitions on that target drive only.
- Install Windows to the unallocated space.
- Complete the setup process.
Drive cloning
Cloning copies the old system drive to the new SSD. It can save time, but the destination SSD must have enough usable space for the data being copied.


Before cloning:
• Check the health of the old drive.
• Remove unnecessary files.
• Back up important data.
• Confirm that the cloning software supports your partition style.
• Make sure the new SSD uses the correct boot mode.
After cloning, enter the computer’s UEFI settings and place the new SSD first in the boot order. If Windows does not start, the EFI boot files may need repair.
Never format the old drive until the new SSD boots correctly and your files are safe.

How to activate an SSD on macOS
macOS uses Disk Utility to prepare internal and external SSDs. The steps are similar to Windows, but the names and file systems differ.
- Connect the SSD to your Mac.
- Open Applications.
- Select Utilities.
- Open Disk Utility.
- Choose View, then Show All Devices.
- Select the physical SSD, not only a volume beneath it.
- Click Erase.
- Choose a name and format.
- Select GUID Partition Map as the scheme.
- Click Erase.
Choose APFS when the SSD will mainly work with modern macOS systems. Choose exFAT if the SSD must work with both macOS and Windows.
Be careful when selecting the drive. Disk Utility can erase the wrong disk if you choose by name alone. Check the storage capacity and connection before confirming.
For a Mac boot drive, use macOS Recovery or a bootable installer. The Mac may also need the correct startup disk selected in System Settings.

How to activate an SSD in Linux
Linux can activate an SSD through a graphical disk utility or the command line. The exact steps vary by distribution, but the core process remains the same.


A graphical tool such as GNOME Disks can help you:
• Identify the physical SSD.
• Create a GPT partition table.
• Create an ext4 partition.
• Format the partition.
• Mount the drive.
For a Linux-only SSD, ext4 is a common choice. For a drive shared with Windows, exFAT may be more practical.
Advanced users can use tools such as lsblk, fdisk, parted, and mkfs. These commands are powerful, but a wrong disk name can destroy data instantly. Always confirm the device path with a command such as lsblk before changing partitions.
After formatting, Linux may mount the SSD temporarily. To mount it automatically after each restart, add its UUID to the file system table. This step requires care because an incorrect entry can affect system startup.

What to do if the SSD is not detected
If the computer does not detect the SSD, formatting will not solve the problem. Start with the physical connection, then check firmware and operating system settings.
Try these steps:
- Shut down the computer completely.
- Disconnect and reconnect the SSD.
- Test a different SATA cable or USB cable.
- Try another motherboard port.
- Check whether the M.2 drive is installed in a compatible slot.
- Enter UEFI or BIOS and look for the drive.
- Update the motherboard firmware if needed.
- Test the SSD on another computer.
- Check Disk Management, Disk Utility, or a Linux disk tool.
- Look for error messages in the operating system.
A SATA SSD needs both a data connection and power. An M.2 SSD usually receives both through the motherboard slot, but it must be inserted at the correct angle and secured with the proper screw.
Some laptops have only one storage slot. Others disable a SATA port when a particular M.2 slot is used. The motherboard or laptop manual can reveal these shared connections.
If the SSD appears in firmware but not in Windows, the issue may be initialization or driver related. If it does not appear in firmware on multiple systems, the drive or connection may be defective.

How to fix common SSD activation errors
“Unknown, Not Initialized”
This usually means the operating system sees the drive but cannot find a usable partition table. Initialize it in Disk Management or Disk Utility after confirming that it contains no needed data.
“Unallocated space”
The SSD has no usable volume yet. Create a new simple volume in Windows or erase and partition it in macOS or Linux.
“No media”
This can point to a faulty external enclosure, USB adapter, cable, or SSD. Test the drive with another enclosure or direct connection if possible.
“Access denied”
You may not have administrator rights, or the volume may have file system permissions from another computer. Use an administrator account and avoid changing permissions on a system disk without a backup.
The SSD shows the wrong capacity
Manufacturers use decimal units, while many operating systems display capacity differently. A drive advertised as 1 TB may appear as roughly 931 GB in Windows. A small difference is normal, but a major difference may indicate a partition issue or a defective device.
The SSD is slow after activation
Check whether the drive is nearly full, overheating, connected through a slow port, or using an old driver. SSD performance can also drop during long writes because of cache limits. Allow the drive to cool and maintain free space for normal operation.

SSD setup mistakes to avoid
The biggest mistake is treating every SSD as empty. A drive from an old computer may contain photos, documents, or a complete operating system. Always identify the disk before you initialize or format it.
Avoid these common errors:
• Formatting the wrong disk.
• Choosing MBR without a compatibility reason.
• Using FAT32 for large video files.
• Installing an NVMe SSD in an incompatible M.2 slot.
• Forgetting the power cable on a SATA drive.
• Cloning a disk without checking the destination size.
• Removing the old drive before testing the new boot drive.
• Filling the SSD completely.
• Skipping backups because the SSD is new.
• Using random command-line instructions without checking the disk path.
Current SSD guidance also supports leaving some free space. The exact amount depends on the drive, workload, and controller, but keeping at least 10% free is a sensible general practice for many users. It gives the operating system room for temporary files and maintenance tasks.

How to check SSD health after activation
Activating an SSD makes it usable, but it does not prove that the drive is healthy. Check its condition before trusting it with important files.
Useful checks include:
• Review SMART data with a reputable drive utility.
• Check the drive temperature.
• Confirm that the reported capacity is correct.
• Copy test files to and from the SSD.
• Restart the computer and confirm that the drive remains visible.
• Run the operating system’s file system check if errors appear.
Windows may report basic drive health through its storage settings, while many SSD makers provide diagnostic tools for their own products. On Linux, smartctl can read SMART information when the device and adapter support it.
Do not panic over a small temperature increase during large file transfers. SSDs can become warm under load. However, repeated thermal warnings, disappearing drives, or large numbers of reported errors deserve immediate attention.
Frequently Asked Questions About How to Activate an SSD
Do I need to activate a new SSD before using it?
Yes, most new internal SSDs need to be initialized, partitioned, and formatted before they can store files. External SSDs may arrive preformatted, but you should still check that the file system matches your devices.
Why is my SSD detected but not visible in File Explorer?
The SSD may not have a partition, format, or drive letter. Open Disk Management, locate the correct drive, create a volume, format it, and assign a drive letter.
Should I choose GPT or MBR when I activate an SSD?
Choose GPT for most modern computers using UEFI. MBR is mainly useful for older systems that require Legacy BIOS and has limitations with large drives.
Does activating an SSD erase its data?
Initialization and formatting can erase existing partitions or files, especially when you create a new partition table. Back up the SSD first if it has been used before.
Can I activate an SSD without formatting it?
You can use an existing compatible partition without formatting it if the operating system recognizes the file system. A new or unallocated SSD normally requires formatting before it can store files.
Why does my computer not detect my M.2 SSD?
The slot may support SATA but not NVMe, or it may share lanes with another port. Check the computer manual, reseat the SSD, and confirm detection in UEFI or BIOS.
Is NTFS or exFAT better for an external SSD?
NTFS is usually best when the drive is used mainly with Windows. exFAT is more convenient when you regularly move the SSD between Windows and macOS.
Conclusion
Activating an SSD usually means making the drive visible, initializing it, creating a partition, formatting it, and assigning access through the operating system. Windows users can use Disk Management, Mac users can use Disk Utility, and Linux users can use a disk utility or terminal tools.
The safest approach is simple: identify the correct drive, back up existing data, choose GPT for most modern systems, select the right file system, and test the SSD before relying on it. Follow these steps carefully, and your new SSD should become a fast, reliable part of your computer setup. Share your SSD model and operating system if you need help troubleshooting a specific activation problem.

Everett Ashford is a tech reviewer at mytechgrid.com specializing in SSDs, cameras, TVs, earbuds, headphones, and other consumer electronics. He provides honest, data-driven reviews based on hands-on testing and real-world performance analysis. Everett simplifies complex tech details to help readers make smart, confident buying decisions.