Measure your ear canal opening and outer ear gently, then match those measurements to an earbud tip size.
Learning how to measure ear size for ear buds can make a big difference in comfort, sound, and stability. As someone who has tested many earbud fits, I have found that the best results come from combining simple measurements with a short, careful listening test. This guide explains the tools, steps, common mistakes, and signs of a proper fit.
Why Earbud Fit Depends on Ear Size
Earbuds do not sit in every ear the same way. Ear canals vary in width, depth, shape, and angle. Even your left and right ears may need different ear tip sizes.
A good fit should create a gentle seal without pressure. This seal helps keep outside noise away and stops music from leaking out. It also helps the earbuds produce clear bass.
If the ear tip is too small, the earbud may feel loose. You may notice weak bass, sound leakage, or frequent movement. If the tip is too large, you may feel pressure, soreness, or a blocked sensation.
Measuring ear size for ear buds is not about finding one exact number. It is about finding the ear tip shape and size that work with your ear canal.
What You Need to Measure Ear Size for Ear Buds
You do not need special medical tools for a basic fit check. However, a few simple items can make the process easier.
Gather these items:
- A clean ruler with millimeter markings
- A soft measuring tape
- A small mirror
- A smartphone camera
- The ear tips that came with your earbuds
- A clean sheet of paper
- A pen or pencil
- A soft cotton swab, used only around the outer ear
Never push a ruler, pencil, cotton swab, or any other object into your ear canal. The ear canal is sensitive, and small injuries can cause pain or infection.
For better accuracy, measure in good light. Remove glasses, hats, or anything that changes how the earbud sits. Also clean the earbuds before testing them.
A helpful tip is to measure both ears. Your ears may not match, and using the same ear tip size on both sides is not always ideal.
How to Measure Ear Size for Ear Buds at Home
The safest home method focuses on the outer ear and the entrance to the ear canal. You are not trying to measure deep inside the canal.
Step 1: Find the ear canal opening
Look in a mirror and identify the small opening where the ear canal begins. It is usually below the upper folds of the ear and above the earlobe.
The opening may look round, oval, or slightly angled. Do not assume that its visible shape shows the full canal. The canal bends and changes shape farther inside.
Step 2: Measure the canal entrance
Place the ruler next to the ear, not inside it. Estimate the width of the canal entrance in millimeters.
For many people, the entrance may appear to be roughly 6 to 12 millimeters wide. This is only a rough guide. Camera angle, lighting, ear shape, and the natural skin folds can affect the result.
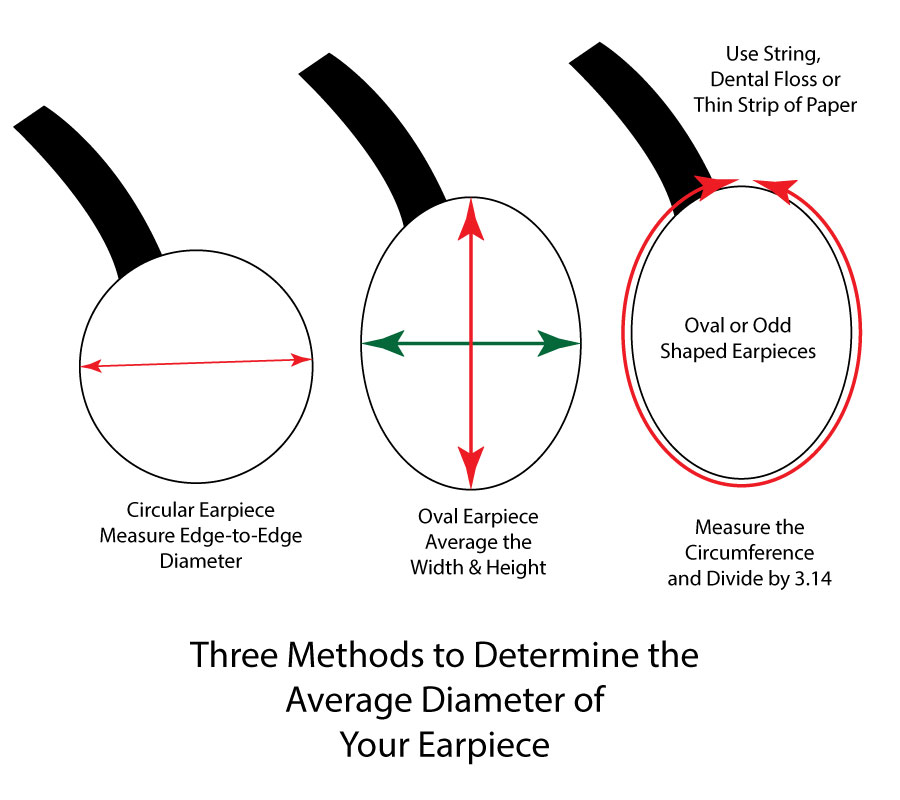
If the opening looks oval, record both measurements:
- The widest side to side measurement
- The top to bottom measurement
For example, you might estimate one ear at 8 millimeters wide and 10 millimeters tall. That suggests an oval opening, not a perfect circle.
Step 3: Measure the outer ear
Measure the distance from the top of the ear to the bottom of the earlobe. Then measure from the front edge of the ear to the back edge.
Outer ear measurements help when choosing earbuds with ear hooks, wings, or large housings. They can also show whether an earbud body may press against the concha, which is the bowl shaped area beside the canal.
Step 4: Compare your measurements with ear tip sizes
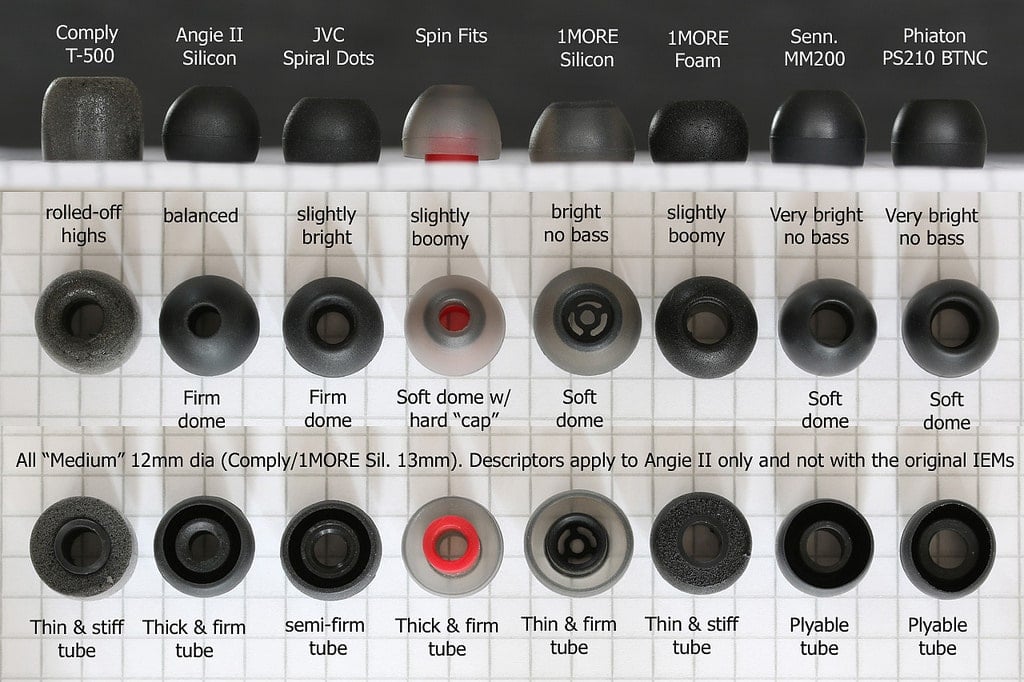
Check the ear tip package or the product guide. Many brands label tips as extra small, small, medium, and large. Some list the actual diameter in millimeters.
Use your measurement as a starting point:
- A narrow canal entrance often suits extra small or small tips.
- A medium opening often suits medium tips.
- A wider opening may need large tips.
- A long or angled canal may work better with oval, foam, or double flange tips.
These ranges are not strict rules. Material, shape, softness, and insertion depth all affect the final fit.
Step 5: Test each ear separately
Insert the earbuds using a gentle twisting motion. Do not force them straight inward. The earbud should sit securely while remaining comfortable.
Play a familiar song with clear vocals and steady bass. Move your jaw, smile, speak, and turn your head. If the sound stays stable and the earbud does not shift, the fit may be close.
Repeat the test with the next smaller and larger tip. A short comparison is often more useful than measuring alone.

How to Check Whether Your Earbud Fit Is Correct
The best fit balances comfort, sound, and stability. Think of the ear tip as a soft door seal. It should close the gap without pushing hard against the frame.
A properly fitted earbud usually has these signs:
- Bass sounds full but not muddy.
- Voices sound clear and centered.
- The earbud stays in place while walking.
- Outside noise becomes quieter.
- You do not need to increase the volume to hear detail.
- There is no sharp pain or strong pressure.
- Both earbuds feel secure for at least 20 to 30 minutes.
Try the “seal test.” Play music at a low volume, then gently press the earbud inward. If the sound becomes much fuller only when you press it, the current tip may be too small or may not seal your canal.
Try the movement test as well. Walk, nod, chew, and open your mouth. Earbuds can loosen when the jaw moves because the ear canal changes shape slightly.
A good fit should not create intense fullness, pain, itching, or numbness. If those symptoms appear, remove the earbuds and try a different size or shape.

Choosing the Right Ear Tip Size
Ear tip size is only one part of the fit. The material and design matter just as much.
Silicone ear tips
Silicone tips are common and easy to clean. They come in many sizes and often feel light in the ear.
They work well when you want:
- A quick, easy fit
- A cooler feel during exercise
- Simple cleaning
- A moderate level of noise reduction
Silicone tips may not seal well if your ear canal is unusually narrow, shallow, or oval.
Foam ear tips
Foam tips compress before expanding inside the canal. They can improve passive noise blocking and may stay in place better.
To use them correctly, compress the foam gently, insert the earbud, and hold it in place for several seconds. Foam tips may need more frequent replacement because oils and moisture affect their shape.
Double flange and triple flange tips
These tips use more than one sealing ring. They may offer a stronger seal, but they can feel deeper or more noticeable.
Use care with deeper tips. They should never cause pain or pressure. If you have sensitive ears, a shallow silicone tip may be a better choice.
Ear tips with wings
Wings press lightly against the outer ear to add support. They can help active users, especially when the earbud itself does not stay in place.
Measure the outer ear and check the wing position before buying. A wing that is too large can rub the skin and cause soreness.

How to Measure Ear Size for Ear Buds Without Special Equipment
If you do not have a ruler, you can still make a useful fit estimate.
Take a clear photo of the ear from the side. Place a known object, such as a standard coin, beside the ear for scale. Do not place the object inside the ear. Compare the visible canal opening with the known object using an image editor or ruler app.
This method has limits. Camera distance and lens distortion can change the apparent size. Use it to compare your ears or narrow your tip choices, not as a clinical measurement.
You can also use the included ear tips as a guide. Start with the medium tip, then compare how each size feels. This practical method often works better than measuring because it tests the full system: ear shape, tip material, earbud housing, and insertion angle.
A useful fitting routine is:
- Start with the medium tips.
- Try the smaller size in one ear.
- Try the larger size in the other ear.
- Play the same music at the same volume.
- Compare bass, comfort, and movement.
- Keep the best size for each ear.

Common Mistakes When Measuring Ear Size for Ear Buds
Many fitting problems come from measuring the wrong part of the ear. The outer ear can look large while the canal entrance is small. The reverse can also happen.
Avoid these mistakes:
- Measuring only the length of the outer ear
- Pushing a tool into the ear canal
- Choosing a large tip for stronger noise blocking
- Using the same size in both ears without testing
- Judging fit after only one minute
- Testing only while sitting still
- Increasing the volume to hide a poor seal
- Ignoring pain or pressure
- Wearing dirty or damaged ear tips
- Assuming every brand uses the same size system
One mistake I often see during fit checks is choosing the largest tip because it seems more secure. In practice, a large tip can create pressure and may slowly work its way out. A smaller, softer tip with the right shape can often stay in place better.
Another common mistake is inserting earbuds too deeply. Depth is not the same as security. The right fit should feel stable without making the ear feel plugged or sore.

How Ear Shape Affects Earbud Comfort
Ear size is only part of the picture. Ear shape often explains why one person loves a particular earbud while another person cannot wear it for more than a few minutes.
The main factors include:
- Canal width
- Canal angle
- Canal depth
- Concha size
- Outer ear folds
- Earlobe shape
- Skin sensitivity
- Differences between the left and right ear
A shallow canal may need a short ear tip. A narrow canal may need an extra small tip. A sharply angled canal may work better with an oval tip or an earbud that sits at a slight rotation.
The earbud housing also matters. A large housing can press against the outer ear even when the tip size is correct. If the pressure is outside the canal, changing the tip may not solve the problem. You may need a smaller earbud body.
For people with sensitive skin, soft silicone or memory foam may feel better than firm silicone. However, foam can hold heat and moisture, so it needs careful cleaning and regular replacement.
How to Improve Earbud Fit for Exercise
Exercise adds movement, sweat, and jaw motion. A fit that feels perfect at a desk may loosen during a run.
Before exercising, test the earbuds during several movements:
- Walk quickly for five minutes.
- Turn your head from side to side.
- Bend forward.
- Speak or chew.
- Perform light jumping movements.
- Wipe away sweat and test again.
If an earbud slips, first check the insertion angle. Rotate it slightly backward or forward rather than pushing it deeper. You can also try a different tip size or add a support wing.
Do not use a tip that creates pain just because it stays in place. Pain is a warning, not proof of a secure fit. A stable fit should still allow normal movement of the jaw and outer ear.
For workouts, clean the tips after use. Sweat and skin oil can make silicone slippery. Moisture can also affect electronic components if the earbuds are not designed for water exposure.
When to Stop Measuring and See a Professional
Home measurements are useful for choosing ear tips, but they cannot diagnose ear problems. Stop using the earbuds if you develop pain, bleeding, drainage, strong itching, or a sudden change in hearing.
You should also seek professional advice if:
- One ear always feels blocked.
- You have a history of ear surgery.
- Earwax buildup affects fit or hearing.
- You experience ringing after using earbuds.
- You cannot find a comfortable tip size.
- The earbud causes repeated skin irritation.
- You notice hearing loss or dizziness.
An audiologist can inspect the ear canal and check whether a custom ear tip is appropriate. Custom tips may improve comfort, but they are not necessary for most users.
Ear canal shape can also change over time. Swelling, irritation, wax, and skin conditions may temporarily change the way earbuds fit. If the fit suddenly changes, do not assume you need a new size right away.
How to Maintain a Safe and Comfortable Earbud Fit
Correct measurement is only the beginning. Clean, well maintained earbuds are more comfortable and easier to fit.
Follow these habits:
- Wipe silicone tips with a clean, slightly damp cloth.
- Remove foam tips according to the maker’s cleaning instructions.
- Let all parts dry before use.
- Inspect tips for tears, cracks, or hard spots.
- Replace worn tips.
- Keep the earbuds in their charging case.
- Avoid sharing earbuds.
- Keep volume at a safe level.
- Give your ears regular breaks.
The World Health Organization advises keeping personal audio at a safe volume and limiting long listening sessions. A perfect ear tip cannot protect your hearing from excessive volume.
A simple rule is to lower the volume when you are in a quiet place. If people nearby can hear your music, or you need to raise your voice while listening, the volume may be too high.
Frequently Asked Questions About How to Measure Ear Size for Ear Buds
Can I measure my ear canal with a ruler?
No. Use a ruler only beside the ear to estimate the canal entrance. Never place a ruler or another object inside the ear canal.
What is the most common earbud tip size?
Medium is often the starting size included by manufacturers, but there is no universal standard. Ear canal width, tip shape, and earbud design vary, so test small, medium, and large options when possible.
Should both ears use the same earbud tip size?
Not always. Many people have slightly different ear shapes, so one ear may need a small tip while the other needs a medium or large tip.
How do I know if my earbud tips are too small?
A tip may be too small if the earbud slips, bass sounds weak, or outside noise remains loud. Pressing the earbud inward and hearing a sudden increase in bass is another sign that the seal may be too loose.
How do I know if my earbud tips are too large?
A tip may be too large if you feel pressure, soreness, itching, or pain. The earbud may also feel difficult to insert or may slowly push itself out.
Can earbud size affect sound quality?
Yes. A poor seal can reduce bass and make outside sounds more noticeable. A good seal usually produces fuller sound at a lower listening volume.
Are foam tips better than silicone tips?
Neither is always better. Foam tips can improve seal and noise blocking, while silicone tips are often easier to clean and may feel cooler during long use.
How long should I test an earbud tip?
Test each size for at least 10 to 15 minutes, then repeat the test while walking or moving your jaw. Some pressure problems appear only after longer use.
Can I use different ear tip sizes on the same pair?
Yes. If your ears differ, using separate sizes can improve comfort and stability. Just make sure both earbuds still sit securely and produce balanced sound.
Conclusion
Measuring ear size for ear buds is a safe, simple process when you focus on the canal entrance, outer ear, and real world comfort. Use a ruler beside the ear, compare several tip sizes, test each ear separately, and pay attention to sound, movement, and pressure.
The best fit is not always the largest or tightest one. It is the tip that creates a gentle seal, stays in place, and remains comfortable during normal use. Try the steps today, replace worn tips when needed, and share your fitting experience or questions in the comments.

Everett Ashford is a tech reviewer at mytechgrid.com specializing in SSDs, cameras, TVs, earbuds, headphones, and other consumer electronics. He provides honest, data-driven reviews based on hands-on testing and real-world performance analysis. Everett simplifies complex tech details to help readers make smart, confident buying decisions.