Move your Lightroom catalog, previews, and images to an SSD for much faster load and edits.
I’ve spent years working with large photo libraries and editing workflows. In this guide I show exactly how to save Lightroom to SSD the smart way. You’ll learn what to move, how to move it on Windows and macOS, and how to avoid common mistakes. Read on to get faster imports, snappier Develop responses, and safer backups when you save Lightroom to SSD.

Why move Lightroom to an SSD?
Moving Lightroom to an SSD speeds up your workflow. SSDs read and write data far faster than old hard drives. Lightroom opens catalogs, builds previews, and swaps cache files often. When those files live on an SSD, Lightroom feels much faster.
Benefits of how to save Lightroom to SSD
- Faster catalog open and switching between images.
- Quicker import and export times.
- Smoother Develop module and preview redraws.
- Faster smart preview generation and face recognition.
- Lower chance of stutter during culling or tethered capture.
When to prioritize moving Lightroom to SSD
- You use Lightroom Classic with large catalogs.
- You edit many RAW files daily.
- You do tethered shooting or batch exports.
- Your current drive is slow or nearly full.

What to prepare before you save Lightroom to SSD
Preparation keeps the move safe and fast. Follow these prep steps each time you plan how to save Lightroom to SSD.
Essential steps
- Back up your catalog and photos. Create a full catalog backup and copy your photo folders.
- Check SSD space. Ensure enough room for catalog, previews, and cache. Leave 10–20% free for best performance.
- Update Lightroom. Use the latest Lightroom Classic or Lightroom app for best compatibility.
- Close Lightroom. Always close the app before moving files to avoid corruption.
- Note current folder structure. Keep a record of your photo folders and catalog path.
Optional checks
- Test SSD health and firmware. Good firmware avoids odd bugs.
- Enable TRIM on your OS to keep SSD performance healthy.
- If the SSD is external, use USB 3.1, USB-C, Thunderbolt, or SATA III for best speeds.

How to save Lightroom to SSD — step-by-step guide
This section shows clear steps for Lightroom Classic and Lightroom desktop on both Windows and macOS. Follow each step slowly. I list numbered actions to make it simple.
Step 1 — Backup first
- Open Lightroom Classic.
- Go to Edit > Catalog Settings (Windows) or Lightroom > Catalog Settings (macOS).
- Click "Show" to locate the catalog file (.lrcat). Close Lightroom.
- Copy the .lrcat file and the associated .lrdata preview files to a backup drive or cloud.
Step 2 — Decide what to move
- Move the catalog (.lrcat) and its preview files (.lrdata).
- Move the Camera Raw cache if you want faster Develop edits.
- Optionally move original photos or store them on a larger HDD while keeping the catalog on the SSD.
How to save Lightroom to SSD often means moving only the catalog and cache if your SSD is limited.
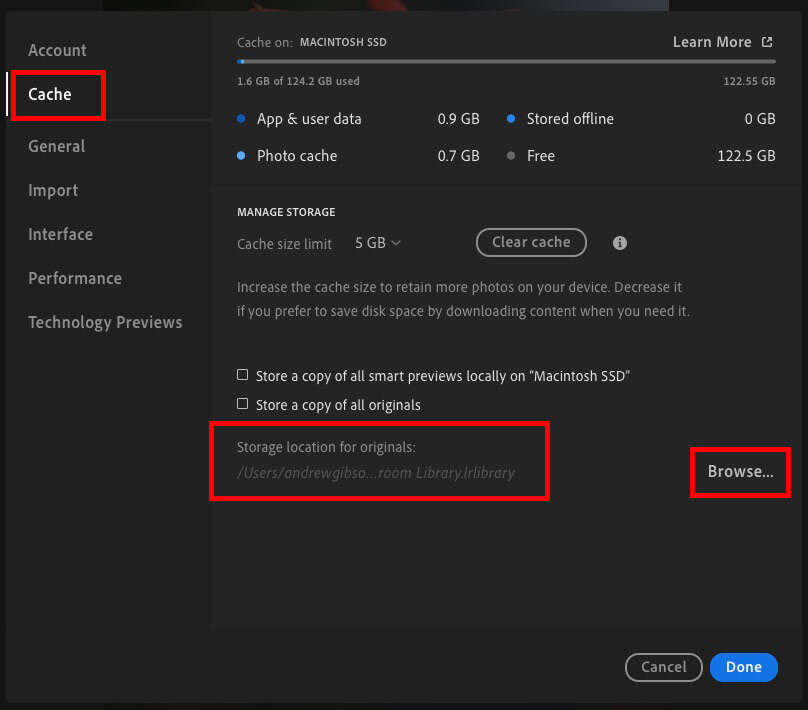
Step 3 — Move the catalog to the SSD
Windows and macOS (same idea)
- Copy the .lrcat file and the .lrdata folder to a folder on the SSD.
- Double-click the .lrcat file on the SSD. Lightroom opens that catalog. Or open Lightroom while holding Alt (Windows) or Option (macOS) and choose "Open Catalog" then select the catalog on the SSD.
- Verify previews and edits load. If everything works, delete the old catalog copy or archive it.
Step 4 — Move previews, smart previews, and cache
- Previews (.lrdata) should sit next to the catalog on the SSD for best speed.
- Smart previews help speed up editing when originals live on a slower disk.
How to save Lightroom to SSD is fastest when previews and cache are together with the catalog.
Step 5 — Move original photo folders (optional)
- Move the photo folders using File Explorer (Windows) or Finder (macOS) if you want the originals on the SSD.
- In Lightroom, right-click the top folder in Library > Folders and choose "Update Folder Location" then point to the new SSD folder.
- Lightroom will relink images without losing edits if folder structure stays intact.
Step 6 — Change Camera Raw cache location
- In Lightroom Classic, go to Edit > Preferences > File Handling.
- Set Camera Raw cache to a folder on the SSD and increase size (20–50 GB if you edit lots of RAWs).
Changing cache is a key tip when you want faster develop operations after you save Lightroom to SSD.
Step 7 — Test, then cleanup
- Test library load, develop edits, and exports.
- If all good, remove old copies to free space or keep as an archive.
- Update backup routine to include new SSD paths.
How to save Lightroom to SSD with Lightroom (cloud) app
- Lightroom desktop (cloud-first) stores originals in the cloud or locally. Go to Preferences > Local Storage and set location to the SSD.
- Sync settings and originals will then use the SSD for faster local access.

Managing files, paths, and backups after the move
Keeping your library healthy matters after you save Lightroom to SSD. These tips reduce errors and lost links.
Best practices
- Keep a clear folder structure. Don’t rename or move folders outside Lightroom, or you will break links.
- Use File > Import when adding new folders so Lightroom tracks them.
- Keep a regular backup plan. Back up the catalog weekly or after big edits.
- Store originals and backups on separate drives. SSD for active work, HDD or NAS for archive.
Fixing missing files
- Use the question mark icon on missing images to locate an image.
- Use "Find Missing Folder" to relink entire folders if you moved them outside Lightroom.

Performance tips and troubleshooting when you save Lightroom to SSD
Small tweaks can make a big difference after you save Lightroom to SSD. Here are reliable fixes for common pain points.
Tips for best speed
- Use NVMe SSD for top speed. NVMe beats SATA SSDs by a wide margin in real use.
- Keep 10–20% free space on the SSD.
- Enable TRIM in macOS and Windows to maintain SSD health.
- Increase Camera Raw cache to 20–50 GB for heavy editing.
Common issues and fixes
- Lightroom says a file is missing — Relink the folder with "Find Missing Folder".
- Permissions errors on macOS — Make sure Lightroom has Full Disk Access in System Preferences.
- Slow exports — Check that export location is on the SSD and NVMe drivers are up to date.

My experience: what I learned moving Lightroom to an SSD
I moved a 200,000-photo catalog to an NVMe SSD three years ago. The difference was obvious the next day. Catalog opens in seconds. Previews render almost instantly. Exports finish hours sooner on big batches.
Mistakes I made so you won’t
- I once moved files while Lightroom ran. That created a messy relink job. Don’t do that.
- I trusted a single backup. A drive failed. Now I use two backups and cloud sync.
- I stored everything on a small SSD. Now I keep active work on SSD and archives on a larger HDD.
Practical tip from experience
- Keep smart previews on the SSD. They make edits smooth even if originals sit on slower storage. This is the most cost-effective way to speed Lightroom if your SSD is small.
src="https://marissachrzanstudios.com/wp-content/uploads/sites/14198/2025/02/photographers-how-to-store-and-edit-images-819×1024.png"
alt="Frequently Asked Questions of how to save lightroom to ssd”
style=”max-width: 100%; height: auto; border: 2px solid black; border-radius: 10px; display: block; margin: 0 auto;”
loading=”lazy”
/>
Frequently Asked Questions of how to save lightroom to ssd
How do I move my Lightroom catalog to an SSD?
Close Lightroom, copy the .lrcat file and its .lrdata preview folder to the SSD, then open that catalog from the SSD. Verify everything loads, then update backups.
Will moving Lightroom to an SSD speed up exports?
Yes. Exports often read and write many files and temporary data. An SSD reduces export times, especially for large batches and complex stacks.
Should I move my original photos to the SSD or just the catalog?
If the SSD has ample space, move both for max speed. If space is limited, move the catalog, previews, and cache to the SSD and keep originals on a larger HDD.
How do I change the Camera Raw cache to the SSD?
Open Lightroom Preferences > File Handling and set the Camera Raw cache location to a folder on the SSD. Increase cache size for heavy RAW editing.
Can I use an external SSD for Lightroom?
Yes. Use a fast interface like Thunderbolt or USB-C with USB 3.1+ for best performance. Keep the drive connected during editing to avoid missing files.
Conclusion
Saving Lightroom to an SSD will make your edits faster and your workflow smoother. Back up first, move the catalog and previews, and relink folders if you move originals. Use an SSD for active work and an HDD for archives to balance speed and cost. Try the steps here, test your setup, and update your backup plan. Ready to speed up your workflow? Move your Lightroom files to an SSD today and leave a comment about your results or questions.

Jamie Lee is a seasoned tech analyst and writer at MyTechGrid.com, known for making the rapidly evolving world of technology accessible to all. Jamie’s work focuses on emerging technologies, product deep-dives, and industry trends—translating complex concepts into engaging, easy-to-understand content. When not researching the latest breakthroughs, Jamie enjoys exploring new tools, testing gadgets, and helping readers navigate the digital world with confidence.