Taking apart a digital camera safely means removing the battery, documenting each step, and avoiding charged circuits and delicate optics.
Learning how to take apart a digital camera can help you clean a sensor, replace a screen, inspect a button, or recycle an old body. However, a camera is not like a simple toy. It has tiny screws, fragile ribbon cables, strong springs, sealed lens parts, and, in many models, a flash capacitor that can hold a dangerous charge. This guide explains the process in a careful, practical way, with clear limits on what most home users should attempt.
Before You Take Apart a Digital Camera
The first step in learning how to take apart a digital camera is knowing whether the repair is worth the risk. A simple battery-door repair may be reasonable at home. A flash circuit, image sensor, or zoom lens repair may require a trained technician.
Check the camera model before opening it. Search for its service manual, parts diagram, or repair guide. Camera designs vary widely, even within the same brand.


Before starting:
• Remove the battery, memory card, strap, and accessories.
• Turn off wireless features and disconnect any USB or charging cable.
• Work on a clean table with bright light.
• Use a small parts tray or several labeled containers.
• Take photos of the camera after every major step.


• Read the warranty terms. Opening the body may cancel warranty service.
A useful rule is simple: if the camera still has value, or if you need the flash to work, professional repair is often safer and cheaper than replacing damaged parts.
Tools You Need
Good tools make taking apart a digital camera much easier. The wrong screwdriver can strip a screw head in seconds, and a metal pick can scratch a circuit board or short two contacts.
Gather these items:
• Precision Phillips screwdrivers, often sizes PH00 and PH000
• Small flat screwdriver for gentle prying
• Plastic opening picks or guitar picks
• Fine-tip, nonmagnetic tweezers
• A magnetic parts tray
• Painter’s tape and a fine pen for labels
• A soft, lint-free cloth
• A camera-safe blower
• An anti-static wrist strap or grounded work surface
• A phone or camera for progress photos


• A bright desk lamp
Avoid using compressed air directly on the sensor or inside the lens. It can push dust deeper into the camera and may leave moisture or propellant behind.
Do not use a knife to split the camera shell. A plastic opening pick gives better control and reduces marks.
Important Safety Risks
Digital cameras contain several parts that can cause permanent damage or injury if handled poorly. The most serious risk is the flash capacitor. It can store a high voltage charge even after the battery is removed.
Never touch exposed flash circuitry unless you have proper electronics training and the correct discharge equipment. Do not short the capacitor with a screwdriver. That can create a spark, damage the board, or cause burns.
Other risks include:
• Lithium-ion batteries that can swell, leak, or ignite when punctured
• Sharp metal brackets inside the body
• Fragile flex cables and board connectors
• Static electricity that can damage the image sensor or processor
• Lens springs and gears that can move suddenly
• Glass filters that can crack or collect fingerprints
If the battery is swollen, hot, leaking, or damaged, stop immediately. Place the camera in a safe, nonflammable area and follow local battery recycling guidance.
A professional camera technician should handle flash capacitor work, power-board repair, sensor replacement, and lens-unit disassembly. This boundary is important. Taking apart a digital camera does not always mean taking apart every part inside it.


How to Prepare the Camera
Preparation prevents most mistakes. Before taking apart a digital camera, test and record its current condition.
Take a photo with the camera and check:
• The shutter
• The flash
• The display
• The buttons
• The zoom
• The memory card slot
• The lens cover
• The USB or charging port
Write down any fault. For example, note whether the lens is stuck, the screen is blank, or the camera shuts down. This record helps you compare the camera after reassembly.
Next, remove the battery and memory card. Open the battery door and leave it open for a few minutes. This does not guarantee that all stored electrical energy is gone, but it reduces the chance of accidental startup.
Place a clean cloth under the camera. It protects the body from scratches and keeps tiny screws from bouncing away.


Step-by-Step: How to Take Apart a Digital Camera
The exact screw layout differs by model, but most compact digital cameras follow a similar pattern. Move slowly, and never force a panel that does not release.
1. Remove the external screws
Inspect the bottom, sides, and front of the camera. Screws may hide under:
• Rubber grips
• Decorative covers
• Battery doors
• Port covers
• Stickers
Use the correct driver and press straight down while turning. This keeps the tool seated in the screw head.
Place each screw in a labeled section of your tray. Screws may look alike but have different lengths. A long screw in the wrong hole can damage an internal board or lens assembly.
2. Separate the outer shell
After removing the visible screws, use a plastic pick along the seam. Start near a corner or a port opening, where the shell often has a small gap.
Slide the pick gently around the body. You may hear small clips release. That sound is normal, but cracking plastic is not.
Do not pull the front and rear shells apart quickly. A ribbon cable may connect the rear screen, buttons, or control wheel to the main board.
3. Disconnect ribbon cables carefully
Ribbon cables are flat, thin cables with small locking connectors. Most use one of two designs:
• Flip-lock connectors have a small dark or brown bar that lifts.
• Slide-lock connectors have a tab that moves slightly outward.
Use tweezers only on the cable edge or connector tab. Never pull hard on the cable itself.
Take a close photo before disconnecting each cable. Mark the cable location with a small piece of tape if several connectors look similar.
4. Remove the rear screen assembly
Many compact cameras have the LCD screen attached to the rear shell. Once its ribbon cable is released, remove the screen or leave it in the shell if it is not blocking your work.
Keep the display face down on a clean cloth. Avoid pressing the screen, as older LCD panels can crack under surprisingly little force.
5. Inspect the main board
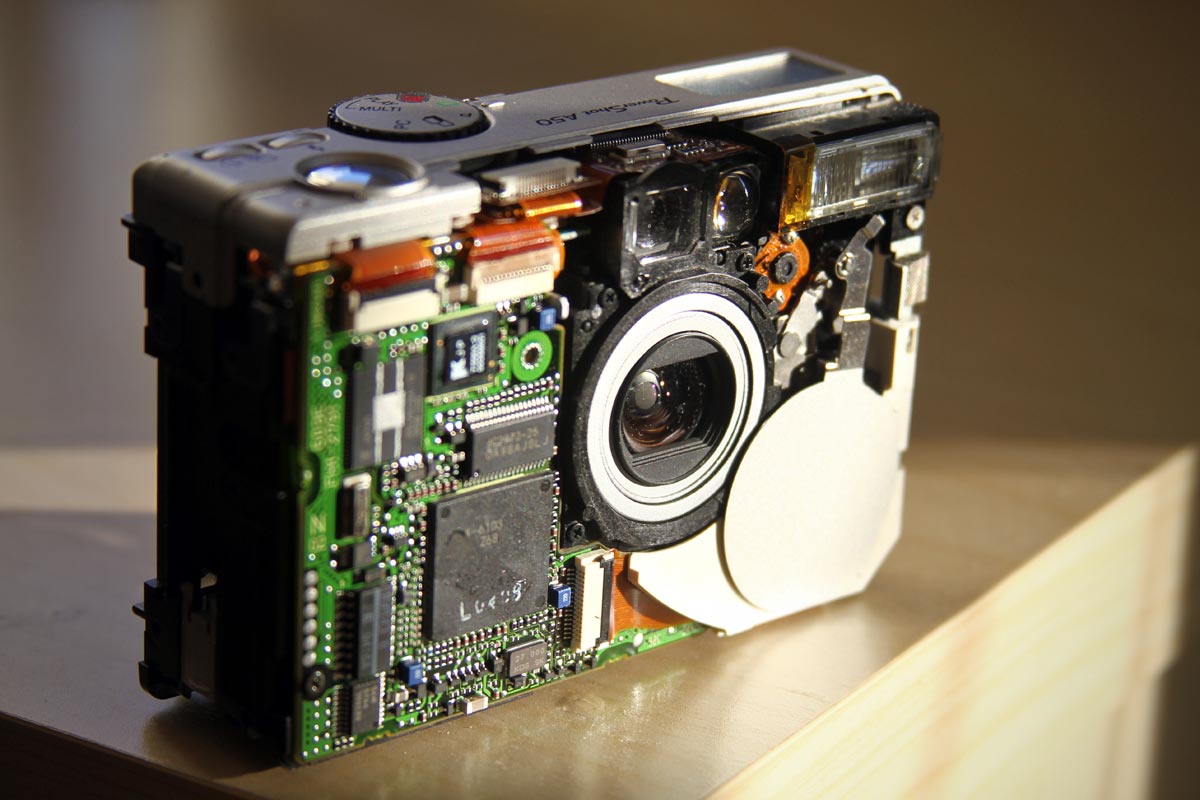
The main board may contain the processor, memory card slot, USB port, image sensor connection, and power circuits. Do not touch the board more than needed.
Look for:
• Loose connectors
• Corrosion
• Broken solder joints
• Torn ribbon cables
• Dust or debris
Do not scrape corrosion with a sharp tool. Board repair often needs magnification, flux, soldering equipment, and electronics experience.
6. Stop before the flash circuit
The flash assembly is usually near the top of the camera. It may include a capacitor, transformer, trigger circuit, and high-voltage wiring.
For most people, this is the correct stopping point. You can inspect the area visually, but do not touch exposed contacts or attempt to remove the flash capacitor without proper training.
7. Avoid opening the lens unit
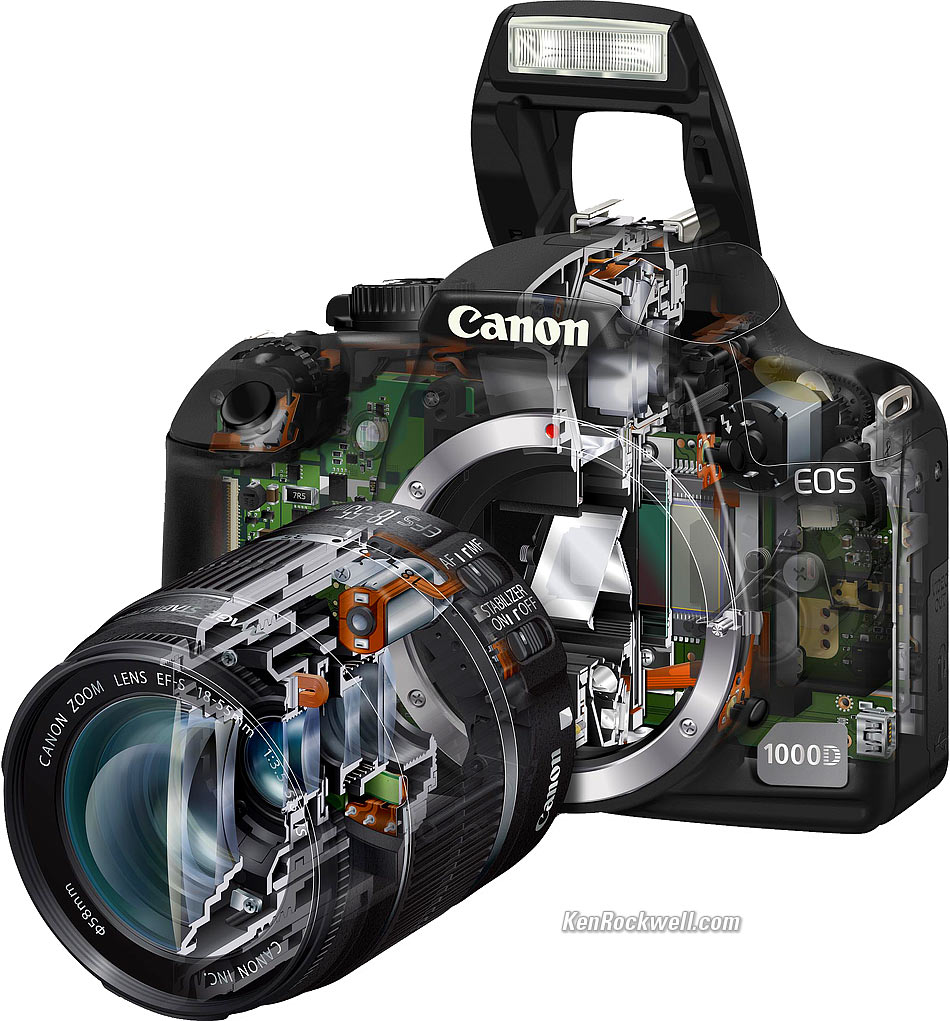
A camera lens is a carefully aligned system. It may contain several small groups, guides, springs, gears, and a shutter mechanism.
Opening the lens can cause:
• Misaligned focus
• Zoom errors
• Dust inside sealed groups
• Damaged gear timing
• Permanent image softness
If your goal is cleaning, use a blower on the outside of the camera and follow the manufacturer’s sensor-cleaning instructions. Do not insert cotton swabs or tools into the lens barrel.

How to Remove Common Camera Parts
Some parts are easier and safer to remove than others. Your camera model may use different clips, screws, or adhesive.
Battery door
A battery door may use a small pin, spring, or hinge. Inspect the hinge before applying force. If a spring jumps out, photograph its position before removing it.
A replacement door is often easier to install than repairing the original plastic. Search by the exact model number, not just the brand.
Wrist strap lug
The strap lug may be held by one or two screws. Keep its washers and spacers in order. These small pieces control how the lug sits against the body.
LCD screen
The screen usually connects with a ribbon cable. Disconnect the cable before lifting the display. Do not bend the screen sharply or touch the exposed contact area.
Control buttons
Buttons may sit under a rubber membrane or on a small circuit board. Keep dust and oils away from the contacts. If a button is sticky, clean only the accessible area with a suitable electronics cleaner and let it dry fully.
Memory card or USB port
These parts are often soldered to the main board. A loose port may need board-level soldering. Do not pry it away, because the copper pads can lift from the circuit board.

Cleaning a Digital Camera While It Is Open
Taking apart a digital camera is sometimes done for cleaning, but opening the body can create more dust than it removes. Clean only areas you can reach safely.
Use these methods:
• Blow loose dust away with a hand blower.
• Wipe the outer shell with a slightly damp microfiber cloth.
• Use a soft brush for the battery compartment.
• Keep liquids away from switches, boards, sensors, and lens openings.
• Hold the camera so dust falls out rather than deeper inside.
Never use household glass cleaner, alcohol wipes, or water on the image sensor unless the product is made for camera sensors. Sensor cleaning fluids must be used with the correct swabs and technique.
If you see dust spots in photos, first test the camera at a narrow aperture against a plain bright surface. A visible spot may be on the sensor filter, lens, or software image. Cleaning the wrong part will not solve the problem.

How to Organize Screws and Parts
A common mistake when taking apart a digital camera is mixing screws from different sections. This can lead to missing parts or internal damage during reassembly.
Try one of these systems:
• Draw the camera shape on paper and place each screw on its matching location.
• Use an ice cube tray with a label for each step.
• Place screws on painter’s tape in the order you remove them.
• Take a photo with each group before moving it.
Keep cables flat and avoid folding them sharply. Ribbon cables often break at the fold line, especially in older cameras.
If a part does not come out easily, stop and look for another screw or clip. Force is usually a sign that something remains attached.

Reassembling the Camera
Reassembly should follow the reverse order of disassembly, but there are a few details that deserve extra care.
Start by checking that no screws, tools, or loose parts remain inside the body. A stray screw can short a board or jam the lens.
Reconnect each ribbon cable fully. The exposed contact area should sit evenly inside its connector. Close the locking tab without excessive pressure.
Before closing the outer shell completely, check:
• The screen cable is connected.
• Buttons sit correctly.
• The battery contacts are not bent.
• No cable is trapped near a screw hole.
• The lens moves freely.
• The port covers align with their openings.
Install only a few shell screws at first. Insert the battery and test basic functions before tightening every screw. If the camera works, remove the battery again and finish tightening the body gently.
Do not overtighten. Small plastic bosses can crack, and tiny screws need much less force than large household screws.
Common Mistakes to Avoid
The most damaging mistakes are often simple ones. Patience matters more than strength when taking apart a digital camera.
Avoid these errors:
• Working with the battery installed
• Pulling ribbon cables without opening their locks
• Mixing screw lengths
• Using the wrong screwdriver
• Touching the sensor with bare fingers
• Spraying cleaner inside the camera
• Opening the flash circuit without training
• Disassembling the lens without alignment marks
• Testing the camera while loose parts can move
• Closing the shell over a trapped cable
A useful repair habit is to pause after every step and ask, “What is still attached?” This small question prevents many torn cables and broken clips.
When to Use a Professional Repair Shop
Home disassembly makes sense for simple inspections, cleaning around the body, and replacing accessible external parts. Professional help is better when the fault involves precision alignment or high voltage.
Contact a qualified repair shop if:
• The flash does not work
• The camera has liquid damage
• The lens is stuck inside the barrel
• The image sensor needs replacement
• The main board has corrosion
• The battery is swollen
• The camera contains valuable photos
• You cannot find a model-specific repair manual
Ask the technician for a written estimate. Compare the repair cost with the price of a working used camera. For older point-and-shoot models, replacement may be more practical. For premium mirrorless or DSLR bodies, repair can be worthwhile.
Benefits and Limits of Camera Disassembly
Learning how to take apart a digital camera can teach you how electronics, optics, and mechanical parts work together. It may also help you recover a usable screen, button, battery door, or housing from a damaged camera.
The benefits include:
• Better understanding of camera construction
• Easier inspection of loose connections
• Possible savings on simple repairs
• Safe recycling of old electronics
• Useful skills for future device repairs
There are also clear limits. Modern cameras use compact parts that are difficult to replace without specialized tools. Some parts are calibrated at the factory, and a camera may stop working if one connector, shield, or ground point is misplaced.
Treat the camera like a small machine with a memory. Every part has a place, and every cable has a job.
Frequently Asked Questions About How to Take Apart a Digital Camera
Is it safe to take apart a digital camera at home?
It can be safe when the battery is removed and you avoid the flash circuit, power board, and lens internals. If you see a large capacitor or exposed high-voltage wiring, stop and use a qualified repair technician.
What screwdriver do I need to take apart a digital camera?
Most cameras use small Phillips screwdrivers, often PH00 or PH000, but some models use Torx or other specialty screws. Check the model-specific repair manual before buying tools.
Can I take apart a digital camera to clean the sensor?
You can clean an accessible sensor filter with camera-specific tools, but opening the body is not always required. Use a blower first, and never touch the sensor with a household cloth or cotton swab.
Why will my camera not turn on after reassembly?
A loose battery contact, disconnected ribbon cable, locked connector, or trapped cable may be responsible. Remove the battery, reopen the body carefully, and compare every connection with your progress photos.
Can I remove the flash capacitor myself?
Removing or discharging a flash capacitor is not recommended without electronics training and proper equipment. It may retain a dangerous charge after the battery is removed and can cause injury or serious board damage.
Should I open the lens assembly?
Most users should not open the lens assembly because its gears and optical groups require precise alignment. A camera repair shop is the safer choice for stuck zoom mechanisms or internal lens damage.
How do I keep track of tiny camera screws?
Use labeled containers, painter’s tape, or a drawn screw map. Keep screws grouped by location because screws that look alike may have different lengths.
Conclusion
Taking apart a digital camera is possible, but safe progress depends on preparation, light pressure, careful labeling, and respect for stored electrical energy. Remove the battery, photograph each step, protect ribbon cables, and stop before the flash circuit or sealed lens assembly.
Start with a low-value camera and a simple goal, such as inspecting the screen cable or replacing a battery door. Use the exact model manual, and choose professional repair when the risk is high. If this guide helped, explore your camera’s service documentation, share your repair experience, or leave a comment with the model you are working on.

Everett Ashford is a tech reviewer at mytechgrid.com specializing in SSDs, cameras, TVs, earbuds, headphones, and other consumer electronics. He provides honest, data-driven reviews based on hands-on testing and real-world performance analysis. Everett simplifies complex tech details to help readers make smart, confident buying decisions.