Most headphone ear pads can be fixed by cleaning, regluing, restitching, or replacing the worn cushion.
Learning how to fix headphone ear pads can save money, improve comfort, and restore sound quality. I have worked with many over-ear and on-ear headphones, and the key lesson is simple: inspect the pad and its mounting system before reaching for glue. This guide explains safe repair methods, common mistakes, and when replacement is the better choice.
Why Headphone Ear Pads Wear Out
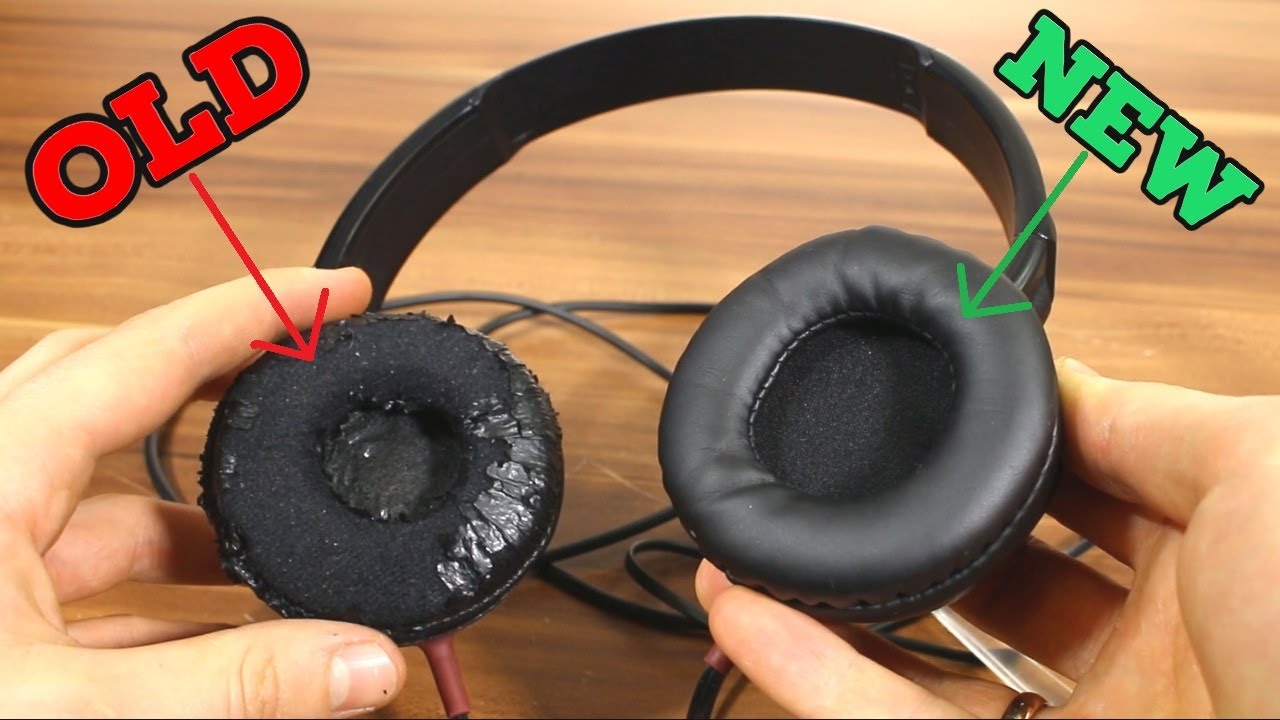
Headphone ear pads face daily stress. Skin oil, sweat, heat, friction, and repeated stretching slowly break down the outer cover and inner foam. Synthetic leather, often called protein leather or PU leather, may crack and peel even when the headphones still work perfectly.
Fabric pads usually last longer, but they can flatten, stain, or lose their shape. Real leather may resist peeling, yet it still needs cleaning and conditioning. Foam can also become hard or uneven over time.
Common signs of damaged headphone ear pads include:
• Cracked or peeling outer material
• Loose stitching or torn seams
• Flattened foam
• A pad that keeps slipping off
• Uneven pressure around the ears
• More outside noise entering the ear cups
• A noticeable change in bass or sound balance
The pad is more than a comfort layer. It creates a seal around your ear. If that seal breaks, bass may sound weaker and outside noise may become more noticeable. This is why knowing how to fix headphone ear pads can improve both comfort and audio performance.

Check the Damage Before You Repair It
Start by removing the ear pads if your headphone design allows it. Many pads twist off, while others use clips, rings, or hidden tabs. Check the user manual before pulling hard, because a thin mounting ring can break.
Take a close look at four parts:
• The outer cover: Check for peeling, holes, stains, and deep cracks.
• The foam: Press it gently and see whether it returns to its shape.
• The seam: Look for loose thread or separated edges.
• The mounting system: Inspect clips, plastic rings, glue, and fabric tabs.
If the cover is dirty but still flexible, cleaning may solve the problem. If only a small seam has opened, stitching may be enough. If the foam is flat or crumbling, replacement is usually more effective than repair.
A useful test is the seal test. Put the headphones on and play a familiar song with steady bass. Press one ear pad gently against your head. If the bass becomes stronger, the pad may not be sealing well.
Avoid using water until you know the pad material. Too much moisture can soak the foam, loosen glue, or damage nearby electronic parts.

How to Fix Headphone Ear Pads With Cleaning
Cleaning is the easiest form of headphone ear pad repair. It works well when the pads are dirty, oily, or slightly stiff but not torn.
Cleaning synthetic leather and plastic surfaces
Mix a small amount of mild dish soap with warm water. Dip a soft microfiber cloth into the mixture, then wring it out until it is almost dry. Wipe the surface gently.
Do not pour water onto the ear pad. Do not use bleach, alcohol, acetone, or strong household cleaners. These products can remove the surface coating and speed up peeling.
Follow these steps:
-
Remove the ear pads when possible.
-
Wipe away dust with a dry cloth.
-
Clean the surface with a lightly damp cloth.
-
Use a cotton swab around seams and grooves.
-
Wipe away soap with a separate damp cloth.
-
Let the pads air-dry fully before reinstalling them.
Keep the headphones away from direct heat while they dry. A hair dryer can shrink the cover, harden the foam, or weaken the adhesive.
Cleaning fabric and velour pads
Fabric pads can often be washed more safely than synthetic leather pads. Remove them first, if possible, and follow the headphone maker’s care instructions.
For light dirt, use a soft brush or vacuum with low suction. For deeper stains, use a small amount of mild soap and water. Press the fabric with a towel instead of twisting it.
Allow fabric pads to dry for several hours. Never reinstall damp pads, because moisture can create odor and may affect the ear cup.
How to Fix Headphone Ear Pads With Glue
Glue can repair a loose cover, separated seam, or detached mounting edge. It is not a good solution for foam that has lost its shape.
Use a flexible adhesive made for fabric, vinyl, leather, or foam. Flexible contact cement or fabric repair adhesive is often safer than super glue. Cyanoacrylate, commonly called super glue, dries hard and can make the pad stiff and uncomfortable.
Before gluing:
• Clean and dry both surfaces.
• Test the adhesive on a hidden area.
• Protect the headphone driver with paper or a clean cloth.
• Apply a very thin layer.
• Press the surfaces together without crushing the foam.
• Hold them with clips or soft elastic bands.
• Follow the curing time on the adhesive label.
Do not let glue touch the speaker driver, mesh, or sound port. Adhesive fumes and liquid can cause permanent damage.
For a small lifted edge, apply glue with a toothpick. Work in short sections rather than covering the whole pad at once. This gives you better control and reduces the chance of creating a hard ridge.
One repair mistake I see often is using too much glue. The extra adhesive soaks through the cover and leaves a stiff spot near the ear. A thin, even layer is stronger and feels better.

How to Fix Headphone Ear Pads With Needle and Thread
Stitching works well when a seam has opened but the material is still strong. It is especially useful for cloth, mesh, and genuine leather.
Choose a curved upholstery needle or a small strong needle. Use polyester thread because it resists moisture and daily wear better than ordinary cotton thread.
Use this method:
-
Remove the pad from the headphone.
-
Trim loose threads carefully.
-
Align the torn edges.
-
Sew small, even stitches through the existing seam area.
-
Keep the thread tight but not tight enough to wrinkle the pad.
-
Tie off the thread inside or beneath the pad.
-
Add a small amount of flexible adhesive to the knot if needed.
A ladder stitch can close a split seam while keeping the repair neat. For a hole in the middle of the cover, a patch may work better than pulling the edges together.
Avoid stitching through the foam unless necessary. The needle can tear the foam and create a weak spot. If the tear is large, replacing the cover or the full pad will give a cleaner result.

How to Replace Headphone Ear Pads
Replacement is usually the best answer when the foam is flat, the cover is badly peeled, or the pad has lost its shape. New pads can also improve comfort and restore the original seal.
Before buying replacement headphone ear pads, check:
• Headphone brand and model
• Pad diameter and thickness
• Mounting method
• Mounting ring or clip shape
• Inner opening size
• Material, such as leather, fabric, or velour
• Whether the pad changes the sound profile
Universal pads may fit several models, but “universal” does not always mean compatible. Measure the old pad and compare its mounting system with the replacement.
Removing twist-on ear pads
Many headphones use a bayonet-style mount. Hold the ear cup firmly and rotate the pad counterclockwise. Do not twist the ear cup housing if the headband feels flexible.
Removing clip-on ear pads
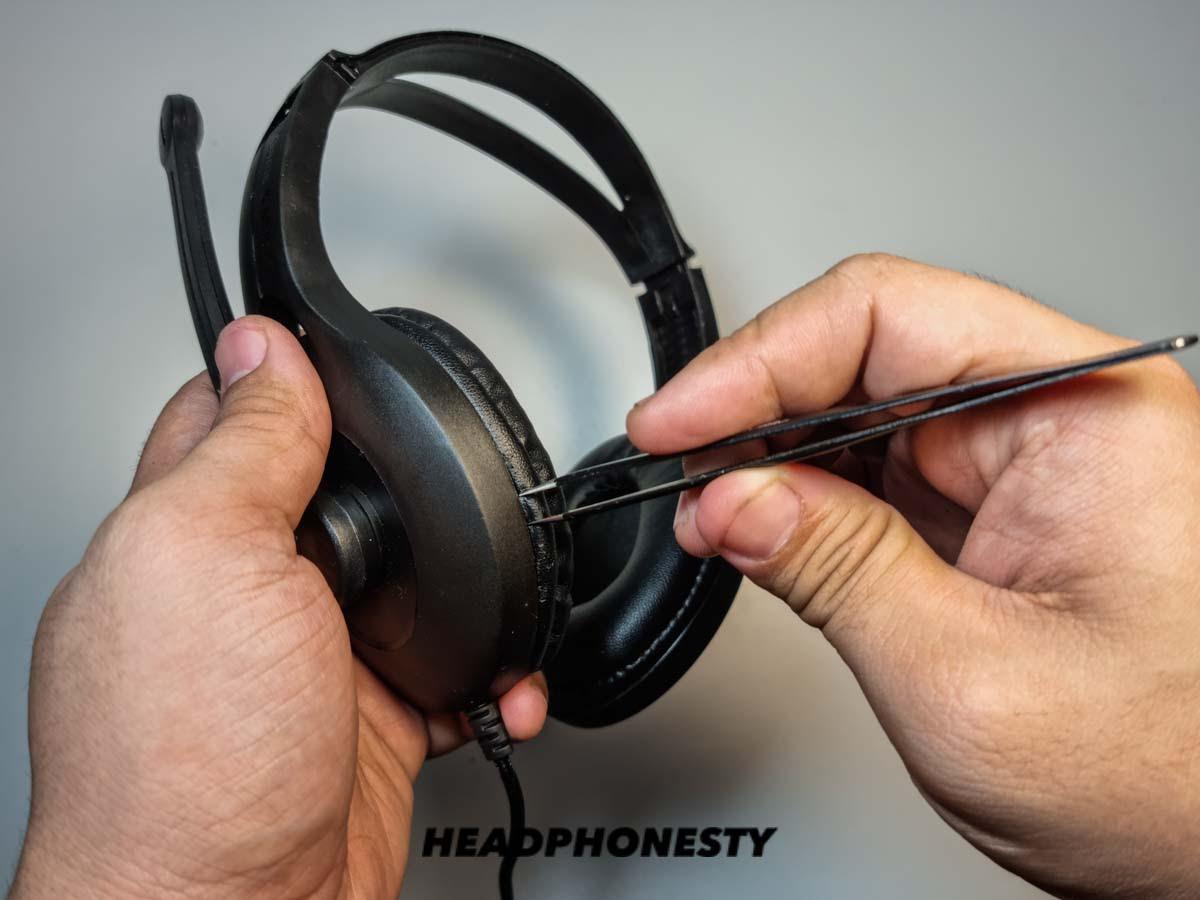
Look for a gap between the pad and ear cup. Use a plastic pry tool or an old plastic card. Avoid metal tools, which can scratch the housing or cut the pad.
Installing new ear pads
Line up the mounting ring, clips, or tabs. Work around the edge one section at a time. You should hear or feel each clip settle into place.
After installation, gently pull around the pad. If it comes loose, one section is not seated correctly. Play music and compare both sides. Check for even comfort, balanced sound, and a proper seal.
In my experience, replacing both pads at the same time is better than replacing only one. Pads compress with age, so mixing an old pad with a new one can create uneven pressure and sound.
How to Fix Headphone Ear Pads That Keep Falling Off
A pad that falls off usually has a damaged mounting ring, stretched fabric lip, broken clip, or weak adhesive. First, remove the pad and inspect the attachment points.
If the mounting ring is intact, reseat the pad carefully. Make sure the fabric lip is fully tucked into the groove. If the ring is cracked, adhesive alone may not hold it for long.
Possible repairs include:
• Replacing the mounting ring
• Sewing a stretched fabric lip
• Using a small amount of flexible adhesive
• Replacing the complete ear pad
Do not use tape over the mount. Tape may hold briefly, but it can leave residue and prevent the pad from sitting evenly.
If the clip on the headphone itself is broken, a replacement pad may not solve the issue. In that case, check whether the manufacturer sells a replacement clip or ear cup assembly.
Materials and Tools You May Need
Most headphone ear pad repairs require only simple tools. Gather everything before you begin.
• Microfiber cloth
• Mild dish soap
• Cotton swabs
• Plastic pry tool
• Small scissors
• Curved needle
• Polyester thread
• Flexible fabric or leather adhesive
• Soft clips or elastic bands
• Replacement ear pads
• Ruler or measuring tape
Use clean tools. Dirt trapped under a repaired seam can cause bumps and weaken the bond. Work on a flat table with good light.
A bright desk lamp helps you see tiny clips and loose threads. Keep screws and mounting rings in a small container so they do not disappear under furniture.

Mistakes to Avoid When Repairing Ear Pads
The wrong repair method can damage the pad or the headphone. Avoid these common errors:
• Pulling hard before checking for clips
• Using super glue on flexible areas
• Soaking the foam in water
• Applying heat with a hair dryer
• Blocking the driver with glue
• Installing only one new pad
• Buying pads without checking measurements
• Wearing the headphones before glue has cured
• Using sharp metal tools near the driver
Another common mistake is repairing a pad that should be replaced. If the foam is crumbling, no surface glue can restore its structure. If the pad smells strongly after cleaning, the inner foam may have absorbed sweat and moisture.
Repair also has limits. A homemade patch may look less attractive than a new pad, and different pad materials can change sound. Thicker pads may increase comfort but move the driver farther from your ears. That change can affect bass, treble, and noise isolation.

How to Prevent Future Ear Pad Damage
Good care can extend the life of headphone ear pads. Wipe them after long listening sessions, especially after exercise or use in hot weather.
Store headphones in a cool, dry place. Avoid leaving them in a hot car, near a heater, or in direct sunlight. Heat can speed up cracking in synthetic leather.
Follow these simple habits:
• Wipe the pads once a week.
• Let sweaty pads dry before storage.
• Use a case when carrying the headphones.
• Do not stretch the headband more than needed.
• Keep pets away from exposed pads.
• Replace worn pads before the foam collapses.
Some users place cloth covers over synthetic leather pads. These covers can reduce sweat and improve comfort, but they may slightly change the sound and seal. Wash removable covers often.
Many manufacturers recommend gentle cleaning and avoiding harsh chemicals. Those instructions matter because materials differ widely between models.
How Ear Pad Repairs Affect Sound Quality
Ear pads help control the distance between your ears and the headphone drivers. They also form a seal that affects bass response and outside noise.
A thick replacement pad may make the sound feel more open but less bass-heavy. A soft, tight pad may improve the seal and increase bass. Velour often feels cooler, while synthetic leather may block more outside noise.
There is no single “best” material for every listener. Choose based on your main need:
• Choose synthetic leather for stronger isolation and easier wiping.
• Choose velour for breathability and less heat.
• Choose memory foam for pressure relief and better shape retention.
• Choose genuine leather for durability and a premium feel.
After installing pads, listen to familiar music at a safe volume. Compare vocals, bass, and comfort. If the sound changes too much, another pad shape or material may be a better match.
When to Use a Professional Repair Service
Most pad repairs are safe to do at home because they do not require opening the electronic housing. Professional help makes more sense when the mounting system is broken or the headphone is expensive.
Seek repair support if:
• The ear cup housing is cracked.
• A cable runs through the pad mount.
• The driver or wiring is exposed.
• The headphone has active noise cancellation and internal parts are damaged.
• Replacement pads are unavailable.
• The repair requires soldering.
Stop immediately if you see torn wires, loose solder, or a damaged battery. Ear pad work should not expose you to those components.
For valuable studio headphones, a manufacturer-approved service center can protect the fit and sound. Keep the original pads until the repair is complete, since they may help identify the correct replacement.
Frequently Asked Questions About How to Fix Headphone Ear Pads
Can I repair peeling headphone ear pads?
You can glue small lifted areas, but widespread peeling is usually not worth repairing. Replacing the ear pads will look better, feel smoother, and provide a more reliable seal.
What glue is safe for headphone ear pads?
Use a flexible adhesive designed for fabric, vinyl, leather, or foam. Avoid super glue because it dries hard and may make the pad stiff or brittle.
How do I clean headphone ear pads without damaging them?
Use a nearly dry microfiber cloth with mild, diluted soap. Never soak the foam, use harsh chemicals, or apply heat while drying.
How do I know which replacement ear pads will fit?
Check the headphone model, pad dimensions, inner opening, thickness, and mounting style. A replacement must match the clips, ring, or fabric lip on your specific headphone.
Can new ear pads change headphone sound?
Yes. Pad thickness, material, and seal can change bass, treble, comfort, and noise isolation. Choose pads with a similar shape if you want to keep the original sound.
Should I replace one ear pad or both?
Replace both whenever possible. Matching pads provide more even pressure, comfort, and sound balance.
How long do headphone ear pads usually last?
Their life depends on material, use, sweat, heat, and storage. Many pads show wear after one to three years, while careful cleaning and dry storage can extend that period.
Conclusion
The best way to fix headphone ear pads depends on the damage. Clean pads when dirt is the issue, stitch small seam tears, use flexible glue for loose edges, and replace pads when the foam is flat or the cover is badly damaged.
Work slowly, protect the driver, and check the mounting system before applying force. With the right tools and a careful approach, you can restore comfort and sound without buying a new pair of headphones. Try the safest repair method for your model, then share your results or explore more headphone care guides.

Everett Ashford is a tech reviewer at mytechgrid.com specializing in SSDs, cameras, TVs, earbuds, headphones, and other consumer electronics. He provides honest, data-driven reviews based on hands-on testing and real-world performance analysis. Everett simplifies complex tech details to help readers make smart, confident buying decisions.