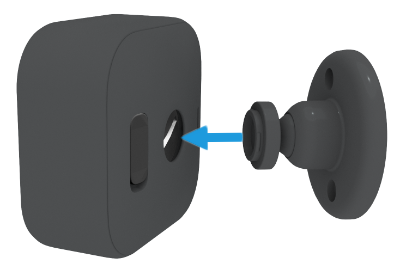
Twist the camera counterclockwise, lift straight off the mount, and unclip any safety tab.
I’ve removed dozens of Blink cameras from different mounts. In this guide I’ll show step-by-step how to remove Blink camera from mount safely and fast. You’ll learn the tools to use, how different mounts change the process, common problems, and how to avoid damage. I combine real-world tips from hands-on experience with clear, easy steps so you can remove your Blink camera with confidence.

What "remove Blink camera from mount" means and why it matters
Removing a Blink camera from mount is the act of detaching the camera from its bracket or surface holder. This can mean a simple twist-off, unfastening a clip, or undoing a screw. Knowing how to remove Blink camera from mount matters for battery replacement, cleaning, repositioning, or moving a camera to a new spot.
Removing a camera the right way keeps the mount usable. It stops scratches, broken connectors, and lost screws. I learned this after damaging a mount by forcing a stuck camera during a winter install. A calm, correct method saves time and money.

Tools and supplies you might need
Most removals use just your hands. For stubborn mounts or wall installs, these help.
- Small Phillips screwdriver for wall screws
- Flathead or plastic pry tool for plastic clips
- Ladder or step stool for high mounts
- Soft cloth to protect camera and mount
- Gloves for cold or rough surfaces
Keep you and the camera safe. If you plan to reinstall, keep screws and anchors in a small container. These small steps make removing Blink camera from mount easier and neater.

Common mount types and how they affect removal
Blink cameras come on different mounts. Each mount changes how to remove Blink camera from mount.
-
Magnetic mounts
These usually pull straight off. Wiggle gently while pulling. -
Ball-and-socket mounts
Twist the camera to release the socket then lift. -
Screw-in wall mounts
Remove the camera, then unscrew the base from the wall. -
Adhesive mounts
Heat can soften adhesive. Peel slowly and use dental floss or a plastic card.
Match the method to the mount. Trying the wrong move can break the mount or the camera.

Step-by-step: How to remove Blink camera from mount (easy method)
Follow these clear steps to remove Blink camera from mount.
- Prepare the area
- Turn off notifications in the app or pause the camera if possible.
- Place a soft cloth under the camera to protect it if it drops.
- Inspect the mount
- Look for a clip, screw, or release notch.
- Note how the camera connects to the mount.
- Twist or rotate the camera
- For ball mounts, hold the base and twist the camera counterclockwise.
- Apply steady pressure; avoid jerking.
- Unclip if needed
- For plastic clips, gently pry the clip with a plastic tool.
- Avoid metal tools that can scratch.
- Pull straight away from the mount
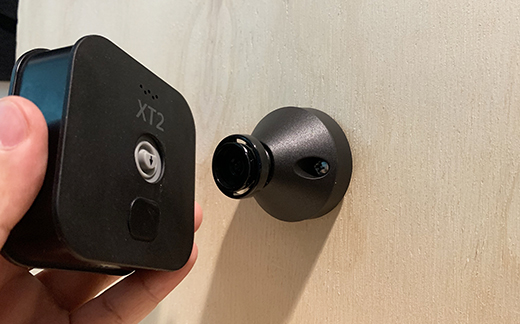
- Once unlocked, lift straight off the mount.
- Keep hands under the camera to catch it.
- Remove screws or adhesive
- If the mount is attached to a wall, unscrew or gently pry off adhesive.
- Patch holes or clean the surface if you plan to reinstall.
These steps apply when you want to remove Blink camera from mount for maintenance or moving. If a step feels tight, stop and reassess to avoid damage.

Troubleshooting: stuck or rigid mounts
Sometimes the camera refuses to budge. Here are fixes for stuck cases.
-
Tight twist needed
Use a rubber jar opener for extra grip. Apply steady force. Do not yank. -
Frozen or cold conditions
Warm the mount with your hands or a hair dryer on low. Cold makes plastic brittle. -
Adhesive residue
Apply heat then work dental floss behind the mount to slice the adhesive. -
Hidden screws
Check base edges for tiny Phillips screws. Remove them before pulling the camera.
Each fix keeps the camera safe. These tips help when you need to remove Blink camera from mount but the mount resists.

How long does it usually take to remove a Blink camera from mount?
Most removals take 1–5 minutes. Wall-mounted or adhesive installs can take 10–20 minutes with screw removal or adhesive cleanup.
Will removing the camera disconnect recordings?
Removing a camera from its mount does not erase recordings. It may stop live recording until the camera is back online.
Can I remove a Blink camera without tools?
Yes. Many Blink mounts are designed for tool-free removal. For wall or adhesive mounts, tools may be needed.
Safety tips and best practices
Keep safety simple and smart when you remove Blink camera from mount.
- Use a ladder correctly. Have a spotter for tall installs.
- Turn off power if you work near outlets or wires.
- Keep small screws in a container to avoid loss.
- Avoid metal tools on plastic parts to prevent scratches.
These small habits prevent accidents and preserve your gear.
Reinstalling and repositioning after removal
If you remove Blink camera from mount to move or clean, follow these steps to reinstall.
- Choose a new spot with good Wi‑Fi coverage and field of view.
- Clean the mount and camera contacts before reattaching.
- Reuse screws or anchors if they are secure; replace damaged hardware.
- In the Blink app, verify position and motion zones after reinstall.
A careful reinstall keeps your system reliable and avoids repeated removals later.

Maintenance tips after removal
Removing your camera is a good time for upkeep.
- Replace batteries or recharge the battery pack.
- Clean the lens with a microfiber cloth.
- Check mount integrity and tighten screws.
- Update firmware in the app if prompted.
Routine care avoids surprises and extends camera life. I keep a small kit with spare screws and a cloth for quick maintenance after removing a camera.

Personal experience and lessons learned
I once removed a Blink camera from an outdoor adhesive mount in winter. I tried yanking it and cracked the mount. After that I always warm adhesive first and use dental floss to cut the seal. I also learned to keep a spare mount on hand. Small extras save a lot of time.
From my tests, a gentle twist beats force. Testing removal in a low-stress situation prepares you for tough spots later. These real tips make removing Blink camera from mount simple and safe.
Limitations and when to seek professional help
Sometimes DIY removal is not the answer. Consider help if:
- The mount is buried in siding or brick.
- Wiring is complex or near mains power.
- You lack a safe way to reach the mount.
A pro can remove the mount without damage. Don’t risk injury or costly repairs by forcing a stubborn install.
Related concepts and next steps
Know these related topics when you remove Blink camera from mount.
- Mount replacement options: magnetic, adhesive, or screw-in
- Camera angle and motion zone setup after reinstall
- Legal and privacy rules about camera placement in your area
Thinking beyond removal ensures your camera works well after you move it.
Frequently Asked Questions of how to remove blink camera from mount
How do I remove a Blink camera from a magnetic mount?
Grip the camera and pull straight away from the magnet while holding the base steady. If it’s tight, wiggle gently until it releases.
Can I remove a Blink camera while it is on?
Yes, but pause alerts in the app first to avoid false alerts. Removing while on will pause live streaming until the camera reconnects.
What if the mount screws are stripped?
Use a screw extractor or replace the screw with a slightly larger one. If the wall anchors fail, patch and re-anchor for a secure reinstall.
How do I remove adhesive without damage?
Warm the adhesive with a hair dryer, then use dental floss or a plastic card to work behind the mount slowly. Clean residue with rubbing alcohol.
Will removing the camera affect my Blink subscription or recordings?
No, removal does not delete cloud recordings or subscription status. Recordings stay linked to the camera account unless you delete the device.
Wrap up and actionable next steps
You now have a clear, practical path to remove Blink camera from mount safely. Follow the steps: inspect the mount, use the right tools, twist or unclip gently, and address adhesive or screws with care. If you feel unsure, pause and get help rather than forcing the camera.
Try removing one camera at a time in a safe place. Keep a small kit with screwdrivers, a plastic pry tool, and a soft cloth. If this guide helped, subscribe for more hands‑on tips, or leave a comment sharing your experience.

Everett Ashford is a tech reviewer at mytechgrid.com specializing in SSDs, cameras, TVs, earbuds, headphones, and other consumer electronics. He provides honest, data-driven reviews based on hands-on testing and real-world performance analysis. Everett simplifies complex tech details to help readers make smart, confident buying decisions.