
To clean an SSD drive, remove unwanted files safely, free space, and use secure erase tools when needed.
Learning how to clean SSD drive storage is not the same as cleaning an old hard disk drive. SSDs use flash memory, so actions such as defragmenting, overwriting files, or repeatedly running disk cleaners can reduce drive life without offering real benefits. This guide explains safe ways to clean an SSD, improve available space, protect your data, and prepare the drive for a fresh installation or sale.
What Does It Mean to Clean an SSD Drive?
To clean an SSD drive can mean several different things. You may want to remove junk files, delete large personal files, uninstall apps, free disk space, erase private data, or reset the entire drive. Each goal needs a different method.
A normal cleanup removes unnecessary data while keeping your operating system and personal files. A full wipe removes everything and may use a secure erase function from the SSD maker.
It is helpful to separate these tasks:
• Storage cleanup removes files you no longer need.
• System cleanup removes temporary files, old updates, and unused applications.
• Privacy cleaning removes personal data before you give away or sell the SSD.
• Secure erase returns the SSD to a clean state and makes old data difficult to recover.
An SSD is more like a row of labeled storage boxes than a traditional filing cabinet. Deleting a file removes its label, but the drive manages the physical memory in the background through a process called garbage collection.

Before You Clean an SSD
Before you clean an SSD drive, protect the files that matter. A cleanup tool can remove data quickly, and some actions cannot be undone.
Create a backup on an external drive or a trusted cloud service. Check that the backup opens correctly before deleting the original files. For important work, use the 3-2-1 backup approach:
• Keep three copies of important data.
• Store the copies on at least two different types of media.
• Keep one copy in a separate location.
Also check whether the SSD contains your operating system. If Windows or macOS is running from that drive, do not erase the whole disk from inside the normal desktop. Use the correct recovery or boot environment instead.
Before starting, record these details:
• The SSD brand and model.
• The current free space.
• The operating system version.
• Any recovery key, license key, or encryption password.
• The location of your backups.
If the drive contains BitLocker or FileVault encryption, confirm that you can access the recovery key. Encryption can protect your files, but losing the key can also lock you out.

How to Clean SSD Drive in Windows
Windows includes built-in tools that can safely remove common junk files. These tools are usually enough for routine maintenance.
Use Windows Storage Settings
Windows 11 and Windows 10 provide a Storage page that shows how your disk space is used.
-
Open Settings.
-
Select System.
-
Choose Storage.
-
Review categories such as Installed apps, Temporary files, Documents, and Other.
-
Open Temporary files.
-
Select the items you want to remove.
-
Click Remove files.
Be careful with the Downloads folder. It may contain old installers, photos, tax documents, or other files that Windows cannot identify as disposable.
Storage Sense can also automate cleanup. It can remove temporary files and clear items from the Recycle Bin after a set period. Review its settings first so it does not remove files you still need.
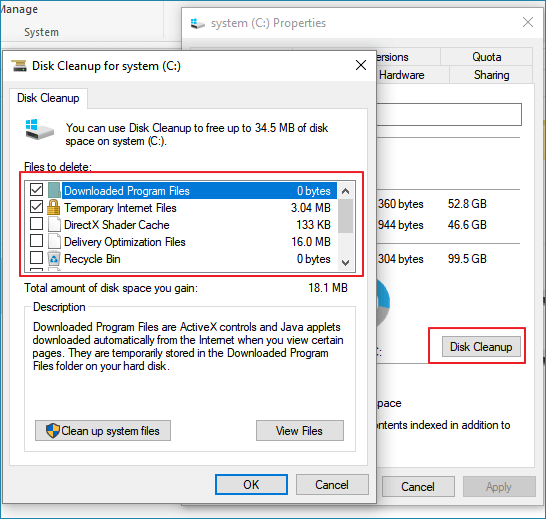
Run Disk Cleanup
Disk Cleanup remains useful on many Windows systems.
-
Press the Windows key.
-
Search for Disk Cleanup.
-
Choose the SSD you want to scan.
-
Select safe categories, such as temporary internet files and thumbnails.
-
Choose Clean up system files if you need to remove old update files.
-
Review the list again before confirming.
Old Windows installation files can use many gigabytes. However, deleting them may remove your ability to return to a previous Windows version. Keep them only if you may need that recovery option.
Remove Unused Programs
Large applications and games often use more space than temporary files. Open Settings, go to Apps, and sort installed programs by size.
Remove software you no longer use. Avoid deleting folders manually from Program Files. Uninstalling an application removes related files and registry entries more safely.
A lesson that often saves time is to check game libraries first. A single modern game can occupy more space than thousands of small documents.

How to Clean SSD Drive on macOS
macOS includes several tools for managing storage without installing third-party cleaning software.
-
Open the Apple menu.
-
Select System Settings.
-
Choose General.
-
Select Storage.
-
Review the categories shown on the screen.
You can remove large files, old downloads, unused applications, and empty Trash contents. macOS may also show recommendations for optimizing storage.
Use Finder to locate large files:
-
Open Finder.
-
Press Command-F.
-
Choose This Mac.
-
Add a file size filter.
-
Review large files before deleting them.
Do not remove system folders just because they look large. macOS protects many important files, but manual deletion can still cause problems.
To uninstall most applications, move them from the Applications folder to the Trash. Some apps include their own uninstall tool, which may remove support files as well.
You can also review iPhone and iPad backups stored on the Mac. Old backups may take up substantial space, but keep at least one current backup if you rely on it for recovery.

Remove Unnecessary Files Safely
Whether you use Windows or macOS, start with files that are easy to identify. This approach reduces risk and usually provides the best results.
Review these areas:
• Downloads
• Desktop
• Videos
• Duplicate photos
• Old installers
• Temporary export files
• Archived projects
• Recycle Bin or Trash
Sort files by size and date. Large video files, virtual machines, raw photo folders, and game libraries often explain why an SSD is full.
Do not delete a file only because its name looks unfamiliar. Search for its purpose first. If you are unsure, move it to a temporary folder on an external drive and wait several days before removing it permanently.
Cloud storage needs extra care. Some services show online-only files, but others keep local copies. Deleting a synced file may remove it from every connected device. Check the service settings before you clean an SSD drive that contains synced folders.
Uninstall Apps and Find Large Files
Uninstalling unused software is one of the safest ways to clean an SSD drive. It also reduces background processes and can improve system organization.
On Windows, use Settings > Apps > Installed apps. On macOS, review the Applications folder and use an official uninstaller when one is available.
For large files, use built-in search tools first. Windows Storage settings and macOS Storage settings can show which categories use the most space. You can also use a reputable disk analysis tool, but download it from the developer’s official website.
Look for files such as:
• Old operating system images
• Virtual machine disks
• Video projects
• Duplicate media libraries
• Previous software installers
• Local backups
• Browser cache folders
A cache is temporary data that helps an app load faster. It is usually safe to clear, but the app may run slightly slower the next time it rebuilds the cache. Never treat every large file as junk.

Should You Defragment an SSD?
You should not manually defragment an SSD with a traditional disk defragmenter. Defragmentation is designed mainly for hard disk drives, which use spinning platters and moving heads.
Windows usually identifies SSDs and performs an appropriate optimization instead of a traditional defrag. This may include sending a TRIM command or applying limited maintenance. Let the operating system handle this process.
TRIM tells the SSD which blocks no longer contain useful data. The SSD can then prepare those blocks for future writes. TRIM supports performance, but it does not securely erase personal data.
Avoid tools that promise to “deep defragment,” “refresh,” or repeatedly overwrite an SSD. Extra write activity can increase wear and may not improve speed.
How to Use TRIM Correctly
TRIM is an operating system command that helps an SSD manage deleted data. It is not a file cleaner, and it does not replace backups.
Modern versions of Windows, macOS, and Linux generally support SSD maintenance automatically. In most cases, you do not need to enable TRIM manually.
On Windows, you can check optimization settings:
-
Search for Defragment and Optimize Drives.
-
Open the tool.
-
Select the SSD.
-
Review the Media type column.
-
Choose Optimize only if Windows recommends or schedules it.
On Linux, TRIM may run through a scheduled service. Advanced users can check the system documentation for their distribution. Do not run commands as an administrator unless you understand their effect.
The best practice is simple: keep the operating system updated, allow scheduled maintenance, and avoid aggressive third-party optimization tools.

How to Clean SSD Drive for Better Performance
Cleaning an SSD does not usually make it faster in the same way that cleaning dust from a computer fan can improve cooling. Still, a nearly full SSD may have less room for background management and future writes.
Try to keep a reasonable amount of free space. The ideal amount varies by drive, workload, and manufacturer, but leaving about 10% to 20% free is a practical target for many users. This is a guideline, not a strict rule.
To improve performance:
• Remove unused applications.
• Move large media files to an external drive.
• Clear safe temporary files.
• Keep firmware and operating system updates current.
• Avoid filling the drive completely.
• Check the SSD’s health with a trusted utility.
Drive health tools may report remaining life, temperature, total bytes written, and warnings. These readings are estimates. A healthy percentage is not a guarantee, and a low percentage does not always mean the SSD will fail immediately.
If the drive is slowing down, crashing, or showing errors, back up your data before attempting extensive cleanup. A failing SSD may become inaccessible without warning.

How to Securely Erase an SSD
If you plan to sell, recycle, or give away an SSD, ordinary deletion is not enough. Emptying the Recycle Bin or Trash only removes normal file references. Specialized recovery tools may still find parts of deleted data.
The safest method is usually the SSD manufacturer’s Secure Erase or Sanitize feature. These tools are designed for the drive’s flash memory and controller.
General steps include:
-
Back up all important files.
-
Confirm the backup works.
-
Find the SSD maker’s official management software.
-
Read the Secure Erase or Sanitize instructions.
-
Create the required bootable USB drive if prompted.
-
Disconnect other storage devices when possible.
-
Select the correct SSD by checking its model and capacity.
-
Start the erase process.
-
Reinstall the operating system if needed.
Secure erase tools can make the SSD unusable for the current operating system during the process. Do not interrupt power or select the wrong drive.
If the SSD is encrypted, destroying the encryption key can also make the old data unreadable. This method is called cryptographic erasure. It can be effective, but it depends on proper encryption and key management.
Some secure erase features are not available through a running operating system. If the tool reports that the drive is “frozen,” follow the manufacturer’s instructions rather than trying random commands.
How to Clean SSD Drive Before Selling It
To clean an SSD drive before selling it, first save your files and remove the device from your accounts.
On a Windows computer, use the Reset this PC feature with the option to remove everything. If the system offers a drive-cleaning option, review its description carefully. For stronger protection, use the SSD manufacturer’s Secure Erase or Sanitize tool.
On a Mac, use Erase All Content and Settings when supported by your Mac model and macOS version. This feature can sign you out of services and erase the device through Apple’s supported process.
For a removable SSD:
• Copy your files to a safe location.
• Verify the backup.
• Securely erase the drive.
• Check that the drive shows no old folders.
• Remove the SSD from encryption and account management systems if required.
• Keep proof of the erase if the device is being transferred for business use.
Do not rely on formatting alone when private data matters. Quick formatting changes the file system structure but may not overwrite every old block.
Mistakes to Avoid When Cleaning an SSD
The wrong cleanup method can waste time, reduce drive life, or cause permanent data loss. These are the mistakes I would warn a friend about first.
• Do not defragment an SSD with a third-party disk defragmenter.
• Do not delete system folders by hand.
• Do not run several cleaning tools at once.
• Do not erase a drive before checking your backup.
• Do not assume deleted files are securely destroyed.
• Do not use an HDD wiping method without confirming SSD support.
• Do not ignore warning signs such as read errors or disappearing folders.
• Do not select a disk by appearance alone during a secure erase.
One common mistake is cleaning the wrong drive. When several drives have similar names, verify the model, capacity, and connection before deleting anything.
Another mistake is expecting a cleaner app to solve every storage problem. These apps may find duplicate files, but some also remove browser data, saved settings, or files that an application still needs. Built-in tools are often safer for routine maintenance.
How Often Should You Clean an SSD?
You do not need to clean an SSD on a fixed weekly schedule. Modern operating systems manage temporary data and SSD maintenance in the background.
A monthly or quarterly storage review is enough for many people. Check the drive sooner if free space falls below about 10% or if you frequently install large programs.
A sensible routine looks like this:
-
Review storage once a month.
-
Remove files you clearly no longer need.
-
Uninstall unused applications every few months.
-
Check backups regularly.
-
Allow the operating system to run its normal SSD optimization.
-
Check drive health if you notice errors or performance changes.
Avoid constant manual cleaning. SSDs are built for normal read and write activity, not repeated full-drive rewrites.
Useful Tools for SSD Maintenance
The best tool depends on your goal. Use simple tools for simple tasks.
For routine cleanup, use:
• Windows Storage and Disk Cleanup
• macOS Storage settings
• File Explorer or Finder
• Your operating system’s uninstall tools
For health checks, use:
• The SSD manufacturer’s management software
• A trusted S.M.A.R.T. monitoring tool
• Built-in operating system health reports
For secure erasure, use:
• The SSD manufacturer’s Secure Erase tool
• A supported Sanitize command
• The operating system’s official reset and erase process
Download software only from reputable sources. Avoid programs that make extreme claims, such as doubling SSD speed or repairing physical flash wear with one click.
Firmware updates can improve compatibility and fix bugs, but they also carry some risk. Back up your files before updating firmware and follow the manufacturer’s instructions exactly.
SSD Cleaning for Windows, Mac, and Linux
The general principles are the same across operating systems, but the tools differ.
Windows users can rely on Storage Sense, Disk Cleanup, and Optimize Drives. These tools understand common Windows storage areas and can manage TRIM automatically.
Mac users can use Storage settings, Finder searches, and Erase All Content and Settings where supported. Apple’s file system and security features make it especially important to use the correct erase process.
Linux users can inspect disk usage with tools such as Disk Usage Analyzer or terminal commands. Because Linux systems vary, confirm commands before using them. A command that removes a directory may work instantly and without a Recycle Bin.
In every system, identify the goal first. Removing junk files, improving performance, and securely destroying data are separate tasks.
Frequently Asked Questions About How to Clean SSD Drive
Is it safe to clean an SSD drive?
Yes, it is safe when you use built-in cleanup tools and delete files you recognize. Always back up important data first and avoid removing system folders manually.
Can I use Disk Cleanup on an SSD?
Yes, Windows Disk Cleanup is safe for SSDs. It removes selected temporary and system files, but you should review options such as old Windows installations before confirming.
Should I format an SSD to clean it?
Formatting is suitable when you need a new file system, but it is not the strongest method for removing private data. For an SSD you plan to sell, use Secure Erase, Sanitize, or a supported encrypted reset process.
Does cleaning an SSD make it faster?
Freeing space can help a nearly full SSD maintain normal performance, but routine file deletion does not repair worn flash memory. If the drive has errors or major slowdowns, back up your data and check its health.
Can I defragment an SSD?
You should not manually defragment an SSD with a traditional defragmentation tool. Let Windows or another modern operating system run its own SSD optimization and TRIM maintenance.
How much free space should an SSD have?
Keeping roughly 10% to 20% free is a useful general target for many systems. The best amount depends on the SSD model, workload, and how heavily you write data.
How do I clean an SSD before selling it?
Back up your files, sign out of accounts, and use the manufacturer’s Secure Erase or Sanitize feature when available. A normal format or deleted files may not provide enough protection for sensitive data.
Conclusion
The safest way to clean an SSD drive is to match the method to your goal. Use Windows or macOS storage tools for temporary files, remove unused apps and large files carefully, let the operating system manage TRIM, and use Secure Erase or Sanitize when permanently removing personal data.
Backups come first, and aggressive cleaning tools are rarely needed. Review your storage today, protect important files, and choose a trusted tool based on whether you want more space, better organization, or complete data removal.

Everett Ashford is a tech reviewer at mytechgrid.com specializing in SSDs, cameras, TVs, earbuds, headphones, and other consumer electronics. He provides honest, data-driven reviews based on hands-on testing and real-world performance analysis. Everett simplifies complex tech details to help readers make smart, confident buying decisions.

2 Comments